


Handmade Stick Flowers For Valentine’s Day is beautiful and unique creations that bring life to any home or garden. They can be used to decorate weddings, parties, and special events, or simply as a bright accent in your home. Handmade stick flowers are easy to make using just sticks, markers, glue, and other basic materials. With a few creative ideas and supplies, you can create stunning handmade stick flower arrangements for your loved ones or yourself.
Creating handmade stick flowers is an enjoyable and rewarding craft. It’s a fun way to get creative and make something beautiful that can be used in home decor, as a gift, or simply as a reminder of how special each season is. Whether you’re looking for a way to spruce up your living room or give someone special a meaningful present, handmade stick flowers are the perfect solution. With the right supplies, creativity, and patience, anyone can make these delightful decorations.
1. DIY Handmade Stick Flowers For Valentine’s Day – EVA Foam Paper Flower – Making Easy Flower For Gift
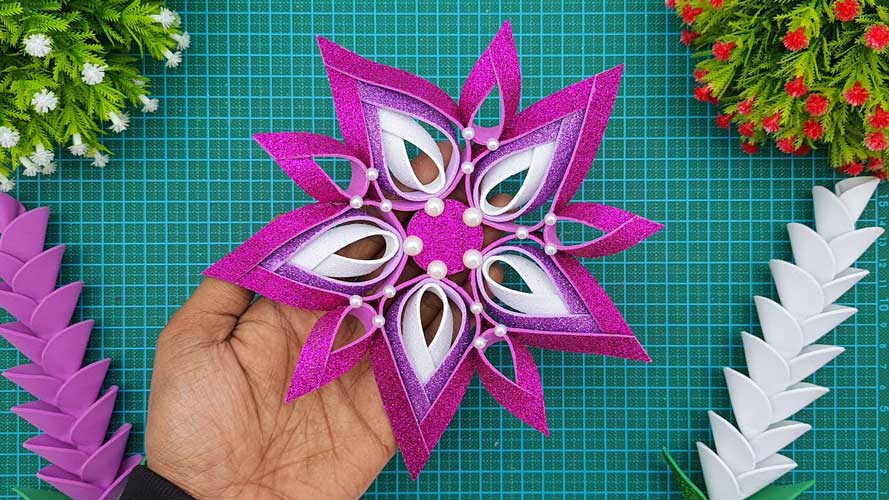
DIY Handmade Stick Flowers
Are you looking to create a special and unique gift for your loved one on Valentine’s Day? DIY Handmade Stick Flowers are the perfect way to show your love and appreciation this February. Not only are they easy to make, but they can make any room look brighter and more cheerful!
Using EVA foam paper, you can quickly craft colorful flowers with just a few simple steps. With its flexible material, it’s easy to shape into beautiful petals that look realistic from every angle. Whether you prefer traditional red roses or something more creative such as sunflowers or daisies, these handmade stick flowers will be sure to bring a smile to everyone’s face! Best of all, it won’t break the bank since each flower is made from inexpensive materials that can be found at any local craft store.
Supplies: Foam Paper, Sticks, Glue
DIY crafts can be a great way to show someone you care this Valentine’s Day. With the right supplies, anyone can make their own handmade stick flowers. All that is needed is some foam paper, sticks, and glue to create beautiful flowers for your loved one.
EVA foam paper is perfect for making these stick flowers as it provides a durable yet soft base for them. The foam paper comes in many colors and patterns so you have plenty of options to choose from when creating these unique blooms! You will also need some strong sticks or pipe cleaners in order to form the stems for your flowers. Finally, some good-quality glue will help ensure that all of your pieces stay together firmly.
With these supplies at hand, you’ll be able to craft unique handmade stick flowers just in time for Valentine’s Day!
Step 1: Preparing the Foam Paper
DIY Handmade Stick Flowers For Valentine’s Day is the perfect way to show your special someone how much you care. If you’re looking for a unique and easy-to-make gift, then EVA foam paper flowers are the answer.
To begin, gather all of your supplies including foam sheets in different colors, scissors, and a glue gun or hot glue. Cut out a variety of petal shapes from the foam paper using scissors that match up with your desired flower design. Make sure each petal shape is symmetrical and all pieces are roughly equal in size and thickness. Once all of the petals are cut out, use a glue gun or hot glue to attach them together into one large flower shape.
Step 2: Cutting and Shaping Petals
Valentine’s Day is a special time of year and what better way to show your love than with beautiful handmade stick flowers? Making flowers out of EVA foam paper is an easy yet creative way to create unique decorations for a gift or to add some sparkle and color to your home. Step 2 in making these delightful floral decorations is cutting and shaping the petals.
The petals can be cut from any shape you desire, but for this project, we will be using heart-shaped petals. Begin by tracing the desired pattern onto the back side of the sheet of EVA foam paper. Using scissors or a craft knife, carefully cut out each petal along its traced outline. Once all of the pieces are cut out, they can then be shaped and molded into perfect heart-shaped petals.
Step 3: Making the Flower Head
Are you feeling crafty and inspired to make your own handmade stick flowers for Valentine’s Day? This DIY project is not only easy but also cost-effective. For this step, we will be making the flower head of the foam paper flower by taking a few simple steps.
The supplies needed are scissors, a glue gun and sticks, EVA foam paper in any color desired, and some glitter (optional). To begin, cut out 5-6 petals from the EVA foam paper. Next, take one of the petals and start folding it lengthwise while keeping its shape intact as much as possible. After that, use hot glue to secure each petal in place around the stick until all five or six petals have been attached in place. Finally if desired, add some glitter to give the flower head more sparkle and dimension!
Step 4: Assembling Petals and Attaching Stem
If you’ve been following the steps in this article on how to make your own EVA foam paper flowers for Valentine’s Day, you’re almost at the home stretch. Step 4 involves assembling the petals and attaching them to the stem. Without further ado, let’s get started!
The first thing you need to do is arrange 9-10 petals into a circle on a flat surface. Make sure each petal is evenly spaced out in order for your flower to look symmetrical. Stack the petals together so that they overlap slightly, then use glue or a hot glue gun to secure them together and form a small cup shape. Once it’s secured, add another layer of petals around it using the same process until all of your petals are attached and form one large flower head.
Step 5: Finishing Touches
The perfect gift for Valentine’s Day is a handmade flower. EVA foam paper can be used to create beautiful, lifelike flowers that will last a lifetime. Step five of the DIY Handmade Stick Flowers For Valentine’s Day project is all about those finishing touches that turn this craft into something special and unique.
To add extra detail and beauty to the flower, start by coloring the edges of each petal with glitter glue or metallic markers. Adding leaves with contrasting colors will bring more life to your flowers and make them look even more realistic. If you’d like, use hot glue to attach tiny beads or buttons in the center of each flower as an embellishment – it’s a great way to add sparkle and shine! Once you are satisfied with your masterpiece, cut off any excess foam paper around the stem so that it looks neat and tidy.
2. How To Make Flowers With Glitter Foam Sheet 🔥🔥🔥 Foam Flowers Ideas 🌸 DIY Home Decor 🌸
Crafting with Foam
Crafting with Foam is an enjoyable and creative way to add a unique flair to your home decor. Glitter foam sheets are an excellent choice for making beautiful, colorful flowers that can be used as wall art or party decorations. This article provides step-by-step instructions for crafting glitter foam flowers along with some fun ideas on how to use them around the house.
With just a few simple materials and a bit of patience, you can create stunning floral pieces that will make any room pop! Whether you want to spruce up the walls in your living room or surprise someone special with a handmade gift, glitter foam sheet flowers are sure to make a lasting impression. Read on for tips on how to make these cheerful blooms and get inspired by our DIY home decor ideas.
Step 1: Gather Supplies
Making flowers with glitter foam sheets is a fun, creative way to bring a little sparkle into your home decor. If you’re looking for an interesting craft project that requires only a few basic supplies, this is it! Here’s step one: gather the materials you need to make your very own DIY foam flowers.
First, decide on the size and shape of your flower creations. Glitter foam sheets come in various sizes and colors so choose whichever suits your design best. You will also need scissors or cutting implements to cut the foam sheet into shapes and petals. Additionally, glue is necessary for sticking pieces together as well as adding decorations such as sequins or beads if desired. Finally, pick up some glittery cardstock paper for the stem and leaves of each flower – this will give them a more finished look when complete!
Step 2: Cut Foam Sheet
Are you looking for a fun and creative DIY craft project? Try making some beautiful foam flowers with glitter foam sheets! This is a great project to do with your kids or to make as home decor. Step 2 of this craft requires you to cut out shapes from the glitter foam sheet. To properly cut the sheet, use a pair of scissors and draw outlines of the desired flower shape before cutting it out. Make sure that your scissors are sharp enough for precise cuts.
For an extra splash of color, you can also add some paint or glitter onto the petals after they are cut out. Once all pieces have been cut, now it’s time to assemble them into a beautiful flower! Place each piece together until you have created your desired flower shape. With patience and creativity, this project will surely be an enjoyable one!
Step 3: Create Flower Form
Creating flower forms with glitter foam sheets is an easy way to add a unique and beautiful sparkle to any home decor project. To begin, you’ll need some basic supplies such as scissors, craft glue, and glitter foam sheets. With these tools in hand, it’s time for Step 3: Create Flower Forms!
Start by cutting the glitter foam sheet into various shapes that resemble petals or leaves—you can even freehand some of the designs. Once all your pieces are cut out and arranged as desired, use craft glue to secure them together, forming your flower form. For added effect, layer pieces of glitter foam over one another for a dimensional look. Finally, add embellishments like rhinestones or sequins to give your flower extra sparkle!
Step 4: Add Details & Glitter
Creating unique and beautiful DIY home decor items can be easy with a few simple materials. Glitter foam sheets are one of the most versatile materials that can be used to make stunning floral creations. Here’s step four in our guide on how to make flowers with glitter foam sheets for your own DIY home decor projects.
When it comes time to add details, you’ll have plenty of options available depending on the type of flower you’re creating. To add extra sparkle and shine, apply a thin layer of craft glue over the surface of your flower and generously sprinkle glitter onto it. You should also consider adding small felt or cloth leaves and petals to give your finished product an even more realistic look. Once everything is dry, you’ll have a colorful flower sure to bring life into any room in your house!
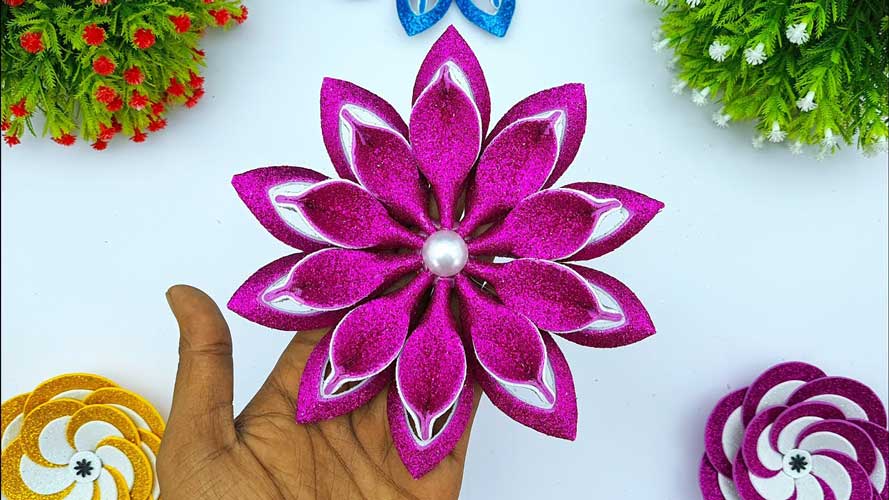
3. How To Make Glitter Paper Flowers || Valentine’s Day Crafts Flower || Glitter Foam Paper Crafts
Valentine’s Day Crafts
Valentine’s Day is the perfect time to show your loved ones how much you care. Whether it’s a romantic dinner or a heartfelt gift, there are countless ways to make this special day even more memorable. But if you want to go above and beyond with your Valentine’s Day celebrations, why not try making something special at home?
Here’s how to make glitter paper flowers using foam paper craft materials. Not only will these sparkly decorations add an extra-special touch to your Valentine’s Day decorations; but they also make great gifts that will last long after the holiday has ended!
Step 1: Gather Supplies
Creating glitter paper flowers is a fun and creative Valentine’s Day craft that anyone can do. Step one of making any craft project is to make sure you have all the supplies you need before getting started. To create your own glitter paper flower, you will need some foam paper, scissors, glue, and a host of embellishments such as glitter, ribbons, or markers for decoration.
Foam paper comes in a variety of colors and sizes so be sure to select the perfect combination for your project. You may also want to have some thin wire or pipe cleaners on hand if you plan on attaching stems to your finished flower creations. With these simple materials, it’s easy to create stunning floral décor pieces without breaking the bank!
Step 2: Cut Flower Shapes
Making glitter paper flowers is a simple and fun Valentine’s Day craft that can be enjoyed by the whole family. Step 2 of this craft involves cutting flower shapes out of glitter foam paper. To begin, gather all the materials you will need for this project including foam sheets, scissors, and glue. Choose the color combinations that you would like to use for your paper flower with one being slightly brighter than the other.
Cut out both colors in a variety of flower shapes such as daisies, roses or tulips using the scissors. Make sure that each flower has two layers – one from each color – so they will stand out when finished. Once you have cut all your flowers, arrange them on a table or countertop and start to assemble them together using glue or tape to make them look more realistic.
Step 3: Glue Glitter onto Foam Paper
Making glitter paper flowers is a fun and creative Valentine’s Day craft. Step 3 of this craft involves gluing the glitter to the foam paper. First, cut several pieces of foam paper into various shapes, sizes, and colors for your flowers. Next, choose different colors of glitter that you would like to use for each flower.
Then, lay out all your materials in a workable area where it is ok to make some messes with the glue and glitter. Thirdly, use an adhesive or glue stick to apply glue across the surface of each piece of foam paper flower you have created. Fourthly, sprinkle an even layer of glitter on top of each piece until fully covered in sparkles. Finally, press down lightly and shake off any excess after all pieces have been completely covered in glitter. This step will ensure that there are no areas left unglittered!
Step 4: Attach Flowers to Stems
Making glitter paper flowers is a fun and simple Valentine’s Day craft that you can do with your kids or by yourself. Step 4 of the project involves attaching flowers to stems for a 3D effect. Stems can be made from pipe cleaners or thin wire, allowing you to add height and dimension to your finished project. Here are some quick tips on how to attach the flowers securely and safely:
One way is to use hot glue or fabric glue as an adhesive. First, cut off about 6-7 inches of pipe cleaner for each flower stem, and curl it at one end to create a loop. Then, put some hot glue onto the back side of the flower petals and firmly press them onto the curled end of the stem until they stick in place.
Step 5: Assemble the Bouquet
Assembling the bouquet is the final step in creating a beautiful glitter paper flower Valentine’s Day craft. To start, lay out all of the components for your bouquet on a flat surface—the stems, leaves, and flowers. Gently insert the stems into a foam block or other base material that will hold them in place. If using tape to secure them make sure to cover any exposed pieces of foam with ribbon or tulle.
Once everything is secured in place, arrange the flowers and leaves so that they are evenly distributed throughout the bouquet. For added texture and color add additional ribbons or small embellishments such as beads or rhinestones to tie it all together. Finally, top off your stunning arrangement by wrapping it in tissue paper and tying it with a bow for an extra special touch.
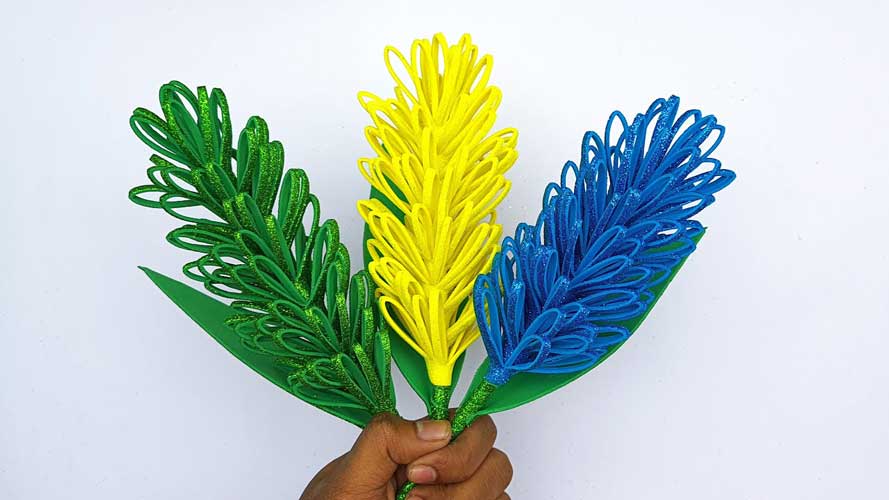
4. ❄️Foam Sheet Flowers 🌺 Easy Foam Flowers for DIY Home Decor | Glitter Foam Paper Crafts
Crafting Foam Flowers
Crafting Foam Flowers is an enjoyable and easy way to add a personal touch to any home decor. With just a few materials, you can create unique and beautiful foam sheet flowers that are perfect for adding color and texture to any space. From glittery poppies to soft roses, get creative with these fun foam paper crafts!
With just some basic supplies like foam sheets, glue, scissors, felt pens, and glitter you’re ready to begin crafting your very own flowers. Start by cutting out the petals in whatever size or shape you desire. Use different shades of paper for added depth and interest when arranging your petals together. Then use glue or double-sided tape to assemble your flower shape; feel free to get creative here by adding layers of petals or using contrasting colors for added effect.
Step 1: Gather Supplies
Foam Sheet Flowers are a fun and easy way to add a touch of style to any home decor. Whether it’s for a party or just for every day, these simple foam paper crafts can help you create beautiful works of art. Before you get started, it’s important to gather the necessary supplies.
First, you’ll need foam sheets in various colors and sizes as well as scissors and glue sticks. You may also want to have some glitter handy if you’re looking to add sparkle and shine to your creations. Additionally, felt sheets can be used as backing material for more intricate designs or simply as an accent color when making larger flowers. Once all of the materials have been gathered together, you’re ready to start crafting your own Foam Sheet Flowers!
Step 2: Create a Base for the Flower
Creating a base for your foam sheet flower is an important step in making this easy DIY home decor craft. To get started, you will need to cut out the petal and stem shapes from the foam sheet. You can either use a paper template or freehand draw the shapes on your foam sheet. Once you have cut out the petals and stem, trace them onto another piece of foam sheet.
Make sure to leave enough space between each shape so it will look like a flower when you are finished. Next, stack two pieces of traced shapes together with glue and press firmly to secure them together. This will create a sturdy base for your flower that won’t easily come apart when it’s completed. Finally, add some details such as leaves or additional petals to make your flower even more beautiful!
Step 3: Add Petals and Glitter
Foam sheet flowers can be a great way to add DIY home decor to any room in your house. Step 3 of this craft is all about adding petals and glitter to make your foam paper flower look even more beautiful.
Start by creating the petals for your flower – you can use either scissors or a hole punch to cut out simple shapes from the foam sheets. Once the petals are ready, use glue dots or a hot glue gun, whichever you prefer, and attach them to the center of your flower shape. By adding different sizes of petals in various colors, you will create an interesting effect on your creation!
To give it that extra sparkle, apply some glitter on top of each petal with a brush and let it dry before placing it wherever you want in your home.
Step 4: Secure Petals with Tacky Glue
Step 4: Secure Petals with Tacky Glue is an essential step in creating beautiful Foam Sheet Flowers. Creating these easy foam flowers for DIY home decor is not only a fun craft activity but also provides endless opportunities for creativity and self-expression. To make sure your glittery foam paper crafts stay put together, use a few drops of tacky glue to secure the petals together.
This will ensure that your flower stays in place and looks just as perfect as when you first made it! The tacky glue will act as an extra layer of protection against any accidental tearing or folding that may happen during handling. Plus, it won’t leave behind any unpleasant residue or mess up delicate textures. With the right kind of glue, you can guarantee that your DIY project will turn out looking amazing every single time!
Step 5: Accentuate with Leaves and Stems
Creating beautiful foam sheet flowers is easy, and it’s a great way to add some sparkle and color to your DIY home decor. Step 5 of this craft project involves accentuating your flowers with leaves and stems made from glitter foam paper. These small touches can make all the difference in bringing these gorgeous blooms to life!
With just a few simple materials like glitter foam sheets, scissors, glue dots or strong adhesive glue, you’ll be able to add perfect finishing touches to your paper flower arrangements. Match up different shades of green for the leaves and stems and adjust the length as desired for varying heights of your blooms. You can even use multiple layers of leaves for added dimension.
Alternative Ideas: Other Foam Sheet Crafts
Are you looking for alternative foam sheet crafts to make for your home? Foam sheet flowers are a popular craft that can create beautiful decorations, but if you’re looking for something different there are many other options. From wall art and bookmarks to jewelry and games, there is no shortage of creative projects that you can make with foam paper. Here we will explore some of the alternatives so you can pick the perfect project for yourself or give it as a gift.
Start by picking out colorful foam sheets in various sizes and patterns. Then get creative! Make a statement with eye-catching wall art, such as framed photo collages or unique abstract designs. For kids, try making fun finger puppets for imaginative play or educational counting games out of shapes cut from the sheets.
Final Thoughts
In conclusion, handmade stick flowers are a beautiful and creative way to bring the beauty of nature into any space. With just a few simple materials and steps, anyone can make these unique decorations for their home or gifts for others. They make an economical and special addition to any room, from the living room to a child’s bedroom. The possibilities of color combinations and shapes are endless, making handmade stick flowers an enjoyable craft for anyone looking for something fun and easy to do.
