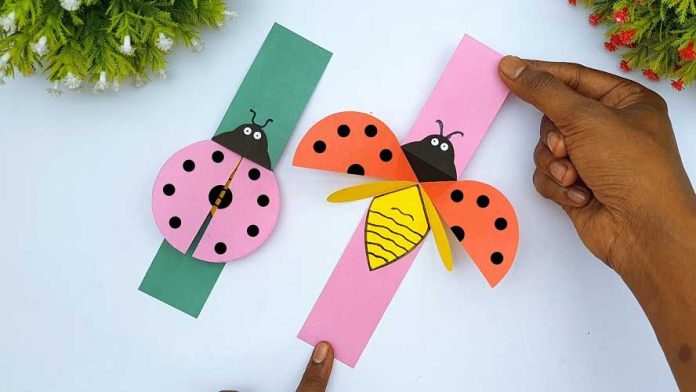
Make Paper Ladybug
Crafting a ladybug is a fun, easy activity that can be enjoyed by both adults and children alike. With just a few simple supplies, you’ll be able to create your own homemade version of this beloved garden insect. You don’t have to possess any special skills or knowledge to complete this project – all it takes is some patience and creativity!
Making paper ladybugs requires only basic crafting materials such as construction paper, scissors, glue, markers, and other miscellaneous items. This craft project is perfect for rainy days or when kids are looking for something fun to do – they’ll love the results! Best of all, with just a little guidance they can make these cute critters on their own! Allowing creative minds to express themselves through custom-made crafts like these brings out their inner artist and encourages them to think outside the box.
Supplies: What You Need
Making paper ladybugs is a fun and easy craft that can be done with minimal supplies. From construction paper and scissors to markers and glue, there are plenty of materials that can help you create your own unique bug! Let’s take a look at what supplies you need to get started.
First, you’ll want to gather your materials: construction paper in two colors (red and black preferred), scissors, a marker or pen, a glue stick, googly eyes (optional), a ruler, and a pencil. You may also find it helpful to have an image of the ladybug on hand as a reference while crafting. Once all the items are collected together, the fun part begins! Using the pencil and ruler as guides draw out shapes for your wings, body pieces, and antennae onto your chosen colored construction papers.
Step 1: Cut Paper
Making a paper ladybug is an easy and fun craft project that can be enjoyed by kids of any age. To make your own paper ladybug, you will need to follow these simple instructions. Step 1: Cut Paper.
First, cut two circles out of red construction or cardstock paper using scissors. It’s best to use a template or circle cutter for this step if you have one available. The circles should be similar in size but the bottom piece should be slightly larger than the top piece; this will help give your ladybug its bug-like shape later on in the process. Make sure to also cut out four small black wings for your ladybug; these can be freehanded with scissors or traced from a template as well. Now that all of your paper pieces are prepared, it’s time to move on to step 2!
Step 2: Assemble Pieces
Making a paper ladybug is an enjoyable craft activity that can be done with children or adults. Whether you are making them as a gift, decoration, art project, or just for fun, it is easy to assemble the components that make up this colorful creature. Step two of creating your paper ladybug is to assemble the pieces.
To start, gather all of your materials and lay them out on a flat surface in an organized manner. Gently punch out the pre-cut pieces from the cardstock and set aside any scraps for later use. You will need two large wings, four small legs, one headpiece, and one body piece with spots already printed on it. Begin by gluing each wing onto the back side of the body piece in order to form a basic ladybug shape.
Step 3: Glue Together
Making paper ladybugs is a fun and easy DIY project that everyone can enjoy. With just a few simple materials it’s possible to create your own bug-eyed critter in no time. Step 3 of the process involves gluing together the pieces of your new creation, so read on for tips on how to do it right!
The first part of this step is to get everything ready for assembly. Gather all your pieces, such as the wings, antennae, and body parts, and make sure you have some glue or double-sided tape handy. Once all the pieces are laid out in front of you, it’s time to begin connecting them with glue or tape. Start by attaching the two wings together at their center points before adding them to either side of the body piece.
Step 4: Decorate
Decorating your paper ladybug is the last step in creating a fun and unique craft. Making your own ladybug allows you to customize it as much as you’d like! There are many different decorations that can be added to make the bug stand out from traditional ones. You don’t need to be an artist or have any prior crafting experience either, so anyone can create their own beautiful handmade design.
Start by adding some paint or marker details onto the body of your ladybug. Consider using vibrant colors such as red and black, or experiment with other hues to find something unique. You can also add extra details such as eyes, antennae, and wings using materials like pipe cleaners, googly eyes, and colorful buttons.
Conclusion: A Perfect Ladybug
The paper ladybug is an easy, fun craft that can be done with children or adults. After following the simple steps outlined in this article, you will have created a perfect ladybug made from paper. With its bright colors and unique design, it is sure to catch the attention of everyone who sees it.
Creating this art project is a great way to get creative and spend quality time together with family or friends. You can use basic materials found around the house like colored paper, scissors, and glue to make your own custom-made masterpiece. Not only are the results of this project aesthetically pleasing but also entertaining to look at. In conclusion, making a paper ladybug can be a rewarding experience for anyone willing to try it out.


