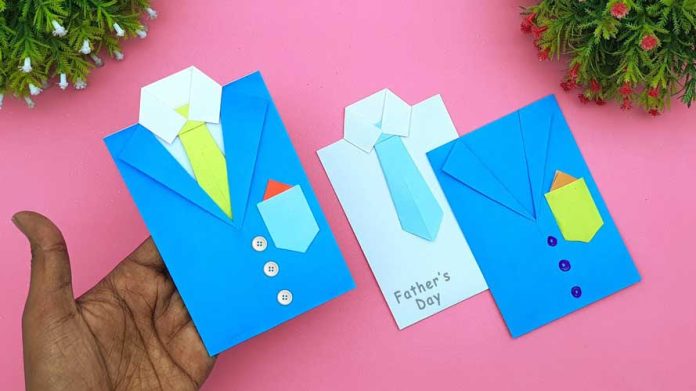
Father’s Day is the perfect occasion to express your love and appreciation for Dad with something handmade and heartfelt. What better way to do this than with DIY Father’s Day craft ideas that include an amazing Father’s Day greetings card? In this guide, we will walk you through the steps to create a beautiful gift card that Dad will cherish forever. Let’s get started!
Materials:
- Cardstock paper (in Dad’s favorite colors)
- Markers, colored pencils, or crayons
- Decorative paper or scrapbook paper
- Glue stick or double-sided tape
- Scissors
- Stickers, washi tape, and other embellishments
- Ruler and pencil
- Optional: stamps and ink pads
Steps:
Step 1: Prepare Your Card Base
- Choose Your Cardstock: Select a piece of cardstock in a color that you know Dad will love. Standard size is usually 8.5″ x 11″, which can be cut and folded into a standard greeting card size.
- Cut and Fold: Using your ruler, measure and cut the cardstock to your desired size. A common choice is to cut it in half to make two 8.5″ x 5.5″ pieces. Fold one piece in half to create a 4.25″ x 5.5″ card.
Step 2: Design the Front Cover
- Create a Border: Cut a piece of decorative paper slightly smaller than the front of your card (about 4″ x 5.25″). Glue this to the front to create a nice border.
- Add Your Greeting: Use markers or colored pencils to write a special message like “Happy Father’s Day” on a piece of white cardstock. Cut this out and glue it to the front center of your card.
- Decorate: Add stickers, washi tape, or other embellishments around your greeting to enhance the design. If you have stamps, use them to add fun patterns or images.
Step 3: Personalize the Inside
- Write a Message: On the inside of the card, use markers or pens to write a heartfelt message. Share a favorite memory, express your gratitude, and tell Dad how much he means to you.
- Add Personal Touches: Decorate the inside with small drawings, stickers, or even a small photo of you and Dad.
Step 4: Finishing Touches
- Check for Completeness: Make sure all glue and ink are dry, and double-check that your card looks exactly how you want it.
- Add a Special Touch: If you have extra embellishments like ribbon or a wax seal, use them to add an extra touch of elegance to your card.
Bonus: Gift Card Holder
- Create a Pocket: Cut a piece of cardstock or decorative paper to create a small pocket that can hold a gift card. The size should be slightly larger than a standard gift card.
- Attach the Pocket: Glue the pocket to the inside of the card, ensuring that it is secure but still has an opening at the top to slide in the gift card.
- Decorate the Pocket: Add a small label or tag on the pocket that says “For You” or another special message.
Conclusion
By following these steps, you can create a truly special greeting card that Dad will treasure. DIY Father’s Day craft ideas like this one are not only fun to make but also deeply meaningful. Crafting an amazing Father’s Day greetings card shows the effort and love you put into making his day memorable. Happy crafting and Happy Father’s Day!
By creating a unique and personalized gift card, you’re giving Dad a keepsake that he’ll remember for years to come. Enjoy the process, and don’t forget to add your own creative touches to make it truly special.


