


This holiday season, take your best Christmas Wreath Making Wreath Making to the next level with paper glitter foam paper. This unique material will add a touch of glamour to your door decor, without the hassle of dealing with real glitter. Plus, it’s easy to work with and comes in a variety of colors. So get creative and make a one-of-a-kind wreath that will dazzle your guests.
If you’re looking for a fun and festive activity to do with your kids this Christmas, why not try making a wreath out of paper glitter foam paper? It’s a simple project that doesn’t require any special materials or tools, and best of all, it’s super sparkly and colorful! Here’s how to make the best Christmas wreath using paper glitter foam paper.
Looking for a fun and unique way to make your own best Christmas Wreath Making wreath this year? Look no further than using paper glitter foam paper! This type of paper is easy to work with and can be cut into any shape or design you desire. Plus, the added sparkle of the glitter will add some extra holiday cheer to your home. Here are some tips on how to get started making the best Christmas Wreath Making using paper glitter foam paper.
3 Tips for best Christmas Wreath Making Using Paper Glitter Foam Paper
Are you looking for the best tips for making a beautiful best Christmas Wreath Making using paper, glitter, and foam paper? Here are three great ideas to get you started!
1. Christmas Wreath Making Using Paper Glitter Foam Paper | Wall Hanging Wreath Making For Christmas
Christmas wreath making using paper, glitter, foam paper, and wall hanging.
Making a wreath for Christmas is a fun and easy way to decorate your home for the holidays. You can use paper, glitter, foam paper, and wall hanging to make a beautiful wreath that will add some holiday cheer to your home.
To make a paper wreath, you will need:
- -A4 or A5 sized paper
- -Scissors
- -Glue or Stapler
- -Ruler or Measuring Tape
- -Pencil or Pen
- -Optional: Decorations such as ribbons, sequins, etc.
Making your own paper wreath is a fun and easy way to get into the holiday spirit! With just a few simple materials, you can create a beautiful and unique decoration for your home.
- -1 sheet of green construction paper
- -1 sheet of red construction paper
- -Glue
- -Scissors
- -Ribbon or string
- -1/4 cup of glitter
First, cut the green construction paper into strips. Then, twist or curl the strips into circles and glue them together to form a ring. Next, cut the red construction paper into strips and glue them around the outside of the green ring. Once the glue is dry, sprinkle the glitter on top of the wreath.
Materials needed: paper, scissors, glitter, foam paper, and wall hanging.
1. For this project, you will need paper, scissors, glitter, foam paper, and a wall hanging.
2. With just a few materials, you can create a beautiful and unique wreath for your home this is best Christmas Wreath Making.
3. Follow the instructions below to get started: first, cut out different shapes from the paper; then, cover them in glitter; next, glue them to the foam paper; finally, hang your wreath on the wall.
4. You can be as creative as you like with this project – have fun with it!
5. If you’re looking for something a little different this holiday season, try making a paper glitter foam paper wall hanging wreath.
Instructions:
1. Cut paper into strips.
2. Glue strips onto foam paper.
3. Add glitter to strips.
4. Hang on the wall.
5. Enjoy!
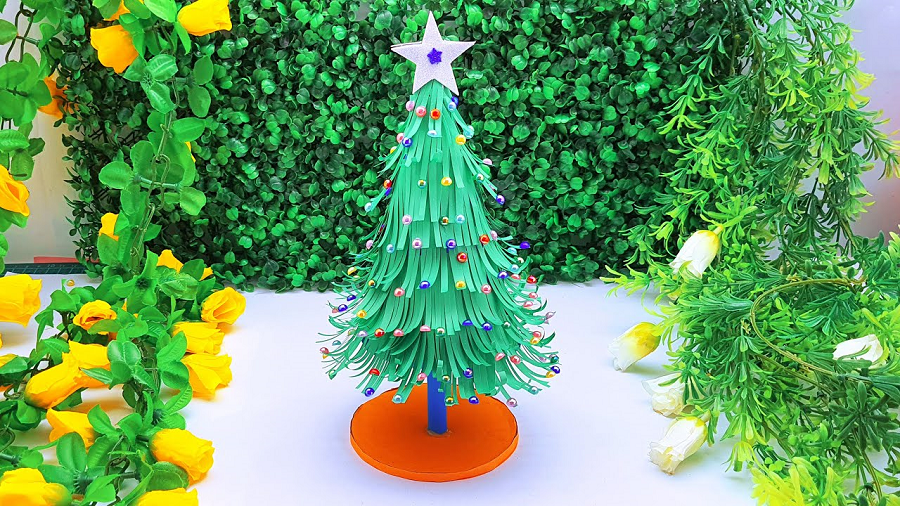
2. DIY Paper Christmas Tree Making at Home | How to Make a 3D Paper Xmas Tree DIY Tutorial | Christmas
Explain what the reader will learn in the article
In this article, you will learn how to make a 3D paper best Christmas Wreath Making tree at home. This easy-to-follow tutorial will show you step-by-step how to create a beautiful and festive decoration for your holiday home. With just a few supplies and some simple instructions, you can make your own DIY paper Christmas tree!
Why make your own paper Christmas tree?
Making your own paper best Christmas Wreath Making tree is a great way to save money and have a unique decoration for your home. You can make a paper Christmas tree in any color or style you want, and it’s easy to do. Here are some reasons why you should make your own paper Christmas tree this year.
1. It’s cheaper than buying a real tree.
2. You can personalize it however you want.
3. It’s eco-friendly.
4. It’s fun and easy to make!
What you’ll need:
- -1 sheet of green construction paper
- -1 sheet of red construction paper
- -1 sheet of brown construction paper
- -Scissors
- -Tape or glue
Making your own Christmas decorations is a great way to get into the holiday spirit! This DIY paper Christmas tree is a fun and easy project that the whole family can enjoy. All you need is some construction paper, scissors, and tape or glue. Follow the instructions below to get started.
3. Easy DIY: How To Make Christmas 3D Snowflakes Using Paper | Christmas Snowflakes Decorations Crafts
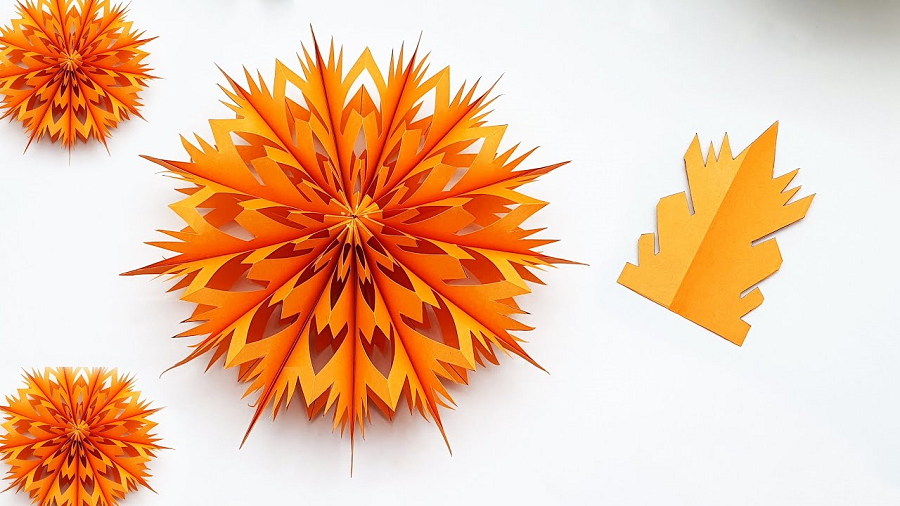
Christmas is a great time for decorating
Christmas is a great time for decorating. One of the best things about decorating for Christmas is that there are so many different ways to do it. You can go all out with lights and garland, or keep it simple with a few candles and some greenery.
If you want to get really creative, you can make your own decorations. One of the most popular DIY Christmas decorations is the 3D paper snowflake. They’re relatively easy to make, and they look absolutely stunning when hung up on the Christmas tree.
To make your own 3D paper snowflakes, you’ll need some white paper, a pair of scissors, and a bit of patience. Start by folding a sheet of paper in half, then in half again. Cut out small triangles along the folded edge, then unfold the paper to reveal your snowflake design.
What You Need: Paper, scissors, glue, glitter
Making your own 3D paper snowflakes is a fun winter activity that the whole family can enjoy. All you need is some paper, scissors, glue, and glitter to get started.
Cutting out paper snowflakes is easy to do and only requires a few household items. First, you will need to gather some white paper, scissors, glue, and glitter. Once you have all of your materials, follow these simple steps to create beautiful 3D snowflakes.
1. Start by folding a piece of paper in half. Then fold it in half again and keep folding until you have a small triangle.
2. Cut off the pointed end of the triangle and then cut out different shapes along the edges of the triangle.
Step One: Cut paper into strips
If you’re looking for a fun and easy Christmas craft, look no further than these 3D paper snowflakes! They’re simple to make and only require a few materials. So gather up your paper, and some scissors, and let’s get started!
The first step is to cut your paper into strips. You’ll need six strips for each snowflake, so cut accordingly. Once you have your strips, it’s time to start folding!
Step Two: Fold the paper into thirds
1. After cutting out your preferred snowflake shape from a piece of paper, fold the paper in thirds horizontally.
2. Once you have a horizontal fold, make another fold vertically so that you have three equal sections.
3. For this step, you will need to cut along the folded edge to create an opening. This will be used later to insert the snowflake into the 3D shape.
4. Next, take the two outermost sections and make a small cut at the center of each one.
5. Now, take the middle section and make a cut at the top and bottom of it. This will create three tabs that will be used to attach the sections together.
6. To assemble your 3D snowflake, start by attaching the two outermost sections together using the tabs that were created in Step 5.
Step Three: Cut snowflake shapes out of folded paper
If you want to make three-dimensional snowflakes, you’ll need to start with some folded paper. You can use any kind of paper you like, but thicker paper will be easier to work with. Once you’ve got your paper folded, it’s time to start cutting out snowflake shapes.
You can use scissors or a craft knife for this step. If you’re using a craft knife, be sure to use a cutting mat or something similar underneath your work surface to protect it. Once you’ve cut out all of your snowflakes, it’s time to move on to the next step.
Step Four: Unfold paper and glue snowflakes together
To make your own 3D snowflakes, you’ll need 6 pieces of paper. Once you have your paper, follow these steps:
1. Cut each sheet of paper into thirds using a ruler and pencil to make three equal rectangles.
2. Make a small cut about ½ inch from the top center of each rectangle.
3. Fold each rectangle in half horizontally and then in half again to create a smaller square. Then, fold the square in half diagonally to create a triangle.
4. Unfold the triangle and cut along both sides of the small cut you made at the top center, stopping about ¼ inch from the point of the triangle.
5. Now refold the triangle along the original folds and glue or tape the top flap down.
Step Five: Add glitter for extra sparkle
If you really want your Christmas snowflakes to stand out, add some glitter. It’s easy to do and only requires a few extra materials. First, gather your supplies. You’ll need glitter, glue, and something to sprinkle the glitter on like a plate or piece of paper.
Next, decide which areas of your snowflake you want to be sparkly. Once you have a plan, start gluing! Apply a thin layer of glue to the areas you want to be glittery and then sprinkle on the glitter. Make sure to tap off any excess before moving on to the next step. Allow the glue to dry completely before handling your snowflake so the glitter doesn’t fall off. And that’s it! Your snowflake is now ready to hang up and enjoy.
4. DIY Handmade Christmas Angel Ornaments | Christmas Angel Making With Foam Paper | Glitter Eva Foam
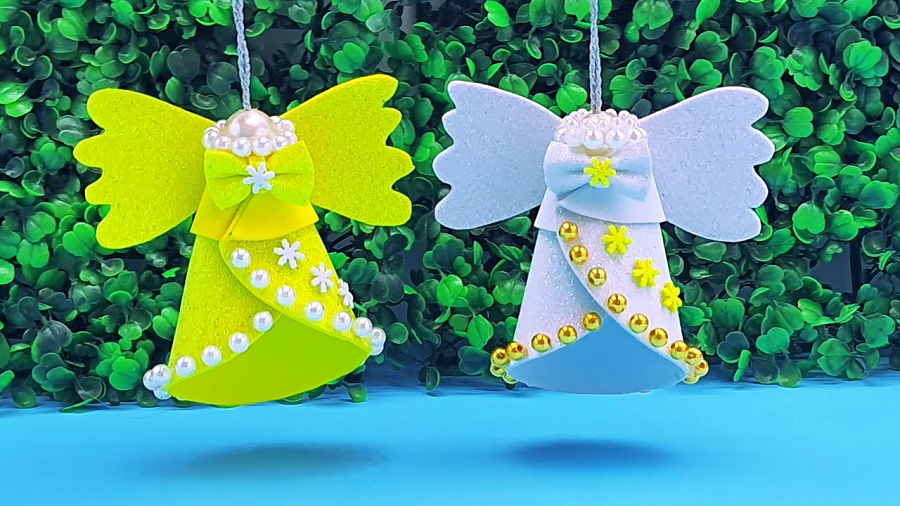
DIY Handmade Christmas Angel Ornaments
Making your own handmade Christmas angel ornaments is a great way to add a personal touch to your holiday decor. And it’s easier than you might think! All you need is some foam paper, glitter, and a little bit of creativity.
To get started, cut out two wing shapes from the foam paper. Then, glue them together at the center point. Once the glue is dry, cover the wings with glitter.
Next, cut a small circle for the head and glue it to the top of the wings. Then, add two small beads for the eyes and a piece of ribbon for the halo. Finally, cut a small triangle for the body and glue it in place.
Your homemade Christmas angel ornament is now complete!
Materials Needed: Foam paper, glitter, Eva foam
1. This Christmas, make your own angel ornaments with just a few simple materials.
2. All you need is foam paper, glitter, and Eva foam to create these beautiful decorations.
3. With a little bit of creativity, you can make unique angels that will add a special touch to your tree this holiday season.
Step One: Cut out the angel shape from the foam paper.
To make these homemade Christmas angel ornaments, you’ll need a few supplies. First, cut out an angel shape from some foam paper. You can use a template or freehand it. Once you have your angel shape, add some glittery details. We used sequins, but you could also use sparkly pipe cleaners or anything else you have on hand. Finally, cut a small hole in the top of the ornament so you can loop a ribbon through it later.
Step Two: Glue on the glitter to the angel
After you’ve cut out your angel shape from the foam paper, it’s time to add some sparkle! Glue on the glitter to the angel, taking care to cover all of the exposed surfaces. You can use any color glitter you like or even a combination of colors. Just be sure to use glue that is safe for use on foam paper. Once you’ve covered the angel in glitter, set it aside to dry. Once it’s dry, your angel ornament is ready to hang on the tree!
Step Three: Attach the wings to the angel’s back with glue.
To make your angel ornament, you will need:
1. Foam paper
2. Scissors
3. Glue
4. A pencil
5. A black marker
6. Some glitter (optional)
7. A pipe cleaner (optional)
8. Some ribbon (optional)
Start by cutting two identical wing shapes out of the foam paper. You can make them any size you want, but we recommend keeping them relatively small so they don’t overpower the rest of the ornament. Once you have your wing shapes cut out, use a dab of glue to attach them to the back of your angel, positioning them so that they look like they’re flapping in the wind.
Step Four: Hang the ornament on the tree
It’s finally time to hang the ornaments on the tree! After all your hard work, your beautiful handmade Christmas angel ornaments are ready to be displayed. Here’s how to do it:
1. Find the perfect spot on your Christmas tree for each ornament. You may want to hang them all in a cluster or spread them out evenly throughout the tree.
2. Use a fishing line or thin ribbon to carefully hang each ornament from its loop. Make sure the line or ribbon is long enough so that the ornament can hang freely without being too close to the branches.
3. Once all the ornaments are in place, step back and admire your handiwork! These unique angels will add a special touch to your tree this holiday season.
5. EVA Glitter Foam Paper Angel Ornaments making For Christmas Decoration | Christmas Angel With paper
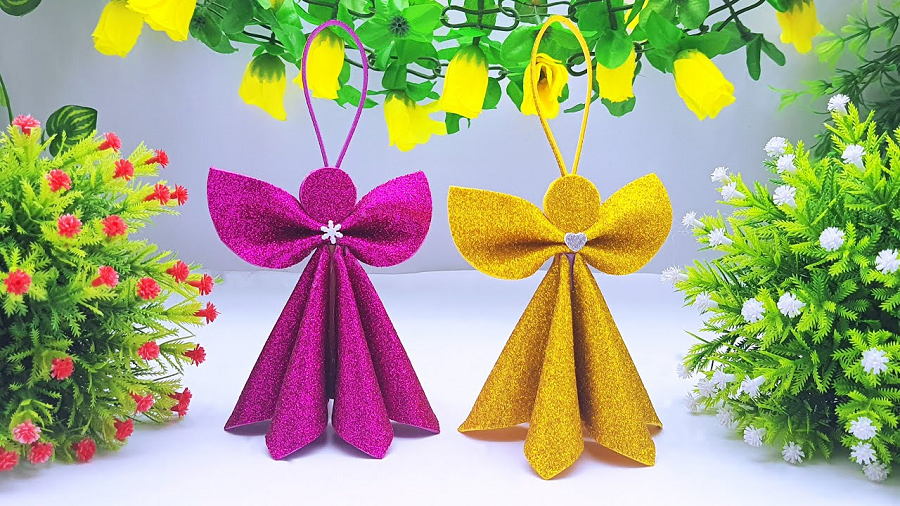
Crafty ideas for Christmas decorations
Looking for some fun and unique ideas for your Christmas decorations this year? Look no further than these glittery foam paper angel ornaments! They’re easy to make and will add a touch of sparkle to your tree.
These ornaments are made from EVA foam, which is a soft, flexible material that’s easy to work with. You can find it at most craft stores. To make the angels, start by cutting out two wing shapes from the foam. Then glue them together, leaving a space in the middle for the body.
Next, cut a small circle out of the foam for the head and glue it onto the body. Finally, decorate your angels with glitter, beads, or whatever else you like! Hang them on your tree or give them as gifts to friends and family.
What you need: glitter foam paper, scissors, glue, wire
Making your own Christmas ornaments is a great way to add a personal touch to your holiday decor. These glitter foam paper angels are quick and easy to make, and they add a beautiful sparkle to your tree.
To make these angels, you will need some glitter foam paper, scissors, glue, and wire. The first step is to cut out the angel shape from the glitter foam paper. Then, use the wire to create a halo and wings for your angel. Finally, glue everything together and let it dry.
These homemade ornaments are sure to be a hit with your family and friends. So get creative and have fun making them!
Step 1: cut out angel shapes from glitter foam paper
1. To make these adorable ornaments, start by cutting out angel shapes from glitter foam paper.
2. You can use a template or freehand the shapes, then cut them out with scissors.
3. Once you have your angel shapes cut out, it’s time to start decorating them! Use markers, sequins, glitter, and anything else you can think of to make them shine.
4. Once you’re happy with your angels, hole punch the top of each one and thread a piece of string through to create a hanger.
5. Hang your angels on the tree or wherever you like and enjoy their sparkle!
Step 2: assemble angel bodies with wire and glue
To make the bodies of your angels, start by cutting two pieces of wire that are about 12 inches long. Then, take a piece of glitter foam paper and cut it into a rectangular shape that is about 6 inches wide and 8 inches long. Fold the rectangle in half lengthwise, and then glue the two pieces of wire to the inside of the fold. Next, cut another piece of glitter foam paper into a smaller rectangle that is about 4 inches wide and 6 inches long. Fold this rectangle in half lengthwise as well, and then glue it to the back of the first rectangle (the one with the wires glued to it). This will form the body and wings of your angel.
Step 3: decorate angels with wings, halo, and glitter
These beautiful ornaments are made from EVA glitter foam paper. You can find them in the holiday section of your local craft store. To make them, simply cut out the shapes of the wings, halos, and bodies. Then, use a hot glue gun to attach the pieces together. Finally, add some glitter for a sparkly touch!
Final Thoughts
In conclusion, making your own Christmas wreath is a fun and easy way to get into the holiday spirit. With just a few supplies and some creativity, you can make a beautiful wreath that will last for years to come. So grab some friends, and some hot cocoa, and get crafty!


