


One of the best ways to get into the Christmas spirit is by hanging ornaments on your tree. But why stop there? You can also use ornaments to add a festive touch to your room decor. Here are some ideas for how to incorporate Christmas ornaments into your room decorations.
It’s that time of year again! Time to get out the Christmas decorations and start hanging those beautiful ornaments on the tree. But why stop there? This year, try using some of those extra ornaments to add a little Christmas cheer to your home office or workout space.
Here are a few ideas to get you started:
1. How To Make Christmas Ornaments hanging Room Decorations Crafts | Make Christmas Glitter Ornaments
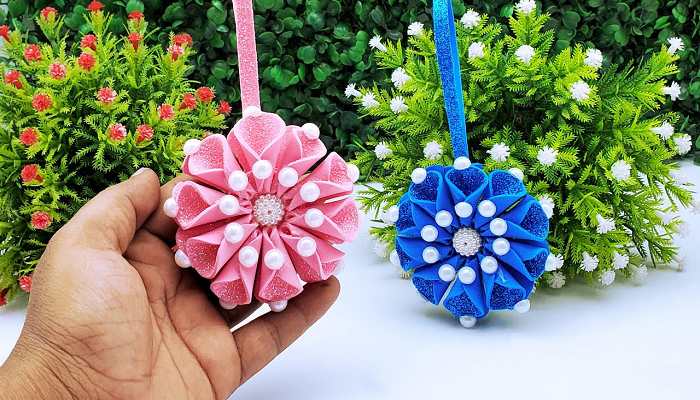
Make your own ornaments!
1. This Christmas, ditch the store-bought ornaments and opt for something unique: homemade ornaments!
2. With a little creativity and some common household materials, you can make beautiful ornaments to hang on your tree or around your home.
3. Check out these easy tutorials for making your own Christmas ornaments.
What you need: supplies for glitter ornaments.
When it comes to crafting, there are a few supplies that are essential for glitter ornaments. First, you will need some form of glue. This can be regular white glue, hot glue, or
even Mod Podge. You will also need glitter in the color or colors of your choice, as well as something to put the glitter in like a bowl or plate. Finally, you will need something to hang your ornament with like ribbon or string. With these supplies, you will be able to create beautiful and unique glitter Ornaments for your Christmas tree or as gifts!
Step 1: Make the ornament base.
To make your own glitter ornaments, you’ll need a few supplies. First, you’ll need to gather up some clear glass or plastic balls. You’ll also need some glue, glitter, and a paintbrush. Once you have your supplies, follow these steps to make your own unique ornament.
Start by painting the inside of the glass ball with glue. Then, add your glitter. You can use as much or as little as you like. Once you’re happy with the amount of glitter, set the ball aside to dry.
Once the glue is dry, your ornament is ready to hang! You can use fishing line, ribbon, or string to create a hanger for your ornament. Hang it on your tree or in a window to enjoy your handiwork all season long!
Step 2: Add glitter and decoration.
It’s time to add some sparkle to your ornaments! In this step, you will add glitter and other decorations to make your ornaments shine.
To start, gather your supplies. You will need glue, glitter, and any other decorations you want to use. Once you have everything, it’s time to get started!
Apply a layer of glue to the ornament. Then, sprinkle on the glitter. Be sure to cover the entire surface of the ornament. You can also add other decorations, such as beads or sequins.
Once you’re finished, set the ornament aside to dry. Once it’s dry, your ornament is ready to hang on the tree!
Step 3: Enjoy your new ornament!
After all of your hard work in Steps 1 and 2, it’s finally time to sit back and enjoy your beautiful new ornament! Whether you’re hanging it on your Christmas tree or giving it as a gift, this homemade decoration is sure to bring joy to all who see it. So take a step back, and enjoy your handiwork – you’ve earned it!
2. Christmas Snowflakes For Home Decorations | Easy Paper Snowflakes | Glitter Foam Paper Christmas
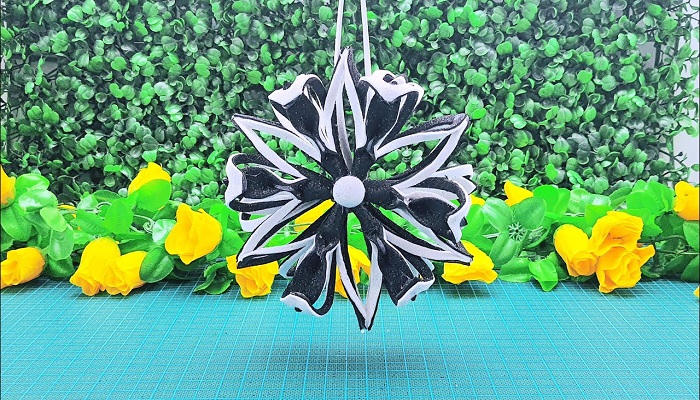
What are paper snowflakes?
Paper snowflakes are a traditional Christmas decoration. They are made from paper and can be any color or design.
To make a paper snowflake, you will need:
-1 sheet of paper
-Scissors
-Tape or glue
-String or ribbon (optional)
1. Fold the paper in half lengthwise and then fold it in half again.
2. Cut along the folded edge to create a fringe.
3. Make cuts along the fringe to create your desired design.
4. Unfold the paper to reveal your snowflake.
5. Tape or glue the snowflake to a string or ribbon and hang it up!
How to make a paper snowflake
Looking for a festive way to spruce up your home for the holidays? Why not try making your own paper snowflakes? It’s a fun activity for both kids and adults, and you can display your creations in any number of ways. Here’s how to make a paper snowflake in just a few easy steps:
Start with a square piece of paper. Fold the paper in half diagonally to create a triangle, then fold it in half again. Now you should have a smaller triangle.
Fold the triangle in half once more, then cut along the folded edge to create four equal-sized triangles. Take one triangle and fold it in half again, then snip off the pointy end. This will be your Snowflake’s center.
Now it’s time to start cutting out your snowflake’s design!
Different types of paper snowflakes
When it comes to decorating for Christmas, paper snowflakes are a must. They are relatively easy to make and can be used in a variety of ways. Here are some different types of paper snowflakes that you can use to decorate your home this holiday season.
The traditional paper snowflake is made from a piece of square paper that is folded into a triangle and then cut into a design. These snowflakes can be hung from the ceiling or placed on windows and mirrors.
If you want something a little more three-dimensional, you can try making glitter foam paper snowflakes. These are made by using two pieces of glitter foam paper glued together. They can be hung from the ceiling or placed on shelves and mantles.
For something really unique, you can try making origami snowflakes.
How to decorate with paper snowflakes
At Christmas, one of the most popular decorations is paper snowflakes. They are very easy and inexpensive to make. You can make them out of any type of paper you want, but glitter foam paper is the best because it is sturdier and will hold up better over time. You can find this type of paper at any craft store.
To make the snowflakes, you will need:
-1 sheet of glitter foam paper
-Scissors
-Pencil
-Ruler or straight edge
First, fold the sheet of paper in half lengthwise. Then, fold it in half again. Next, cut along the folds to create four equal strips. Now you will have four strips that are each two inches wide.
Next, take two strips and tie them together at one end with a small piece of string or thread.
Tips for making perfect paper snowflakes
1. Paper snowflakes are the perfect way to add a touch of winter to your home decor.
2. Follow these tips and you’ll be sure to create perfect paper snowflakes every time.
3. First, choose your paper wisely. Thick, glittery paper works best.
4. Next, fold your paper in half several times until it resembles a triangle.
5. Then, cut out your snowflake shape – be as creative as you like!
6. Once you have your shape cut out, gently unfold your paper, and voila – you have a beautiful snowflake!
7. If you want to add a little extra something, glue on some sequins or beads for extra sparkle.
3. DIY Handmade Christmas Angel Ornaments | Christmas Angel Making With Foam Paper | Glitter Eva Foam
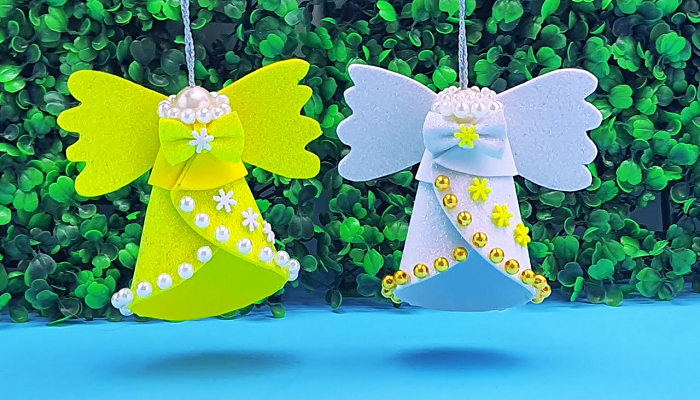
Make your own unique Christmas angel ornaments
When it comes to Christmas, many people like to go all out with their decorations. One way to add a personal touch to your holiday decor is by making your own Christmas angel ornaments. With just a few supplies, you can create unique and beautiful angels that will add a special touch to your tree.
To make your own angels, you will need some foam paper, glitter, and a hot glue gun. Start by cutting out the basic shape of an angel from the foam paper. Then, decorate your angel with glitter and hot glue. You can also add other embellishments, such as beads or sequins. Once you’re finished decorating, simply hang your ornament on the tree with some ribbon or string.
Making your own Christmas angel ornaments is a great way to add a personal touch to your holiday decor.
Materials needed: list of supplies with links
To make these adorable handmade Christmas angel ornaments, you’ll need some supplies. First, you’ll need some foam paper. You can find this at most craft stores. You’ll also need some glitter and glue. I like to use Eva Foam because it’s easy to work with and it’s very versatile. You can find all of these supplies at your local craft store or online.
Once you have all of your supplies, you’re ready to get started! These ornaments are so easy to make and they’re so sparkly and pretty. Your friends and family will love them!
Step 1: cut out the basic shape of an angel from foam paper
To make a beautiful and unique Christmas angel ornament, start by cutting out the basic shape of an angel from foam paper. You can use a template or freehand your design. Once you have the basic shape cut out, add details like wings, a halo, and a face. Make sure to add plenty of glitter and sequins for a sparkling effect! Finally, hang your ornament on the tree and enjoy your handiwork!
Step 2: Add glitter and details to personalize
When it comes to holiday decorations, personalization is key. That’s why, when it comes to making your own Christmas angel ornaments, step two is all about adding glitter and details to make them your own.
Whether you’re using foam paper or glittery EVA foam, a little bit of extra sparkle will go a long way in making your angels unique. And don’t be afraid to get creative with the details! You can add anything from bows and sequins to beads and buttons.
So have fun with it and let your creativity shine through! Your finished angels are sure to be a hit with everyone who sees them.
Step 3: enjoy your beautiful creation!
Now that you have completed steps one and two it is time for step three which is to enjoy your beautiful creation! you have now made an angel ornament that can be used year after year. these make great gifts for friends and family too. so sit back, relax, and enjoy your work!
4. Glitter Foam Paper Christmas Angel Ornament Tutorial | Easy Way To Make Christmas Angel Step By Step
Glitter foam paper is an easy way to make a beautiful Christmas angel step by step.
Making a glitter foam paper angel is an easy and fun way to add some holiday cheer to your home décor. This step-by-step tutorial will show you how to make a beautiful angel that will dazzle your friends and family.
All you need is some glitter foam paper, scissors, and hot glue. First, cut out two identical angel shapes from the glitter foam paper. Next, cut a small hole in the top of each angle for the hanger.
Now it’s time to decorate! Add whatever details you like to make your angel unique. You can add wings, a halo, or anything else you can think of. Once you’re finished decorating, glue the two angels together at the sides.
Now your glitter foam paper angel is ready to hang on your tree or anywhere else in your home!
What You Need: Glitter foam paper, scissors, hot glue gun, and ribbon.
This easy tutorial will show you how to make a beautiful Christmas angel ornament out of glitter foam paper. With just a few supplies and some simple steps, you can create your own unique angel to hang on your tree. So gather up your materials and let’s get started!
Step One: Cut two Angel shapes out of glitter foam paper.
Step Two: Hot glue the two Angel shapes together, leaving the bottom open.
1. Begin by hot gluing the two Angel shapes together at the top, leaving the bottom open.
2. Make sure to align the shapes so that the bottoms are flush with each other.
3. You can also add a bit of hot glue around the edges of the angels for extra stability.
4. Once the glue has cooled, your angel is ready to be decorated!
Step Three: Cut a small hole in the top of the Angel.
Now that Angel’s body is complete, it’s time to give her a face. Cut a small hole in the top of Angel’s head, being careful not to cut too close to the edge. This will be the opening for the halo. Next, use a craft knife to make a small slit in the center of Angel’s face. This will be the mouth. Finally, use the knife to make two small slits for the eyes.
Step Four: Tie a piece of ribbon through the hole.
This step is simple, yet important. You will need to take a piece of ribbon and tie it through the hole in the middle of your angel. This will be what you use to hang your ornament on the tree. Be sure to make the knot tight so that your angel will be secure.
Step Five: Hang your new Glitter Foam Paper Christmas Angel Ornament on your tree!
1. Hang your new Glitter Foam Paper Christmas Angel Ornament on your tree! This easy tutorial will show you how to make a beautiful angel step by step.
2. All you need is some glitter foam paper, a hot glue gun, and some patience! Follow the instructions below and you’ll have a beautiful ornament in no time.
3. With just a few simple steps, you can create a stunning Glitter Foam Paper Christmas Angel Ornament that will add some sparkle to your tree this holiday season!
Final Thoughts
In conclusion, making your own Christmas ornaments can be a fun and easy way to get into the holiday spirit. With a little bit of creativity, you can turn your home into a winter wonderland that will make all your friends and family jealous. So what are you waiting for? Start crafting!


