


- Get Creative this Holiday Season with a Handmade 3D Paper Christmas Tree:
- 1. DIY Paper Christmas Tree Making at Home | How to Make a 3D Paper Xmas Tree DIY Tutorial | Christmas
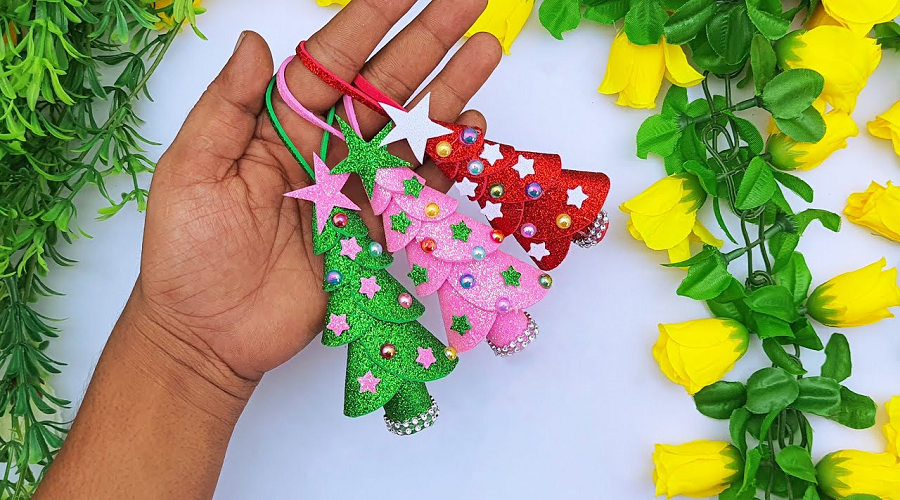
- 2. DIY Christmas Tree Making Glitter Foam Paper | X-Mas Christmas Tree | DIY Christmas Tree Decorations
- 3. Most Beautiful Christmas Mini Tree | How To Make a 3D Christmas Tree | DIY Christmas Tree Tutorial
- 4. Wall Hanging Christmas Tree Decoration | Christmas Tree Making | Tree | How To Make Christmas Tree
- 5. DIY Christmas Tree | 3D Christmas Tree Making With Paper | How To Make A X-Mas Christmas Tree
- Final Thoughts
Christmas is a special time of year when family and friends gather together to celebrate. What better way to get into the holiday spirit than by making your own decorations? This article will show you how to make a 3D paper Christmas tree. With just a few materials and a little bit of time, you can have a festive decoration for your home.
It’s easy to make a 3D paper Christmas tree with just a few supplies! All you need is some construction paper, scissors, and glue.
First, cut out a triangle shape from the construction paper. This will be the base of your tree. Then, cut out several smaller triangles and glue them onto the base, overlapping each one slightly. Continue adding layers of triangles until your tree is as tall as you want it to be. Then, decorate your tree with any additional details you like! You could add some glitter, sequins, or even tiny presents at the bottom.
Get Creative this Holiday Season with a Handmade 3D Paper Christmas Tree:
This holiday season, get creative and make your own 3D paper Christmas tree! With just a few supplies, you can create a beautiful and unique decoration for your home. Here’s how to do it:
1. DIY Paper Christmas Tree Making at Home | How to Make a 3D Paper Xmas Tree DIY Tutorial | Christmas
Why make your own paper Christmas tree?
Making your own paper Christmas tree is a great way to save money and have a unique decoration for your home. You can make a paper Christmas tree in any size or color you want, and it’s easy to do.
Paper Christmas trees are also eco-friendly since they’re made from recycled materials. And when you’re done with the tree, you can just recycle it again.
So why not give DIY paper Christmas trees a try? It’s fun and easy, and you’ll end up with a one-of-a-kind decoration for your home.
Step 1: gather your materials
To make a 3D paper Christmas tree at home, follow these steps:
1. Gather your materials. You will need a sheet of green construction paper, a sheet of brown construction paper,
a stapler, scissors, and glue.
2. Cut the green construction paper into strips that are about 1 inch wide and 8 inches long.
3. Staple the strips together at one end to form a cone shape.
4. Cut out a small circle from the brown construction paper and glue it to the pointy end of the cone to form the tree trunk.
5. Decorate your tree with small pieces of construction paper or other materials like glitter, beads, or sequins.
Step 2: make the tree template
If you want to make your own Paper Christmas Tree, the first step is to create a template. You can use any type of paper you have on hand, but construction paper or cardstock will be the easiest to work with.
To make the template, start by folding a piece of paper in half lengthwise. Then, cut along the fold line to create two identical pieces of paper. Next, fold each piece of paper in half again lengthwise and cut along the fold line to create four identical pieces of paper.
Now you should have eight pieces of paper that are all the same size. To create the tree template, take four of the pieces and stack them on top of each other. Then, fold the stack in half and cut along the fold line to create two identical halves.
Step 3: cut out the tree
It’s finally time to cut out the tree! You’ll need a sharp knife and a cutting mat for this step.
First, cut out the base of the tree. Make sure to leave a little bit of extra paper at the bottom so you can fold it over and glue it shut.
Next, start cutting out the individual branches. You can make them as long or short as you want, just be sure to leave a little bit of extra paper at the top so you can fold it over and glue it shut.
Finally, cut out the star for the top of the tree. Once again, leave a little bit of extra paper so you can fold it over and glue it shut.
Now that your tree is all cut out, it’s time to move on to Step 4: assemble your tree!
Step 4: assemble the tree
A paper Christmas tree is a great way to save money and have a unique decoration for your home. Making your own paper 3D Paper Christmas Tree, and only takes a few materials.
To make your own 3D Paper Christmas Tree, you will need construction paper, scissors, tape, and a stapler.
First, cut the construction paper into strips. The strips should be about 1 inch wide and 12 inches long.
Next, take two strips and tape them together at one end. Then, fold the strip in half so that the taped end is in the middle. This will form one “branch” of the tree. Repeat this step until you have enough “branches” to form a full tree.
Finally, staple all of the “branches” together at the top to form the shape of a tree.
Step 5: Decorate the Tree!
Now that you have your DIY paper Christmas tree all made, it’s time to decorate it! You can use any kind of decorations you want – from traditional baubles and tinsel to more unique ornaments. Let your imagination run wild and have fun decking out your tree!
Here are a few tips for decorating your 3D Paper Christmas Tree :
- – Start with the basics: string up some lights and add a star or angel to the top of the tree.
- – Then, start filling in the gaps with baubles, tinsel, or other decorations.
- – Use different colors, sizes, and shapes of decorations to create an interesting and unique look.
- – Finish off by adding a few special touches, like bows or ribbons.
2. DIY Christmas Tree Making Glitter Foam Paper | X-Mas Christmas Tree | DIY Christmas Tree Decorations

Why making your own Christmas tree is the best
Making your own 3D Paper Christmas Tree is the best way to ensure that your tree is exactly what you want. You can choose the perfect size, color, and style for your home. Plus, DIY trees are usually much cheaper than buying a pre-made tree. And decorating your own tree is a fun activity that the whole family can enjoy.
Here’s how to make your own glitter foam paper 3D Paper Christmas Tree :
1. Cut out a tree shape from glitter foam paper.
2. Use a hot glue gun to attach sequins, beads, or other decorations to the tree.
3. Hang your sparkling creation on the wall or in a window for all to see!
What You Need: List of Materials
Making your own 3D Paper Christmas Tree is a fun and festive way to get into the holiday spirit! But before you start, you’ll need to gather a few supplies.
Step-by-step instructions: how to make the tree
Decorating your tree: ideas for glitter, foam paper, and more
Are you looking for some fun and unique ideas for decorating your Christmas tree? If so, you’ve come to the right place! Here are some great ideas for using glitter, foam paper, and more to create a one-of-a-kind tree that is sure to impress your family and friends.
Glitter is always a popular choice when it comes to decorating a 3D Paper Christmas Tree. If you want to add a little sparkle to your tree, try using glitter in different ways. You can add it to the base of your tree, sprinkle it on the branches, or even use it to create unique ornaments.
Foam paper is another great option for creating unique decorations. You can cut it into different shapes and sizes and then glue or tape it onto your tree. This is a great way to add color and dimension to your tree.
3. Most Beautiful Christmas Mini Tree | How To Make a 3D Christmas Tree | DIY Christmas Tree Tutorial
A brief description of the project
The project is a tutorial on how to make a 3D Paper Christmas Tree. The tree is made out of paper and is decorated with lights. The project takes about an hour to complete.
This project is perfect for anyone who wants to add a personal touch to their 3D Paper Christmas Tree. The finished product is a beautiful mini tree that can be placed anywhere in your home. Follow the tutorial below and you’ll have your own 3D Paper Christmas Tree in no time!
What You’ll Need: list of supplies
-A few different sizes of styrofoam balls (mine were 2″, 3″ and 4″)
-Tiny gold ornaments
-Tinsel garland
-Glue gun and glue sticks
-Scissors
-Gold paint (optional)
Making your own mini 3D Paper Christmas Tree is a fun and easy way to get into the holiday spirit! All you need are a few supplies and some patience while you assemble your tree. Once you have your styrofoam balls, ornaments, and tinsel, you’re ready to start crafting.
Step 1: Instructions for the first step
Start by cutting a small hole in the bottom of your styrofoam cone. This will be where you insert the lights. Next, cut thin strips of paper and glue them around the cone. Once that is dry, begin wrapping your garland around the tree. Make sure to leave some slack at the top so you can easily hang your star or ornament. Finish by adding a little bit of extra embellishment, like pom poms or ribbon!
Step 2: Instructions for the second step.
In order to make your mini 3D Paper Christmas Tree look its best, follow these simple instructions for the second step. First, cut a small hole in the bottom of the paper cone. Next, insert the wire through the hole and twist it to secure it. Finally, add some hot glue around the rim of the cone and insert your mini-tree into it. Allow the glue to dry completely before moving on to step three.
Step 3: Instructions for the third step
To make a mini 3D Christmas tree, you will need:
1. A green Styrofoam cone
2. A hot glue gun
3. A gold ribbon
4. Gold beads
5. Scissors
6. A star topper (optional)
Follow these steps:
1. Start by cutting a piece of green ribbon that is about 2 feet long.
2. Hot glue one end of the ribbon to the top point of the Styrofoam cone.
3. Wrap the ribbon around the cone, gluing as you go, until you reach the bottom point of the cone.
4. Cut off any excess ribbon, and hot glue the end to secure it in place.
4. Wall Hanging Christmas Tree Decoration | Christmas Tree Making | Tree | How To Make Christmas Tree

Make a wall-hanging Christmas tree
A wall-hanging Christmas tree is a unique and festive way to decorate your home for the holidays. Here’s how to make your own wall-hanging 3D Paper Christmas Tree :
1. Cut a piece of plywood or cardboard into a tree shape. You can use a template or freehand it.
2. Paint or cover the tree with wrapping paper, fabric, or whatever you like. Be creative!
3. Hang the tree on your wall using nails, screws, or adhesive hooks.
4. Decorate your tree with lights, tinsel, garland, ornaments, etc. Get creative and have fun!
5. Enjoy your unique and festive wall-hanging Christmas tree!
What You Need: List Materials Needed
For this wall-hanging Christmas tree decoration, you will need the following materials: a styrofoam cone, a hot glue gun, glue sticks, a box cutter or Exacto knife, acrylic paint and a paintbrush, sequins, glitter, and ribbon.
First, using the box cutter or Exacto knife, cut off the bottom of the styrofoam cone so that it is flat. Next, hot glue the cone to the center of your chosen piece of cardboard or paper. Then, begin painting the cone with your chosen color of acrylic paint. Once the paint is dry, it’s time to add some sparkle! Use hot glue to attach sequins, glitter, and/or ribbon around the edge of the cone. And that’s it – you’re finished!
Step 1: cut out a tree shape
Cut out a tree shape from a piece of construction paper. Make sure that the tree is about the same size as the wall hanging that you want to make.
Next, cut out small circles from another piece of construction paper. These will be the ornaments for your tree. You can also use other shapes, such as stars or bells.
Finally, glue the ornaments onto the tree. Once the glue dries, your wall hanging is ready to be hung up!
Step 2: paint or decorate the tree
Wall Hanging 3D Paper Christmas Tree:
Whether you want a traditional 3D Paper Christmas Tree or something more unique, painting or decorating your tree is a great way to add your personal touch. Here are a few ideas to get you started:
-Paint your tree with white and silver paint to give it a frosty look.
-Add some sparkle by gluing on sequins, glitter, or small beads.
-Wrap the tree in colorful ribbon or yarn for a fun and festive look.
-Use real or artificial flowers to give your tree a touch of springtime.
Step 3: add a hanger to the tree
To complete your wall-hanging 3D Paper Christmas Tree, add a hanger to the top of the tree. This will allow you to easily display your tree on the wall.
There are a few different ways to add a hanger to the top of your tree. You can use a ribbon or string to create a loop, or you can hot glue a hook directly to the top of the tree. If you’re using a ribbon or string, make sure it is securely fastened so that your tree doesn’t fall off the wall.
Once you’ve added your hanger, your wall-hanging 3D Paper Christmas Tree is complete! Hang it up and enjoy your handiwork.
Step 4: Enjoy your new decoration!
You’ve followed the steps and now you have a beautiful wall-hanging 3D Paper Christmas Tree decoration. Take a step back and enjoy your handy work. This festive decoration will bring holiday cheer to any room in your house. display it prominently for all to see.
5. DIY Christmas Tree | 3D Christmas Tree Making With Paper | How To Make A X-Mas Christmas Tree
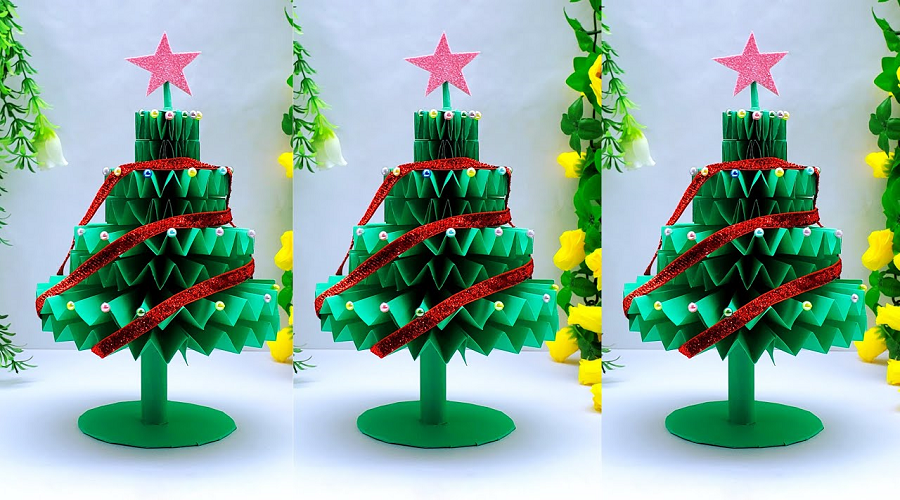
Making a 3D paper Christmas tree
Making a 3D paper Christmas tree is easier than it looks. With a little bit of time and effort, you can make a beautiful tree that will add a touch of holiday cheer to your home.
To make a 3D Paper Christmas Tree, you will need:
-1 sheet of construction paper
-1 sheet of cardstock
-Scissors
-Tape or glue
First, fold the construction paper in half lengthwise. Then, cut out a triangle from the folded edge. This will be the tree’s trunk. Next, cut out two triangles from the cardstock. These will be the tree’s branches. To assemble the tree, tape or glue the trunk to the center of the cardstock. Then, tape or glue the branches to the sides of the trunk.
Step 1: Cutting Out The Tree Template
Making your own 3D paper Christmas tree is a fun and easy holiday craft. All you need is some colorful paper, a few supplies, and a little bit of time. Follow these simple steps to create your own beautiful Christmas tree.
First, you’ll need to cut out a tree template. You can find a variety of tree templates online or in craft stores. Once you have your template, trace it onto the back of your paper. Then, cut out the tree shape.
Step 2: Folding and glue the tree
Fold the tree in half along the centerline and then unfold. Next, fold each side of the tree in to meet the centerline. Glue the two sides of the tree together with a strong adhesive.
To complete your 3D Paper Christmas Tree, follow these folding and gluing instructions. With just a few folds and some glue, you’ll have a beautiful holiday decoration for your home.
Step 3: Decorating the tree
It’s time to add some life to your tree! In this step, you will be decorating your tree with all sorts of fun and colorful ornaments. This is where you can really let your creativity shine!
There are no rules when it comes to decorating your tree. Just have fun and go with whatever you think looks good! If you’re stuck for ideas, try looking at some pictures of decorated trees online for inspiration.
One important tip to remember is not to overload your tree with too many decorations. This can make it look cluttered and messy. A few well-placed decorations are all you need to create a beautiful and festive tree that everyone will love!
Final Thoughts
In conclusion, the 3D Paper Christmas Tree is a unique and fun way to decorate for the holidays. It is easy to make and can be customized to fit any space. With a little bit of time and effort, you can have a beautiful and festive holiday decoration that will impress your friends and family.


