


- From simple three-pointed shapes to intricate designs, snowflake crafting can provide hours of creative enjoyment.
- 1. How To Make Beautiful Snowflakes With Glitter Foam Paper | Room Decoration Snowflake For X-Mas
- 2. DIY Christmas Angel With Paper | How to Make a Paper Angel for Christmas Decorations | X-mas Craft
- 3. DIY Glitter Foam Paper Ball Making | Christmas Tree Ornaments Making Glitter Foam Paper Sheets
- 4. Paper Crane Envelope Tutorial | Easy Paper Envelope Invitations Card | Paper Envelope Making Easy
- 5. SNOWFLAKES: Glitter Foam Paper Snowflakes For Christmas Decorations | DIY Paper Snowflakes Glitter
- Final Thoughts
Make Beautiful Snowflakes is a timeless winter activity that is both fun and rewarding. Whether you are a child or an adult, making snowflakes can be the perfect way to spend a cold winter day.
The beauty of winter is often found in the simplest of things. One of the most iconic images of winter is the snowflake, which can be crafted into beautiful works of art. Making beautiful snowflakes is an easy and enjoyable craft that can be done by anyone, regardless of age or skill level. With just a few pieces of paper and scissors, you can create gorgeous decorations for your home or school.
Have you ever been amazed by the intricate patterns of a snowflake? Make beautiful snowflakes are beautiful and unique works of art, each one different from the next. Making your own paper snowflakes allows you to bring a little bit of winter indoors, creating decorations for any season. With just a few simple steps, you can make stunning paper snowflakes with intricate designs.
From simple three-pointed shapes to intricate designs, snowflake crafting can provide hours of creative enjoyment.
Making beautiful snowflakes crafting is one of the most rewarding and creative activities to do during wintertime. Whether you’re a beginner or an experienced paper crafter, making beautiful and unique snowflakes is an easy way to spruce up your home for the holidays. From simple three-pointed shapes to intricate designs, snowflake crafting can provide hours of creative enjoyment.
Making beautiful snowflakes is a fun and inexpensive way to decorate your home this winter season. With just some basic craft supplies scissors, construction paper, glue, and glitter — you can create stunning pieces of art in no time! All it takes is a few cuts here and there with the scissors, folding and unfolding until you get the desired shape then sprinkle on some glitter for added sparkle. The possibilities are endless when it comes to making beautiful snowflakes!
1. How To Make Beautiful Snowflakes With Glitter Foam Paper | Room Decoration Snowflake For X-Mas
About Snowflakes
Snowflakes have captivated people’s hearts for centuries. Every snowflake is unique and each one can bring a little bit of joy to the world. Glitter foam paper provides an opportunity to make beautiful snowflakes that can be used as decorations or even given away as gifts. Making snowflakes with glitter foam paper is an easy and fun activity that everyone can enjoy, regardless of age or skill level.
Whether you want to create a festive atmosphere in your home or just want to show someone special how much they mean to you, making glitter foam paper snowflakes is a great way to do it. With some basic tools like scissors, glue, and glitter paper you will be able to make beautiful room decorations for X-Mas! The best part is that these handmade snowflakes are sure to add a special touch of winter magic wherever they are hung.
Make beautiful snowflakes Materials: What You Need
Make beautiful snowflakes out of glitter foam paper for X-Mas room decoration is a fun and easy craft for adults and children alike. Making these snowflakes can be done quickly with the right materials, so you’ll need to know what supplies are necessary to make sure your project is a success.
To make beautiful snowflakes, you will need sparkly foam paper in various colors and sizes, scissors, glue sticks, a ruler or tape measurer, and wooden sticks (optional). Using the scissors, you will cut out various shapes from the foam paper such as squares, circles, and triangles. You can then use the ruler or tape measurer to make precise cuts on the edges to give your snowflake its unique shape. The wooden sticks are optional but they help provide more stability when attaching them together using glue sticks.
Steps: Make Foam Paper Snowflake
Making snowflakes out of foam paper is a great way to decorate your home for Christmas. This simple craft project is inexpensive and easy to do, and it can also be used as a decoration or art project in the classroom. With just some basic supplies and a few simple steps, you can create beautiful glitter foam paper and make beautiful snowflakes that will look fantastic hung up around the house.
To make your own glitter foam paper snowflake all you need is some colorful foam paper, scissors, glue, and of course lots of sparkles! Begin by cutting out a large piece of foam paper into the shape of a six-pointed star. Cut each point into thirds and then fold each point in half to form the basic shape for your snowflake.
Glitter: Add Glitter To Snowflakes
Adding glitter to snowflakes is an easy way to make room decorations that are sure to sparkle and shine! Glitter your home with fun, festive make beautiful snowflakes from glitter foam paper. With this simple step-by-step guide, you’ll be able to craft beautiful snowflakes in no time at all. Not only will these decorations add a pop of color and glitz to your room, but they also make great gifts for family and friends during the holiday season. Get creative with different sizes, shapes, and colors of glitter foam paper for even more unique results. Follow along for tips on how to make beautiful snowflakes with glitter foam paper this holiday season!
Hanging Up: Decorate the Room
The holiday season is the perfect time to create a beautiful and festive atmosphere at home. Decorating your room with make beautiful snowflakes from glitter foam paper can be an enjoyable and creative way to bring some winter cheer into your space. If you’re looking for a unique project that will transform any room into a winter wonderland, here’s how to make beautiful snowflakes with glitter foam paper in just three easy steps!
Snowflakes are a classic decoration when it comes to getting ready for the holidays, and making your own out of glitter foam paper can be an especially fun activity. Not only will the result be gorgeous, but it will also add charm and personality to any room. The best part? It’s easy enough for anyone to try—no professional craft skills are required! All you’ll need are scissors, glitter foam paper, and a bit of imagination.
Keepsake: Preserve Your Artwork
For those looking to add some extra sparkle to their holiday decorations, keepsake art is the perfect way to make your home shine. With glitter foam paper, you can create beautiful snowflakes that will bring a festive atmosphere into any room in your house. Not only do these snowflakes look stunning against the backdrop of winter whites, but they also make for a memorable DIY craft that you can keep for years.
Making Christmas snowflakes with glitter foam paper is an easy and fun project anyone can do at home. All it takes is a few simple materials like scissors, glue, and tape – plus some imagination! Follow our step-by-step tutorial on how to make beautiful snowflakes with glitter foam paper so you can have festive decorations all around your house this holiday season.
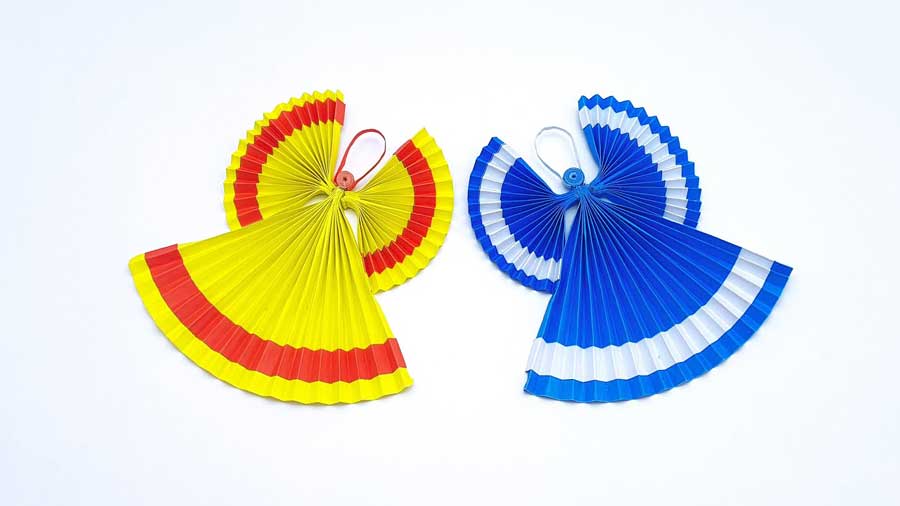
2. DIY Christmas Angel With Paper | How to Make a Paper Angel for Christmas Decorations | X-mas Craft
Materials Needed:
Are you looking for a way to make your own Christmas decorations? Here is the perfect DIY project for you! This tutorial will explain how to make an angel out of paper. You can use this beautiful angel to decorate your home this holiday season.
For this craft, you will need some basic materials such as paper, glue, scissors, and a pen. It is recommended that you use colored paper but if you don’t have any then white or off-white paper works just fine too. To get the shape of the angel’s wings right it is best that you use thick cardstock or poster board instead of regular printer paper. Finally, if you want to add extra sparkle and shine to your angel then grab some glitter glue or sequins from the craft store as well.
Step 1: Drawing the Angel
Christmas decorations can add a special flair to your home, and nothing is more classic than an angel. Making your own paper angel is an easy craft that you can do with the whole family. You will only need basic materials like paper, scissors, and a pencil to get started.
The first step in making your own festive Christmas angel is to draw the shape of the angel on a piece of paper. Using a pencil and ruler, draw two long lines that intersect each other in the middle to form an ‘X’ shape. Then draw two semicircles at either end of the ‘X’ shaped lines, creating an outline for the wings of your angel. Finally, add two circles at either side just below the wings for arms, and one circle at the bottom for the body of your Christmas angel.
Step 2: Cutting Out the Pieces
Making a DIY Christmas angel is an easy and fun craft activity that anyone can do. Step two of the process involves cutting out the pieces of paper to create the angel. First, use a ruler to draw straight lines on your paper according to the pattern provided in this article. Then, use scissors or a craft knife to carefully cut out each piece along those lines. Make sure to take extra care when using sharp tools and be mindful of your fingers!
Once all of the pieces are cut, you’re ready for step three: assembling the parts together. For best results, it’s important that all of the edges are neatly and accurately cut so that they fit together properly. With these steps completed, your Christmas angel will be ready for decoration!
Step 3: Assembling the Angel
This third step in creating a DIY Christmas Angel With Paper is a fun and easy one – assembling the angel! You will need the cutouts from Step 2, glue or double-sided tape, scissors, and a ruler to assemble your paper angel.
To begin, place the two large wings together so that their edges are aligned. Secure them together using either glue or double-sided tape. Once secured together, use your scissors to trim any uneven edges along the wings so they look neat and even. Next, take the four rectangles; these are going to be used for connecting the wings to the body of your angel. Using glue/tape again, attach each rectangle on opposite sides of where you connected your wings earlier.
Step 4: Decorate the Angel
Are you looking for a special way to decorate your home this Christmas season? This DIY Christmas angel with papercraft is an easy and fun project that will add a festive touch to your holiday decorations. Step 4 in the process of making a paper angel for Christmas decorations is decorating, which can be done in various ways.
To start, you can use colorful markers or paint to draw on the wings and body of the angel. In addition, you can also add glittery stars or snowflakes for an extra sparkly effect. Ribbon or thread can be used to create a halo above the angel’s head and beads could be used as eyes. You may also want to glue some small pieces of fabric onto the angel’s outfit if desired.
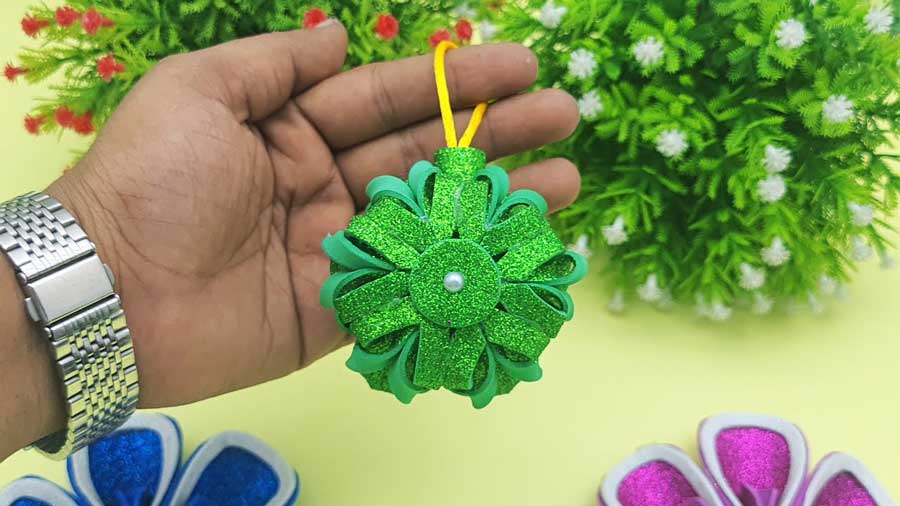
3. DIY Glitter Foam Paper Ball Making | Christmas Tree Ornaments Making Glitter Foam Paper Sheets
DIY Christmas Tree Ornaments
Creating DIY Christmas tree ornaments can be a fun and creative way to celebrate the holiday season. Making glitter foam paper ball ornaments is an easy, inexpensive craft that can also be enjoyed by both children and adults. Glitter foam paper sheets are available in any craft store and are simple to use for making beautiful festive decorations for your Christmas tree.
These glitter foam paper sheets come in various colors, sizes, and patterns so you can customize your own unique ornament. Aside from the basic supplies needed such as scissors, glue sticks, paintbrushes, double-sided tape, ribbons, etc., you will also need a hot-glue gun which helps make the decoration process even easier. With just a few supplies and some imagination, you will have a festive holiday decoration ready in no time!
Materials Needed: Foam Paper, Glitter
Making Christmas tree ornaments is a popular holiday activity. With some simple materials, you can make your own DIY glitter foam paper ball making Christmas tree ornaments. To create your own festive decorations, all you need is foam paper, glitter, and some basic crafting supplies.
Foam paper is a great material to work with because it is easy to cut and shape into different shapes. The glitter adds an extra sparkle to the decorations that will make them stand out from other handmade ornaments. You can also add ribbons and other decorative elements to the ornament for added decoration. Once you have all the materials needed, creating these glittery ornaments is easy!
Step 1: Cut Foam Sheets
Christmas is just around the corner, and what better way to get in the holiday spirit than by making your own ornaments? Making glitter foam paper ball ornaments can be a fun and creative way to spruce up your tree this year. The first step in creating these beautiful decorations is cutting foam sheets.
To start, you will need to gather several foam sheets of the same size and color. Once you have all of your materials gathered, it’s time to begin cutting! Using scissors or an X-Acto knife, carefully cut out circles from each sheet of foam that is about 2″–3″ in diameter. After all of your circles are cut out, it’s time to move on to the next step: gluing them together!
Step 2: Glue Pieces Together
Once you have the glitter foam paper sheets cut out, it’s time for the next step in making your DIY Christmas tree ornaments: gluing the pieces together. It’s important to be careful with this step since a misstep can ruin your entire ornament.
Start by selecting a strong glue that will hold tight and dry quickly. Some good choices are hot glue, super glue, or craft glue. You’ll also need some toothpicks on hand to help you spread and shape the glue before sticking two surfaces together. Combine small sections of two pieces of foam paper at a time and then use the toothpick to spread a thin layer of adhesive over both sides before pressing them together firmly. Work slowly and methodically until all four sections are glued into one piece that resembles an ornament ball shape.
Step 3: Sprinkle Glitter
After creating two colorful layers of foam paper, it’s time to add the finishing touches. Step 3 of this festive DIY project involves Sprinkling Glitter to give your Christmas tree ornaments a magical sparkle and shine.
This step is exceptionally easy – just sprinkle glitter onto each ornament until you are satisfied with the effect. You can use store-bought glitter or make your own from colored tissue paper. Experiment with different shades and sizes to create a truly unique look. If you are making multiple ornaments, try combining different kinds of glitter for an even more eye-catching result! Once your ornaments are completely covered in glitter, shake them gently over a piece of cardboard to remove any excess material.
Step 4: Hang and Enjoy!
Making Christmas tree ornaments doesn’t have to be a complicated endeavor. With some glitter foam paper sheets, scissors and glue you can create gleaming decorations that will light up your tree.
When your glitter foam paper ball making is complete, it’s time to hang the ornaments and enjoy the beautiful results of your hard work. Start by cutting three thin strips of ribbon or string for each ornament. Then thread one through the center of each ball and tie them together at the top. You can then tie a loop at the other end so that you can use it to hang from your Christmas tree branches.
Finally, stand back and admire your festive handiwork!
4. Paper Crane Envelope Tutorial | Easy Paper Envelope Invitations Card | Paper Envelope Making Easy

Making Paper Envelopes
Making paper envelopes is an easy and fun way to make unique invitation cards for any special occasion. Paper envelope-making doesn’t require any special skills or materials – all you need is a piece of paper, some scissors, and a bit of creativity! This paper crane envelope tutorial will show you how to make your own beautiful envelope in just a few simple steps. With our step-by-step instructions and helpful tips, making your own creative paper envelopes has never been easier.
From weddings and birthdays to celebrations of any kind, this tutorial will help you create the perfect invitation card with a unique handmade touch that will show your thoughtfulness and sincerity. So get ready to get crafty – it’s time to learn how to make your own personalized paper envelopes!
Preparation: Supplies Needed
Paper Crane Envelope Tutorial: Easy Paper Envelope Invitations Card and Paper Envelope Making Made Easy
Creating a paper crane envelope is a simple, but elegant way to invite your guests to any special occasion. This tutorial will explain how to make an easy-to-assemble paper crane envelope. The supplies needed are basic and affordable, making it a great option for any budget.
The supplies you’ll need for the project include origami or lightweight paper, scissors, glue stick or double-sided tape, and printer paper with the design of your choice printed on it. Once all of these supplies are gathered, you can begin work on creating the paper crane envelopes. Begin by cutting out two identical 8-inch squares from the origami or lightweight papers that will serve as the outside of your envelope.
Step 1: Fold Corners
For those who are looking to create their own paper envelope invitations, the first step is to fold the corners. This simple and easy tutorial will show you how to make your own paper crane envelope quickly and easily. It’s a great way to create unique and personalized invitations for any special occasion!
The process starts with folding each corner of your chosen material, whether it’s paper, fabric, or cardstock. For best results use a ruler or template to ensure that all four corners are folded in exactly the same way. Make sure that all edges are smooth before moving on to the next step; if needed use an iron on a low heat setting to press each fold flat. Once your four corners have been folded into place, it’s time to move on and finish up your paper envelope invitation!
Step 2: Create Flap
Creating the perfect paper envelope can be a daunting task, but with just a few easy steps, anyone can make a beautiful and creative invitation card. Step 2 in this quick tutorial is to create the flap of the envelope.
Start by cutting out four pieces of square paper, all with the same measurements. Then fold each corner diagonally towards its opposite side so that all of the triangles overlap at their tips. Next, take one side and fold it over to meet up with its opposite side. This should form an X-shape across your square piece of paper. Flip to the backside and hold down this new shape along all sides for added firmness; you now have created your flap!
Now unfold all folds made previously, leaving only the X-shaped crease visible on both sides of your paper square.
Step 3: Make Sides
Making an easy paper envelope is a simple, affordable way to make invitation cards for any occasion. Step 3 in the Paper Crane Envelope Tutorial is making the sides.
To begin, fold one of the corners of your paper diagonally so that it meets the opposite edge and forms a triangle. Make sure you are folding along the existing crease you created in step 2 and press firmly down with your fingers so that it forms a neat triangle. Next, unfold this triangle and use scissors to cut off the extra piece of paper at the top of your triangle, leaving you with two sides that are equal in length.
Finally, open up your folded sheet and fold your sheet in half again but this time horizontally instead of vertically so that all four corners meet together neatly in the center.
Step 4: Glue and Trim
The fourth step of the paper crane envelope tutorial is gluing and trimming. This step requires some patience and a steady hand, as it involves using hot glue to carefully attach the sides of the paper envelope. Start by applying a small dot of hot glue along the edges of one side flap. Then, press down firmly on the other side flap to make sure that everything is properly attached. Take extra care not to get any glue on your fingers or clothing!
Once both sides are secured, use scissors or an Exacto knife to cut off any excess paper that might be hanging off the edge. This will leave you with a neat, clean envelope shape that’s ready for embellishments or further decorations. For best results, try making several envelopes at once so you can practice until you get just the right look and feel for your project!
Step 5: Personalize
Nothing makes a special occasion more memorable than personalized touches. Step five of the paper crane envelope tutorial is all about creating that personalization for your easy paper envelope invitation card. Whether you’re sending out wedding invitations, birthday party invites, or just a friendly hello to someone you care about, customizing these envelopes will give them something extra special.
Start by determining the color palette and patterns that best reflect your individual style or theme of the event. Consider designing a monogrammed wax seal stamp with an initial for each recipient in an embossing powder-like substance for that extra touch of class. You can also write their name on the front of the envelope with calligraphy or go even further and decorate it with colorful gemstones or glitter glue! Allowing yourself the creative freedom to design something unique and memorable gives these envelopes a truly personal feel.
5. SNOWFLAKES: Glitter Foam Paper Snowflakes For Christmas Decorations | DIY Paper Snowflakes Glitter
Crafting Your Own Snowflakes
Nothing says wintertime like a flurry of snowflakes! Crafting your own paper to make beautiful snowflakes is an easy way to bring a bit of the Christmas spirit into your home. Whether you choose foam paper, glitter, or regular paper, you can quickly create stunning decorations that are perfect for the holidays.
Snowflake making is an enjoyable and creative activity that can be done with children as well. All you need is some scissors and a little imagination and suddenly you have unique pieces of art adorning your windows or walls! Choose from traditional white snowflakes or go bold by using bright colors—the possibilities are endless! With these simple instructions, crafting gorgeous DIY snowflakes will be a breeze.
Materials Needed
For those looking to add a bit of sparkle to their holiday decorations this year, look no further than glitter foam paper to make beautiful snowflakes. This simple DIY project is easy enough for even the most novice crafters, and it will make your Christmas decorations stand out from the rest. All you need are a few basic materials and some creativity to get started on your own Glitter Foam Paper Snowflakes.
To begin, you’ll need foam sheets in white or any color of your choice, a pair of scissors, white glue or a hot glue gun, and glitter of various colors. If you don’t have craft scissors on hand at home, regular school scissors can also be used; just be sure they are sharp enough to cut through the foam sheets without too much trouble.
Making the Star Pattern
Making the Star Pattern is a great way to make beautiful snowflakes for your Christmas decorations. Not only are they easy to make, but they also look beautiful and add a special touch to any home. This DIY Paper Snowflake Glitter tutorial will show you how to make the star pattern in five simple steps.
First, begin by cutting out paper stars using scissors or an X-Acto knife. Make sure that each star is of equal size and shape so that when you assemble them together it looks symmetrical. Next, decorate the stars with glitter foam paper for a unique sparkly effect. Finally, use hot glue or tape to attach all of the stars together in a circular pattern resembling a snowflake shape. Once complete, hang your custom snowflakes from a string around your home or use them as centerpieces on tables for an added winter wonderland feel!
Adding Glitter to the Snowflakes
Adding Glitter to make beautiful snowflakes has never been easier! With this simple DIY project, you can create your own snowflakes for Christmas decorations that will sparkle and shine like a winter wonderland. Not only is this an easy craft for even the least experienced crafter, but it’s also affordable, quick, and fun! All you need are some glitter foam paper to make beautiful snowflakes and a few other items easily found around the house. This tutorial will show you how to make your own beautiful glitter foam paper snowflakes for festive holiday decorations in no time. So pull out those craft supplies and get ready to make your very own sparkling winter masterpiece!
Final Thoughts
In conclusion, Make Beautiful Snowflakes is a fun and easy activity that anyone can do. No matter your age, or your artistic ability, you can create amazing designs with just a few simple steps. All you need are some scissors, paper, and a little bit of creativity. You can make snowflakes to decorate your windows or hang from the ceiling – the possibilities are endless!


