


Crafting Christmas decorations can be a fun and rewarding experience for all ages. With the holidays quickly approaching, now is the perfect time to get creative and make something special for your home or office. This article will guide you through the process of making an easy Christmas tree using glitter foam paper. Not only is this craft project fun to do with family and friends, but it also makes a great centerpiece or mantle decoration.
Christmas is right around the corner and it’s time to start getting creative with holiday decorations. Making an easy Christmas tree with glitter foam paper is a great way to get in the spirit of the season. All you need are some basic crafting materials such as foam paper, glue, and scissors.
Foam paper comes in many different colors, allowing for plenty of creativity when making your very own festive Christmas tree! Glue can be used to attach pieces together, create layers and make 3D designs if desired. Scissors can also come in handy for cutting unique shapes out of foam paper for more intricate designs. For those who want an extra sparkle, glittery foam papers let you add a bit of glitz and glamour to your decorations.
With these simple materials, you too can craft yourself a beautiful handmade Christmas tree this holiday season!
Decorating the tree is one of the most beloved Christmas traditions for many families. Every year, people look forward to transforming their homes into a festive winter wonderland with twinkling lights and shiny ornaments. If you’re looking for a crafty way to make your tree stand out this holiday season, consider making easy Christmas tree decorations with glitter foam paper.
This project is perfect for all ages and requires few materials. Using stencils or templates, you can quickly cut out pieces of glitter foam paper in different shapes such as stars, trees, and snowflakes. You can then decorate the pieces by adding ribbons or strings to hang on your tree. The finished product will not only add an extra sparkle to your home but also provide hours of fun as you create unique decorations together as a family!
1. Making Easy Christmas Tree With Glitter Foam Paper – Christmas Tree Decoration Ideas – DIY & Crafts
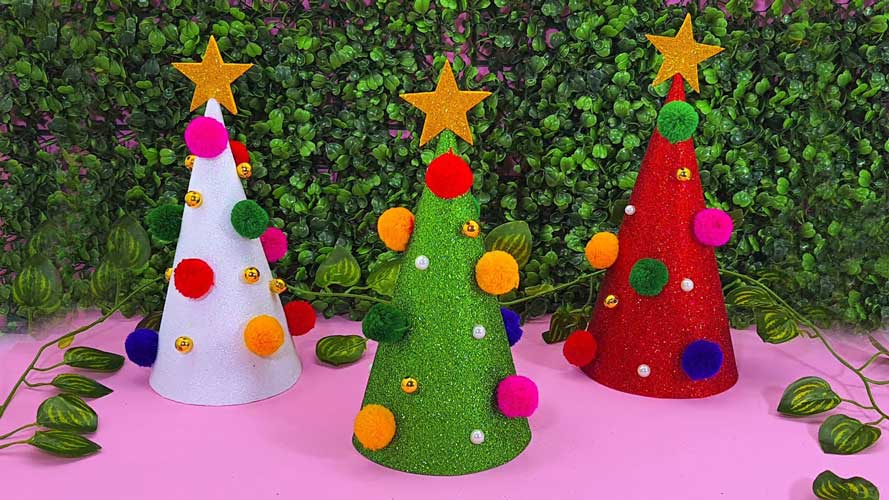
Christmas Tree Decoration Ideas
Christmas is just around the corner and it’s time to start thinking about decorating your tree. If you are looking for a unique, yet easy way to decorate your Christmas tree this year, then making glitter foam paper decorations could be the perfect project for you. With these DIY craft ideas, you will be able to create fun, sparkly ornaments that will bring some extra holiday cheer into your home.
Making decorations with glitter foam paper is a fun and simple way to add a special touch of magic and glamour to your Christmas tree. All you need are some pieces of foam paper in different festive colors like red, green and gold; along with some glue and glitter. You can use cookie cutters or card templates to make stars, holly leaves or any other shape of decoration that takes your fancy.
Supplies Needed
Making your own Christmas tree is always a fun and creative way to celebrate the holiday season. With this easy DIY craft, you can make a glitter foam paper Christmas tree that will light up any room with festive cheer. All you need are some basic supplies to get started.
To create your glitter foam paper Christmas tree, you’ll need green or white glitter foam paper, scissors, glue sticks (or liquid glue), and decorative accessories such as ribbons, pom-poms or bells for extra sparkle. You might also want to have a ruler on hand to help with precise measurements when cutting out the shapes for your tree. Once you’ve gathered all of these items together, then it’s time to start crafting!
Step 1: Create a Template
Making a Christmas tree out of glitter foam paper is an easy and stylish way to add some holiday cheer to your home. With just a few simple supplies, you can make a beautiful tree that will bring sparkle and joy to your festive decorations. Step one in creating your own DIY glitter Christmas tree is creating the template.
Using scissors, create two shapes for each side of the tree – one large triangle and one slightly smaller triangle. Make sure that all four sides match in size as this will be the basis for creating your Christmas tree. Once you’re happy with the shape, use it as a template to cut out several pieces of glitter foam paper using scissors or a craft knife. You can also use the template shape to trace onto other colorful paper if desired, such as metallic or patterned cardstock.
Step 2: Cut Out the Pieces
Step 2: Cut Out the Pieces is an essential part of DIY Christmas Tree Decoration Ideas. Creating a beautiful and unique looking Christmas tree out of glitter foam paper can be easy, fun and rewarding! Before you begin cutting out the pieces, it’s important to get ready with your supplies. You will need a pair of scissors, a sheet of colorful glitter foam paper, some glue, and markers or colored pencils to decorate your tree when it’s done.
To start cutting out the pieces, begin by tracing out all the shapes that you need for your tree on foam paper with a pencil. Once you have all the shapes traced out on the foam paper, use your scissors to cut them out as accurately as possible. Make sure that you also leave some extra space around each shape so that you can make adjustments if needed later.
2. Exclusive Christmas Angel Making For Xmas Decoration | Beautiful Christmas Angel With Glitter Paper
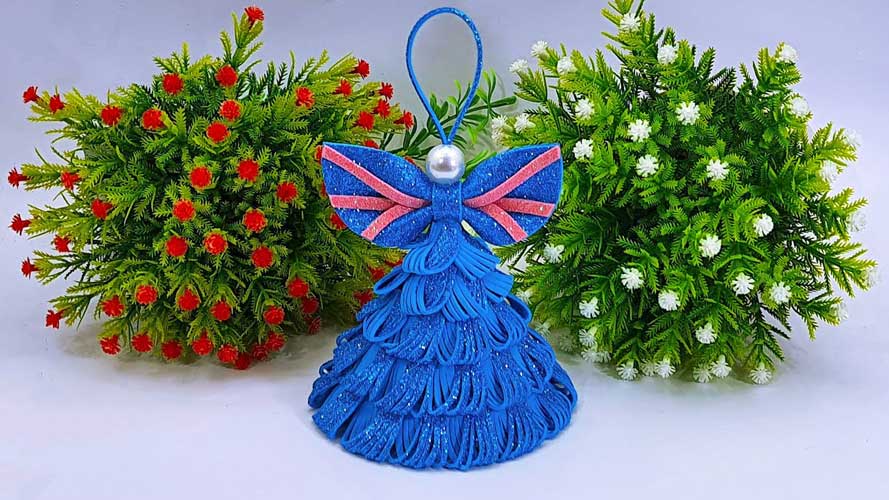
Christmas Angels
The Christmas season is a time for giving and being with loved ones. To make the holidays extra special this year, why not try your hand at making some exclusive Christmas angels? With just a few craft materials like glitter paper and adhesives, you can create beautiful decorations to really get into the festive spirit.
Making unique art pieces to decorate your home gives it an even more magical atmosphere during this special season. With creativity and care, you can even make them in various sizes or shapes to hang up around your house or tree. Crafting these Christmas angels will definitely spread joy throughout the house while still staying within budget! Not only are they easy to make but also very fun activities that you can do by yourself or with family and friends.
So don’t wait any longer – start creating those amazing Christmas Angels today!
Supplies Needed
Christmas Angels are the perfect festive decoration for the holiday season. This exclusive Christmas Angel-making tutorial will provide you with everything you need to make a beautiful Christmas Angel out of glitter paper. To get started, here are some supplies that you will need:
First and foremost, you’ll need some good-quality craft paper in a variety of colors. You can pick up basic white or cream-colored cardstock at any craft store and then add on specialty papers like glittery or textured sheets to lend your angel some extra sparkle. You will also require an assortment of art supplies such as scissors, glue, paintbrushes, pencils, and markers. Furthermore, ribbons and other embellishments can be used to further customize your angel. Finally, don’t forget to have fun!
Step-by-Step Guide
For all the crafty Christmas lovers out there, we have a special treat for you this festive season! This exclusive step-by-step guide will help you create your very own beautiful Christmas angel with glitter paper. Whether it is to add some sparkle to your home decorations or as a heartfelt gift for someone special, this DIY project is sure to catch everyone’s attention and spread the holiday cheer!
This easy and fun tutorial will walk you through all the necessary steps of making an angel from scratch. Here’s what you’ll need: cardstock paper (preferably golden or silver), scissors, glue, watercolor paint (for color if desired), and of course glitter! With these materials in hand, get ready to bring your beautiful Christmas angel into existence.
Tips & Tricks
If you’re looking to get creative this Christmas season, consider making your own Christmas angels. Making these festive decorations are a fun activity for the whole family, and it can help set the holiday mood. Not only that, but you’ll have your own unique decorations to liven up your home!
Here are some tips on how to make an exclusive Christmas angel with glitter paper. Gather supplies like scissors, glitter paper, glue or tape, and craft sticks. Cut out two wings from the glitter paper using scissors and attach them onto each side of the craft stick with glue or tape. Then cut out a round shape for the head or use a foam ball for a quicker option – just remember to add some eyes if you choose foam balls! To finish off the angel’s look add long strips of glitter paper around its body and voila!
Variations & Alternatives
When Christmas comes around, everyone looks for unique ways to decorate their home. If you’re looking to add a special touch of glitter and sparkle this festive season, why not try your hand at making an exclusive Christmas angel? This beautiful decoration is made from glitter paper and will be sure to add a touch of sophistication and elegance.
This DIY project is surprisingly easy to make and can be done with items you probably already have in your home. All you need are scissors, glue, glitter paper, felt or fabric scraps, ribbons and some string. With just these few supplies you’ll be able to create a stunning piece that will make for a delightful addition to any Xmas decorations display. There are also plenty of variations available online so you can customize the angel according to your own tastes.
If making an angel isn’t quite up your alley, fear not!
3. Incredible Christmas Angel Making For Christmas Decorations | Hanging Christmas Tree Ornaments
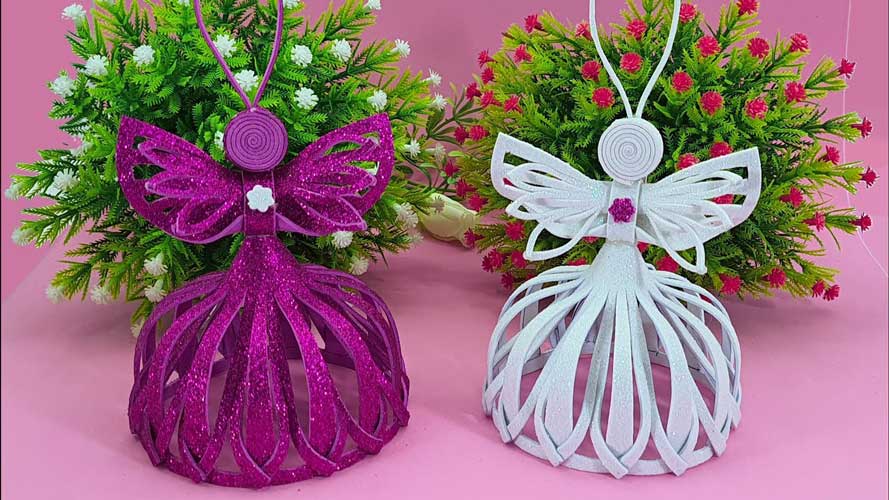
Incredible Angel Making
Making Christmas decorations for the holidays has never been easier than with incredible angel-making! This traditional holiday decoration is sure to bring joy and cheer to your home this holiday season. For those looking to add a touch of elegance to their Christmas tree, nothing looks more beautiful than a hand-crafted angel. With these easy steps, you can craft perfect angels that are sure to make wonderful hanging ornaments on your tree.
To get started, gather all the supplies you’ll need including white cardstock paper, scissors, tape, glue, and glitter. Cut out two wings and an oval body shape from the cardstock paper. You can trace around a template if needed for accurate shapes and sizes. Use tape or glue along the edges of each piece to attach them together in the shape of an angel figure.
Materials Needed
The Christmas season is just around the corner and it’s time to start thinking about creating your Christmas decorations. Making your own hanging Christmas tree ornaments, such as incredible angel figures, can be a fun, festive activity for all ages. To make these amazing angels, you will need some basic crafting materials like foam board, fabric scraps in different colors or patterns, a glue gun, and glue sticks, acrylic paint, and a pair of scissors.
Additionally, you will need an image of an angel that you can use as a template for this project; several options are available online if you don’t have one on hand. You should also gather up some clear thread or fishing line so that you can hang the finished angels from your tree once they are completed.
Step One: Crafting the Angel
The Christmas season is a time of joy and celebration, and what better way to get into the spirit than with a handmade Christmas angel ornament? Crafting an angel for your tree is a great way to show off your creative skills while adding some personalized style to your holiday decorations.
Starting with the basics, there are several options available when it comes to the materials you will need for crafting the perfect angel. Depending on how intricate you want to get, you may need wire, fabric scraps, paper mache, ribbon, glitter and glue. Gather up all of these materials before beginning this project so that you can have everything ready as soon as inspiration hits! With these supplies in hand, it’s time to start crafting!
To begin crafting your angel ornament, start by deciding which shape works best for your design – round or pointed.
Step Two: Adding Detail
Creating a beautiful Christmas tree is a great way to get into the holiday spirit. Adding details such as ornaments, lights, and garlands can help bring your tree to life and capture the joy of the holiday season. Step two in creating an incredible Christmas angel making for Christmas decorations includes adding detail for an even more festive look.
The materials you will need for this step are basic craft supplies including fabric, craft glue, sequins, buttons, glitter glue, ribbons, and any other decorative items of your choosing. Start by cutting out the shape of your angel from fabric with scissors or use premade felt cutouts from a craft store to make things easier. Once you have the fabric cut out you can begin adding details like eyes with buttons or sequins and wings with ribbons or beads.
Step Three: Attaching to Ornament
Creating the perfect Christmas angel ornament is easy and fun! Step three of this incredible craft is attaching the angel to the ornament. To begin, prepare your materials: thin wire, small scissors, and a loop or hook for hanging. First, cut a piece of wire that is approximately 6 inches long. Fold it in half to create a loop at one end. Then, thread the loop through the hole in the top of your angel’s head until both ends are sticking out on either side.
Next, wrap each end around itself several times to secure it firmly to your ornament; this will also help keep it from slipping off when hung up on a tree or mantelpiece. Finally, attach your hook or loop for hanging onto the top of your angel’s head by pushing its open end into one of the wire loops you created earlier – voila!
Step Four: Hanging on Tree
This article will discuss the fourth step in creating incredible Christmas angel decorations for hanging on a Christmas tree. If you’ve been following our guide, you’ll now have wings, a head, and a body for your angel crafted from felt and fabric. Now it’s time to put them together and hang them on the tree. This is an easy process that can be completed in no time at all!
To start, gather all of your materials – the felt wings, head, and body – as well as any other items you may have chosen to add such as sequins or ribbon. Place the body on top of one of your wings so that they are back-to-back and sew through both pieces using a contrasting thread color for decoration purposes.
4. DIY Christmas Angel Making With Eva Glitter Foam For Christmas Decoration – Christmas Tree Ornaments
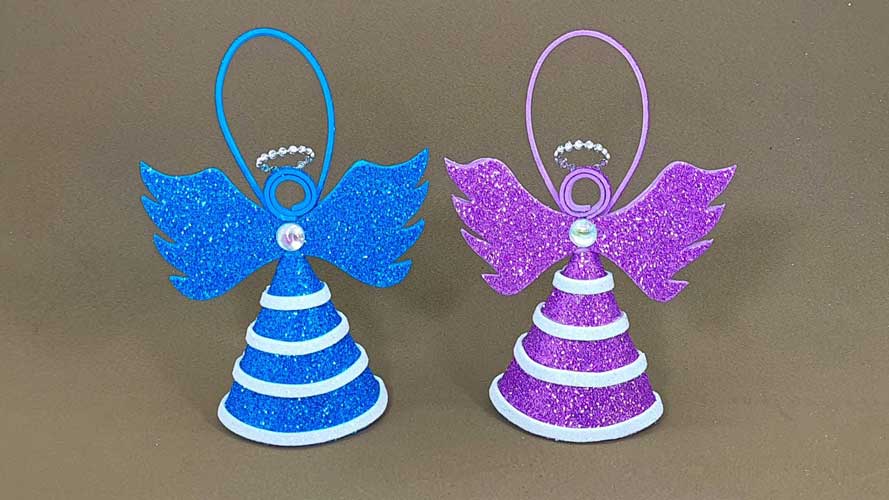
Making Angels with Eva Glitter Foam
Making Angels with Eva Glitter Foam is the perfect way to add some sparkle and shine to any Christmas tree. This easy DIY project takes only a few simple materials, making it an ideal craft for people of all ages. Eva Glitter Foam is a lightweight, flexible foam that can be cut into different shapes and colors, making it a great choice when crafting your own unique angels for the holiday season. With just some scissors and decorative items like glitter or ribbon, you can make your own little angels in no time at all!
These homemade decorations are sure to bring plenty of cheerful smiles during the festive season. The designs are entirely up to you – go wild creating unique wings, halos, and more! You’ll find that once you get started with this craft project, there’s really no limit to what you can create!
Materials Needed
Do-it-yourself Christmas angel-making with Eva glitter foam is a fun and creative way to spruce up your holiday decorations this year. The best part? You don’t have to worry about gathering the necessary DIY supplies, as they are all readily available online or at your nearby craft store. To make your very own festive Christmas angels for your tree ornaments, you’ll need some basic materials – including Eva glitter foam, scissors, and a hot glue gun.
Eva glitter foam is an excellent choice for crafting handmade holiday decor because it’s lightweight enough to hang on branches of the tree yet strong enough that it won’t easily break due to its sturdy construction. Plus, it adds a unique sparkly touch to the finished product! You will also need scissors in order to cut out the shapes of the angels from the Eva glitter foam material.
Steps to Make Angel
Are you looking for a fun, easy way to make your own Christmas decorations this holiday season? Eva glitter foam is the perfect material to create your very own homemade angels. These sparkling angels can be used as a tree ornament or table centerpiece to add a festive touch to your home. Follow these simple steps and get ready to bring some Christmas cheer into your home!
To begin, you will need some 3mm Eva glitter foam, scissors, and an angel-shaped template. Start by printing out the template and cutting it out of the Eva glitter foam using scissors. Make sure that all of the details are cut clearly so that they are visible on the finished product. Once you have all of your pieces cut out, start assembling them together in order from head to toe. You may want to use glue dots or tape for additional support when connecting each piece together.
Personalize Ornaments
The holiday season is a time to get creative — and with Eva Glitter Foam, you can create your own DIY Christmas angels for personalized ornaments! This product is made from foam sheets that come in glittery colors, allowing you to make personalized ornaments like angels and stars. Get your supplies ready, because we’ll show you how easy it is to make the perfect ornament. With just a few basic materials and some crafting skills, you’re on your way to creating unique Christmas tree decorations that will last all season long.
Not only do these custom creations make great gifts but they also add a special touch of personality to any home decor theme. So grab some scissors, glue gun, markers, and Eva Glitter Foam sheets to start making beautiful Christmas ornaments today!
Crafting Tips for Kids
The holiday season is here and parents are looking for creative ways to make DIY Christmas decorations with their kids. Crafting can be a great way to bond with your children and have fun making something special together. One of the best materials for crafting with kids is Eva glitter foam, which can be used to create a range of decorations perfect for the festive season. In this article, we offer some tips on using Eva glitter foam to make adorable Christmas angels that can be hung on your tree as ornaments.
Eva glitter foam comes in a variety of colors and textures, so you can easily customize your creations to match the style of your home’s holiday decor. It’s especially easy to use when making Christmas angels – just cut out two wings, draw an angel face on one side, stuff it with cotton wool and then glue all sides together.
Fun Ideas for Decoration
The holiday season is just around the corner and it’s time to start thinking about decorations for your home. If you’re looking for something unique and fun, why not try making some DIY Christmas angels with Eva Glitter Foam? These gorgeous ornaments will add a festive touch to your Christmas tree, mantelpiece, or window display.
Eva Glitter Foam is an easy-to-use craft material that can be cut into any shape you choose. With its shimmery texture, it’s perfect for creating beautiful angel decorations. It’s simple to assemble too – all you need are scissors, craft glue, and some basic sewing skills.
5. Amazing Christmas Angel Making Tutorial – Easy Christmas Decoration Ideas – Christmas Tree Ornaments
Christmas Angel Making
Christmas angel making is a fun, creative way to make unique decorations for your Christmas tree. This amazing tutorial will show you all the steps you need to create beautiful and festive angels that look like they were made by a professional! Whether you are a beginner or an experienced crafter, this guide will provide easy instructions on how to make these delightful angels that anyone would be proud to hang on their Christmas tree.
The materials required for this project are simple and inexpensive – all you need is some cardstock, scissors, glue, string, and any other embellishments of your choice. You can also use coloring pencils or markers to add extra detail if desired.
Materials Needed
The holiday season is right around the corner, and it’s time to start making your own decorations! With this amazing Christmas angel-making tutorial, you can create beautiful angels that will look perfect on your Christmas tree. All you need are a few simple materials to get started.
To make these festive angels, you’ll need some cardstock paper in colors such as white or light pink. You’ll also need scissors, glitter glue or paint for decoration, a ruler for measuring and cutting straight lines, double-sided tape for assembling the pieces together, and a marker for writing angel messages. Additionally, if you have some string or ribbon handy, it would help with hanging the finished product on your tree.
Once you have all of your supplies ready to go, then it’s time to get creative!
Steps for Making the Angel
This Christmas, create a beautiful angel for your Christmas tree with this easy-to-follow tutorial. This Amazing Christmas Angel Making Tutorial will provide you with simple yet creative steps to make the perfect holiday decoration. Not only will you have a festive ornament for your tree but also a homemade masterpiece that is sure to spark joy in everyone who sees it. Let’s get started!
First, gather materials such as foam sheets, white yarn, large and small beads, scissors, and a hot glue gun. Start by cutting out two identical wings from the foam sheet and glue them together at the center of an oval shape body which can be made from two pieces of foam or one single piece folded in half. Now wrap some of the white yarn around the edges of the wings and body to give it an angelic look.
Decorating the Angel
The Christmas season is a time for decorating, and there are few decorations more iconic than the angel. This timeless symbol of faith and hope brings joy to people young and old as they hang it proudly on their trees. With this amazing tutorial, you can make your own beautiful angel decoration with ease! These easy-to-follow instructions will show you how to create an eye-catching piece that’s sure to be the focal point of your holiday display. You won’t need any special supplies – just some basic craft materials like felt, ribbon and glue are all that’s needed to put together this unique and meaningful ornament. So get ready to create something special this Christmas – let’s get started decorating the angel!
Displaying the Angel
Paragraph 1: With Christmas around the corner, it’s time to start thinking about decorations! One of the most festive and fun decorations is an angel. The angel is a classic symbol of Christmas and has been used in many holiday decorating traditions for centuries.
Paragraph 2: Creating your own angel ornament will be sure to bring some extra joy to your tree this year! This amazing tutorial will show you step-by-step how to make a beautiful and unique angel ornament that is sure to be a conversation starter for all your family and friends. Not only will it make a great addition to any Christmas tree, but it also makes a wonderful gift for someone special in your life.
Paragraph 3: So, get ready to spread some cheer with this easy DIY project!
DIY Variations
Looking for a unique decoration idea to add to your Christmas tree this year? Look no further than making your own Christmas angels. This amazing tutorial will walk you through the easy steps of creating beautiful, homemade angel decorations that can be used as tree ornaments or gifted to friends and family. With different DIY variations available, you will be able to customize each angel according to your style and preferences. Whether you’re a beginner crafter or an expert, this guide will provide all the materials and tips necessary for crafting these festive decorations. Get creative and start making your own Christmas angels today!
Final Thoughts
In conclusion,the Christmas Tree With Glitter Foam Paper project is a fun and easy way to get into the holiday spirit. Not only is it enjoyable to create, but it also makes an eye-catching decoration for your home during the holidays. It’s super simple to make and requires very few materials. Plus, this project can be adapted for any holiday or occasion! Get creative and have fun putting together your own festive piece of art! So what are you waiting for?


