


Flower-making is a fun and creative way to bring beauty into your home. It’s an activity that has been around for centuries, dating back to the ancient Egyptians and their use of papyrus flowers. With so many different materials and techniques available today, you can create beautiful flower arrangements with ease. From paper flowers to fabric blooms, there are a variety of ideas that you can use to make interesting and unique floral pieces.
Flowers are a universal way of expressing love, gratitude, and appreciation. Flower-making is an activity that can be enjoyed by people of all ages and skill levels. With a little creativity and effort, you can make your own beautiful flowers in a variety of styles, colors, and sizes. In this article, we will discuss some fun flower-making ideas that you can use to create stunning floral arrangements.
1. Learn How To Make Foam Paper Flowers – Flower Making Ideas With EVA Foam Paper – DIY Flowers Easy
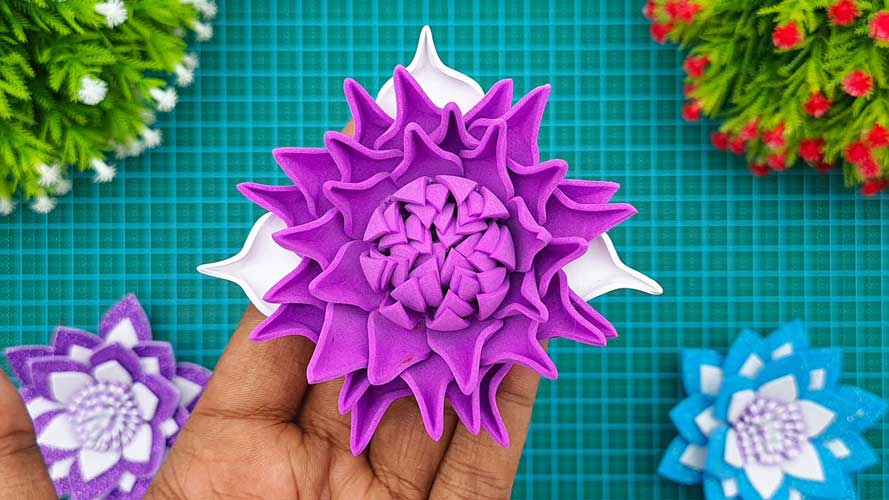
Foam Paper Flowers
Foam paper flowers are the perfect way to show your creative side! Whether you’re looking to make a unique gift for someone special, or simply want to create something beautiful to display in your home, foam paper flowers are sure to bring joy and beauty. With these easy flower-making ideas and EVA foam paper, you’ll be crafting stunning flowers that look just as good as real ones.
Making your own foam paper flowers is a great DIY project for anyone who loves crafting or wants to get creative with their decorations. All you need are some colorful sheets of EVA foam paper, scissors or a craft knife, and glue. With the help of our simple step-by-step tutorials, you’ll be able to create gorgeous blooms in no time!
Crafting Supplies: What You Need
Creating beautiful foam paper flowers is a fun and easy craft for all ages. It’s a perfect way to add decoration to your home, office, or special event. To get started crafting your own paper flowers, there are several essential supplies you will need.
The most important thing you will need is the foam paper itself. Look for EVA Foam Paper specifically designed for crafting – it’s thicker than regular foam paper, making it easier to manipulate into the desired flower shape. You should also have scissors on hand for cutting the petals of your flower as well as any leaves you might want to include in your design. For added texture and color, look for fabric paints or markers that can be used to embellish your finished creation. A ruler can come in handy when measuring out pieces of foam paper before cutting them into shapes.
Step 1: Cut Foam Paper
Creating beautiful foam paper flowers is an easy and affordable way to add a splash of color to any living space. This DIY craft project is perfect for both adults and children, as it requires minimal supplies and time. Step 1 in the process of making your own foam paper flower is to cut the foam paper into desired shapes.
To start, take your piece of foam paper and draw out the shape you would like to cut on it with a marker or pen. For larger shapes like petals, use scissors instead of a blade or craft knife; they will allow you to make more precise cuts without risking tearing or fraying the fabric. If you are creating smaller details such as stamens or pistils, then you may want to opt for using a craft knife for sharper edges.
Step 2: Construct Petals and Leaves
Making foam paper flowers is a great way to spruce up your home or add a unique touch to your next gift. Step 2 of this DIY project is creating the petals and leaves of the flower. You can use different shapes and sizes of EVA foam paper for this step. For example, if you’re making a rose, cut one large oval shape piece as the main petal, then cut smaller petals around it for texture. Use an X-acto knife to make leaf-like shapes for greenery around your flower.
Once all the pieces are cut out, you can start assembling your flower. Start by adding glue along the edges of each petal and layering them onto each other in a circular pattern until they form the outer layer of your flower.
Step 3: Assemble Flowers
Creating beautiful foam paper flowers can be a fun and rewarding project. Step 3 of the flower-making process is to assemble the flowers. This step requires you to take all of your created petals and leaves, and arrange them in a way that will form a complete flower. To begin, place the larger petals on each side of the center portion of your flower. Next, layer smaller petals around these larger ones to create fullness and texture for your design. Finally, attach any leaves or other decorative elements you may have created earlier to help add finishing touches. With some patience and creativity assembling these foam paper flowers is simple enough for anyone to do!
Step 4: Decorate with Glitter
If you’re looking for a little extra sparkle in your foam paper flower craft, then look no further than glitter! Glitter can give any DIY flower an instant dose of glamour. Applying glitter to your foam paper flowers is the fourth and final step in making these beautiful creations. In order to get started, you should have all of your materials on hand: EVA foam paper, scissors, glue gun, and a variety of colors of glitter.
The first thing to do is decide what parts of the flower will receive the glitter treatment – it can be applied to the petals or even around the edges of leaves. Once you have chosen which areas will be glittered up, use a hot glue gun to attach small amounts of adhesive to those areas. Sprinkle generously with glitter and shake off any excess particles before they dry.
Step 5: Arrange a Bouquet
Arranging a bouquet from foam paper flowers is the icing on the cake in the flower-making process. With all of your hard work and effort put in, you are now ready to put together a beautiful arrangement. To get started, grab your foam paper flowers, scissors, and a glue gun. Begin by arranging them into clusters or bunches of 3-5 blooms; this will give your bouquet an aesthetically pleasing look.
Once you have arranged them, use the glue gun to secure each cluster together so that they stay intact when handled. Then simply tie twine around the stems of each bunch to create a handle for easy carrying and presentation. Finally, add some fresh foliage such as eucalyptus leaves or ferns to complete your masterpiece! You can choose whatever colors and shapes you like to make it unique – it’s up to you!
2. DIY Multicolored Foam Paper Flowers – Handmade Foamiran Flower Craft – Easy Glitter Foam Flowers
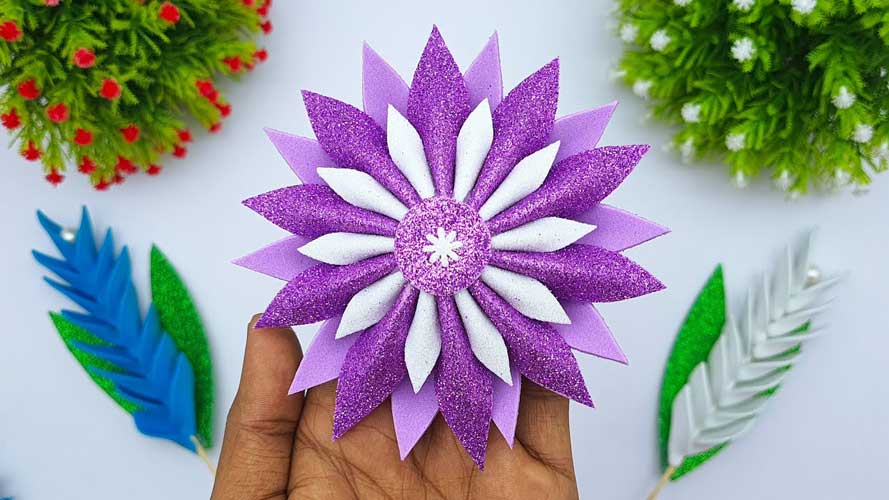
DIY Foam Flower Crafts
DIY foam flower crafts are one of the easiest and most affordable craft projects you can make at home. Whether you’re creating a floral centerpiece for your dining room table or simply want to add some color to your living space, handmade foamiran flowers are the perfect way to do it! Plus, with a little bit of glitter and paint, you can easily customize each flower’s look and give them an extra special touch.
Foam paper flowers are easy to make and require only a few basic supplies: foam sheets in different colors, a pair of scissors, a glue gun, glitter, and paint. All you have to do is cut out the petal shapes from the foam sheets, assemble them together using glue gun adhesive (or double-sided tape), then add sparkle with glitter or colored paints.
Materials Needed
DIY Multicolored Foam Paper Flowers are an easy and fun craft to make with your kids. Handmade Foamiran Flower Crafts can be simple and creative, allowing you to express yourself through beautiful art. This DIY project uses glitter foam paper flowers to create a stunning display piece you will be proud of.
To begin this project, there are some essential materials you will need to get started on making your own colorful flower pieces. You’ll need foam paper in various sizes and colors, scissors or a cutting machine, a glue gun, paper clips, masking tape, and glitter for decoration. A few additional items that would come in handy include pencils for sketching the pattern onto the foam paper or tracing design templates onto the sheets. Depending on what type of stem you want for your flowers, you may also want to purchase pipe cleaners or floral wire.
Step 1: Paper Cutting
Making multicolored foam paper flowers is an easy, fun craft activity that anyone can enjoy! Whether you’re looking to add a splash of color to your home décor or to make some lovely homemade gifts for friends and family, this tutorial will provide step-by-step instructions for creating beautiful glitter foam flowers. Step one in this process is paper cutting.
All you need is a few sheets of foamiran paper and some scissors. Start by selecting the colors that you wish to use and then cut them into small strips about half an inch wide, making sure that each strip is no longer than six inches in length. If you have difficulty cutting the strips with scissors, try using a ruler or straight edge along with a craft knife or blade cutter instead. Once all strips are cut out – voila! You’ve successfully completed step one: Paper cutting!
Step 2: Forming the Base
Do you want to add a colorful, handmade touch to your décor? Look no further than DIY multicolored foam paper flowers! Not only are these fun and easy to make, but they also add a sparkle of glitter for an extra special effect. Whether you’re looking for decorations for a party or just something to brighten up your home, making these handmade foamiran flower crafts is sure to bring a smile to everyone’s face.
Step 3: Adding Color & Glitter
Creating foam paper flowers is an easy and fun DIY craft project. Step 3 of the process is adding color and glitter to these unique blooms. Start by picking out your favorite colors – you can use standard acrylic paint, fabric dye, or even food coloring! Once you have your colors ready, it’s time to start painting. Use a thin brush to apply the paint evenly over the petals of each flower.
If you want to add some extra sparkle, finish off with a coat of glitter glue or spray-on glitter. You can also mix some glitter into the paint itself for an even more dazzling effect. With just a few simple steps, you’ll be able to create beautiful multicolored foam paper flowers that will bring life to any room!
Step 4: Assembling the Flowers
Creating beautiful multicolored foam paper flowers can be done in a few easy steps. Step 4 of the process is assembling the flowers. This part of the project requires patience as it takes time and careful attention to detail to arrange each petal and leaf, but with practice, you can create stunning floral designs!
The foam paper petals are cut out and ready to be assembled. Start by gluing two similar colored petals together with a glue gun or hot glue, making sure they overlap slightly at the edges. Continue adding more petals one by one until you have your desired flower shape. To give your flower an extra dimension, use a craft knife or scissors to trim or add details to any of the petals. When all of the petals are complete, attach them to each other along their overlapping edges using hot glue for added stability and structure.
3. 🌸 Foam Sheet Flowers Craft 🌸 | Learn How To Make Rose Flowers | Foam Paper Rose | Paper Flower
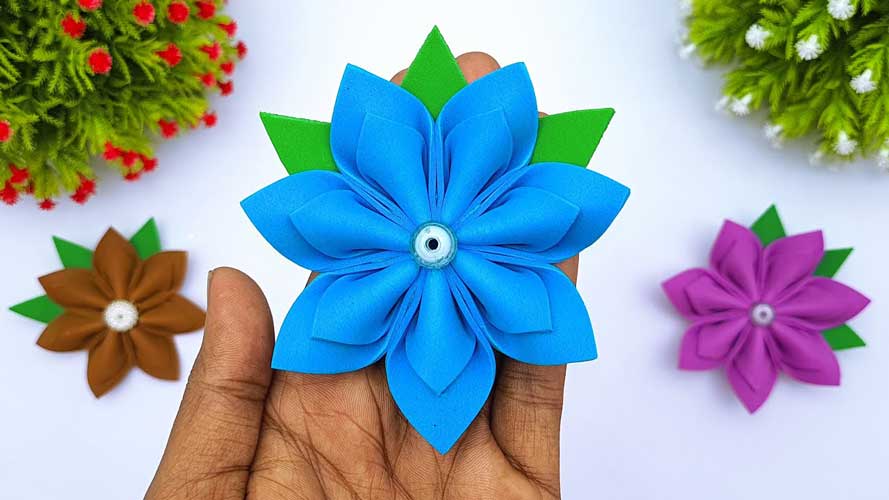
Foam Sheet Flowers
Foam sheet flowers are a beautiful and creative craft idea that can be used to decorate any room or event. This simple and easy-to-follow tutorial will teach you how to make rose flowers out of foam paper so that you can create your own beautiful flower arrangements. Whether you’re looking to spruce up your home décor or need handmade decorations for an upcoming special occasion, these foam paper roses will do the trick!
With minimal supplies needed, this project is a fun way to add some color and texture to any space. Not only are they budget-friendly but also incredibly customizable – allowing you to make each flower unique in its own way. So let’s get started on making these stunning and vibrant foam sheet roses!
Supplies Needed
Foam sheet flowers are a popular craft item, perfect for adding a bit of extra beauty to any decor. In this article, learn how to make colorful rose flowers from foam paper that will last for years! With just a few simple supplies and some creativity, you can easily create these beautiful paper roses in no time.
To get started on your foam sheet flower project, you’ll need some basic crafting materials like scissors, glue, and foam sheets in various colors. You’ll also need thin wire which can be used to shape the petals of your roses. If you plan on making several pieces, it’s helpful to have several different sizes of flower cutters available as well as a variety of colored pens or markers for adding detail. Finally, don’t forget the most important supply – plenty of imagination!
Creating the Paper Rose
Creating the Paper Rose is a craft that can be enjoyed by people of all ages. Crafting with paper has never been easier or more fun, and creating a paper rose is no exception! This simple project requires few materials and only basic tools, making it accessible to everyone. With some colored foam sheets and scissors, you can create beautiful roses that will last for years to come.
To begin the project, simply cut out seven petals from the foam sheet in varying sizes. Once these are cut out, you can make as many roses as desired just by adjusting the size of the petals. After cutting out each petal, roll them up tightly starting with the smaller pieces first and then moving on to larger ones; this will give your flower its signature rose shape. Finally, use glue to secure the petals together at their base for a lasting design!
Making Foam Paper Rose
Making Foam Paper Roses is a creative and simple craft that can be done with the help of foam sheets. These sheets are easily available in any craft store or online. This craft is ideal for children as well as adults, who want to add a bit of color and beauty to their living space. It’s also a great way to spend quality time with family members by involving them in this activity.
This article will present step-by-step instructions on how to make beautiful rose flowers using foam sheets. To begin with, one needs to cut two circles from the foam sheet using scissors or a cutting machine. Then, one should draw petals on both circles, making sure they are exactly the same size and shape on each circle. After this, place the two circles together and fold each petal along its center line so that it forms an angle when opened up.
Learn How to Make a Paper Flower
Paper flowers are one of the most beautiful and creative ways to decorate your home or office. Whether you want to spruce up a vase, make a bouquet as a gift for someone special, or just add a little more color to your room, learning how to make paper flowers is simple and fun. There are many different styles of paper flower crafting that can suit any skill level from beginner to advanced.
This article will teach you how to make realistic foam sheet roses with simple materials and step-by-step instructions. With the help of this guide, you’ll be able to create colorful foam paper roses in no time! All you need is some foam sheets (or cardstock if desired), glue, scissors, and ribbons for personalization. Follow along as we show you exactly how it’s done!
Altering the Design and Color of Foam Sheet Flowers Craft
Discovering how to create beautiful foam sheet flowers is an excellent way to add a unique touch to various craft projects. But if you want to stand out from the crowd, why not consider altering the design and color of your paper roses? With some simple supplies like colorful foam sheets, felt or fabric, you can transform ordinary flowers into extraordinary works of art!
Begin by researching various flower designs online, as well as looking at pictures in magazines for inspiration. After deciding on a design that appeals to you, select fabrics and foam sheets in coordinating colors or patterns. Consider adding details by cutting out small shapes such as hearts or stars from contrasting felt pieces. You can also use permanent markers and glitter glue pens to further customize your paper roses with special messages or decorative accents.
4. DIY – Rose Flower From Glitter Paper | How To Make Rose Flowers | Foam Paper Rose | Paper Flower
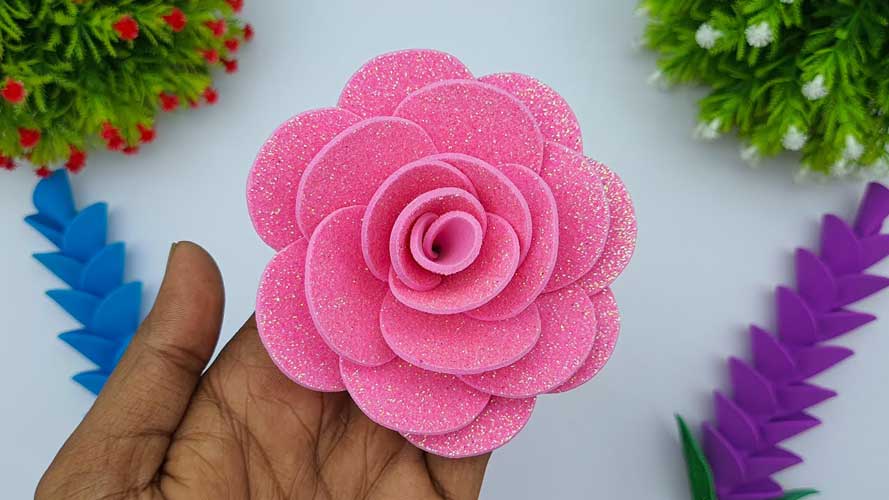
DIY Rose Flower
DIY flowers can be an excellent way to bring a bit of nature indoors, as well as brighten up any room. Making rose flowers from glitter paper is an easy and fun process that requires minimal materials and time. This article will provide step-by-step instructions on how to make beautiful rose flowers from foam paper and glitter paper. With just a few simple supplies, you can create stunning decorations for your home or special event. Read on to learn the secrets behind making this gorgeous DIY rose flowers!
Using glitter paper or foam paper makes this project very budget-friendly, and is also a great way to reuse old materials that might otherwise end up in the trash. You will need scissors, glue sticks, double-sided tape, floral wire (optional), and your choice of either foam or glitter paper for the petals.
Materials: Glitter Paper, Foam Paper
Creating something beautiful and unique doesn’t have to be expensive or difficult. With a few simple materials like glitter paper and foam paper, you can make your own DIY rose flower that will look almost as good as the real thing! Whether you’re looking for a fun craft project or an inexpensive floral addition to your home decor, this is the perfect way to add some roses to the mix.
This guide will walk you through how to make rose flowers out of glitter paper and foam paper. Not only will it show you step-by-step instructions on how to put together these gorgeous blooms, but also offer tips on how to customize them so they are truly one-of-a-kind. So grab your supplies and get ready for a DIY adventure that’s sure to leave you with striking results!
Step 1: Cut Glitter Paper
Making rose flowers out of glitter paper is a fun and creative way to spice up any project! This DIY guide will show you how to make a beautiful rose flower from start to finish.
The first step in making your own rose flower is cutting the glitter paper. Make sure it’s long and wide enough to fold into multiple layers, as this will give the petals more depth and dimension. Using scissors or an x-acto knife, cut the paper into rectangular strips that are approximately 1/2 inch thick and 3 inches wide. If desired, the edges can be trimmed with wavy lines for a more distinctive look. Once finished, it’s time to move on to the next step of folding your strips!
Step 2: Roll Petals
Making a rose flower out of glitter paper is an easy and creative way to make a beautiful decoration for any special occasion. In this DIY guide ‘HOW TO MAKE A ROSE FLOWER FROM GLITTER PAPER’, step two will show you the easiest way to roll petals for your foam paper rose.
First, cut five long strips of foam paper in different sizes. The largest strip should be about 2 inches wide and the smallest strip should be 1/2 inch wide. Next, curl each one of the five strips tightly around your finger or a pencil so that it forms a loop at the top – similar to how you would make curls with ribbon or yarn. Lastly, glue the edges of each loop together at their base so they stay in place while you are creating your flower petal design.
Step 3: Attach Petals Together
This is the third step of a project to make rose flowers from glitter paper. Rose flowers are a great decoration for any occasion and will last longer than real roses. They can also be customized in size and color, making them perfect for decorating cards and scrapbooks.
In this step, petals need to be attached together to form the flower shape. Cut out four or five petal shapes from the glitter paper and set aside two of the petals to use as an inner layer later on. Take one of the remaining petals and cut it along its length into two halves without cutting through its base or tip.
Attach these two halves together by overlapping them at their bases; glue them into place for extra stability if desired. Repeat this process with all remaining petal shapes in order to create double-sided petals that will form your rose flower when assembled correctly.
Step 4: Add Foam Paper Center
Making a beautiful rose flower out of glitter paper is easier than you may think! This craft project can be completed in just four simple steps. In the fourth step, we’ll show you how to add foam paper centers to your rose flowers, creating a more realistic look.
When forming your petals from the glitter paper, leave an open center at the end of each petal. Then take a small piece of foam paper and roll it up into a ball shape for the rose center. Place the rolled-up foam in the middle of your flower and flatten it slightly. Make sure that all of your petals are covering part of your foam center so that it does not slip out easily when handling or displaying your flower masterpiece.
Finish off by securing the foam with glue around its edges where it meets with each petal.
5. How To Make Flower By Glitter Foam Sheets – Making Beautiful Paper Flowers Step By Step – DIY Ideas
Making Paper Flowers
Making paper flowers is a fun and creative way to add unique touches to any home décor. With simple materials like glitter foam sheets, it’s easy to turn plain pieces of paper into beautiful blossoms. This DIY guide will teach you how to make flowers with glitter foam sheets with step-by-step instructions and photos.
Create one-of-a-kind decorations for your walls, tables, or anywhere else in your home! Whether you’re looking for an inexpensive craft project or just want some new ideas for decorating your space, making paper flowers is a perfect choice. You’ll be amazed at how quickly these blooms come together and how gorgeous they look when finished!
Step 1: Gather Supplies
Making beautiful paper flowers from glitter foam sheets doesn’t have to be a daunting task. With the right supplies and a few creative ideas, you can be crafting your own gorgeous creations in no time. Step one in this DIY project is gathering the supplies needed for success. To make flowers with glitter foam sheets, you will need scissors, colored glue sticks, thin double-sided tape or craft glue, and of course the glitter foam sheets themselves.
For extra decoration options, consider picking up some extra ribbon or fabric pieces that coordinate with your chosen colors of glitter foam sheet paper. Once all of your supplies are gathered together and presented before you on an even surface, it’s time to get crafty!
Step 2: Cut Foam Sheets
Step 2: Cut Foam Sheets is the second step of the DIY project on making beautiful paper flowers with glitter foam sheets. This step requires scissors and a cutting board or any flat surface for cutting. To begin, you need to cut the glitter foam sheet into desired shapes of your choice using sharp scissors. You can use templates or draw your own flower shape as a guide for cutting out pieces from your sheet.
Make sure that all pieces are cut in the same size and thickness to ensure uniformity in the end product. When finished, place all the cutouts aside and let them dry completely before proceeding to Step 3: Glue Pieces Together. With these simple steps, you now have the necessary materials ready to make beautiful paper flowers with glitter foam sheets!
Step 3: Create Petals
Creating petals for paper flowers is a great way to make your blooms look realistic and vibrant. If you’re looking for a fun and creative craft project, this step-by-step guide will show you how to make petals out of glitter foam sheets.
This method is perfect for making small and large flower petals, as the material is flexible enough to allow you to adjust each petal’s shape according to the design you desire. To start, trace around a circular object onto the back side of your glitter foam sheet with a pencil or marker. Next, cut out the traced circle and use scissors or an X-acto knife to create the desired shape of your petal by drawing wavy lines from one end of the circle’s circumference towards its center.
Step 4: Gluing Petals Together
Making beautiful paper flowers out of glitter foam sheets is a great way to add a special touch to any event. In this fourth step of the DIY project, we will be gluing the petals together. To begin, choose two petals that have been cut from your glitter foam sheet and lay them flat on the table. With your hot glue gun, place small dots of glue in the center of each petal and press them together for about five seconds before moving on to another pair.
Once all your pairs are glued together, use a pen or pencil to roll around the edges in order to secure them even more firmly into place. Make sure not to press too hard as this may cause your flower petals to break apart. Finally, continue this process until all your flower petals have been glued together neatly and securely.
Step 5: Create Centers
Creating flower centers is an important step when making paper flowers from glitter foam sheets. The center of the flower holds the petals together and helps to create a complete look for your finished project. With a few simple supplies, you can make beautiful flower centers that will add visual appeal to your paper flowers.
The most common materials used for creating flower centers are buttons, beads, and felt. Buttons come in many shapes, sizes and colors to help create unique designs for your paper flowers. Beads can also be used as a centerpiece by gluing them onto the edges of the petals or at the base of the stem. Felt pieces can be cut into small circles or other shapes to resemble the center of real-life flowers.
Step 6: Finish your Flower
Step 6: Finish Your Flower is the last of the steps to take in creating beautiful paper flowers with glitter foam sheets. This step helps put the finishing touches on your masterpiece and will give it a polished, professional look. For this final step, you’ll need to gather a few more items: scissors, craft glue, and clear tape. Once you have these supplies ready, it’s time to get started!
First, use scissors to trim around any edges or jagged pieces of foam that weren’t cut properly with the craft knife. Next, use craft glue to attach all of the individual petals onto one another until your flower shape is complete. Finally, reinforce all of your seams with clear tape for extra strength and durability. With all these steps completed, your flower should be finished and as beautiful as ever!
Final Thoughts
In conclusion,flower-making is a great activity for those who love to be creative and have some fun. It can be done with materials that are easy to find, either online or at a craft store. It can also help people relax and express themselves in their own unique way. Furthermore, flower-making can be done alone or with friends and family, making it an activity all ages can enjoy.


