


Welcome to the world of handmade quilling flower art! Quilling is an ancient paper craft that has been around since the 17th century, and it can be used to create beautiful, intricate designs. The results are almost magical – a single strip of paper can be transformed into a stunning 3D flower with just a few simple tools and techniques. In this article, we’ll explore the basics of quilling and show you how to make your own handmade quilling flowers.
Handmade quilling flower art is an ancient craft with a long history of providing beauty and inspiration to home décor. Quilling involves rolling, shaping, and gluing paper strips into intricate designs. With just a few simple materials, anyone can create amazing quilled flower artworks that bring the beauty of nature indoors. This article will provide step-by-step instructions on how to make handmade quilling flowers that are perfect for home décor projects, gifts, and more.
1. DIY Glitter Foam Paper Stick Flowers – Handmade Quilling Flower By Glitter Foam Sheet
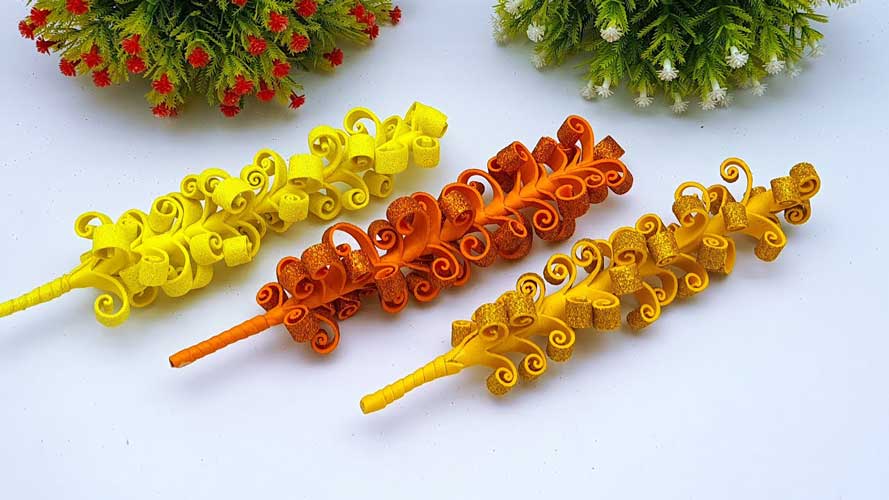
DIY Glitter Foam Flowers
Creating beautiful handmade flowers doesn’t have to be a difficult task. Using some simple materials such as glitter foam paper, quilling strips, and glue, you can make stunning DIY Glitter Foam Flowers in no time! This tutorial will show you how to make these unique paper stick flowers by cutting and shaping the glitter foam sheet into petals. The end result is an eye-catching bouquet of handmade flowers that are perfect for decorating your home or giving away as gifts.
This project requires minimal supplies and offers a fun way to get creative with crafting. All you need is some colorful glitter foam sheets, quilling strips, scissors, glue, and craft sticks. Plus, this project is suitable for crafters of all skill levels – beginners will find it easy enough to complete while more experienced crafters will appreciate the challenge of making such intricate designs poses.
Materials: Glitter Foam Paper, Quilling Tool, etc.
Are you looking for a fun and creative way to make unique decorations? DIY glitter foam paper stick flowers are the perfect project for you! This handmade quilling flower craft is a great way to spruce up any room, event or gift. All you need are some basic supplies like glitter foam paper, a quilling tool, scissors, and glue.
Using the quilling tool, roll the edges of your glitter foam paper into tight spirals to form petals. Then, use scissors to cut out flower-shaped petal pieces from your rolled-up strips. Once all of your petal pieces have been cut out, arrange them around a central stick in the shape of a flower and glue it together. With just these few simple steps, you can easily make stunning handmade quilling flowers with sparkly glitter foam paper!
Step 1: Trace Flower Pattern
Creating a beautiful handmade quilling flower out of glitter foam paper is an easy and affordable craft project that anyone can do! To begin, the first step is to trace the desired flower pattern onto your glitter foam sheet.
Using any shape or size of flower pattern will work. Select either a basic flower shape or use a more intricate one; whatever you choose, trace the outline using a pencil or pen on the non-sticky side of your glitter foam sheet. The traced line should be thin and lightly drawn with enough space for details to be added in later steps. Once you have traced your desired pattern, proceed to step two: cutting out the design from the glitter foam sheet. With careful attention, this craft project can result in an eye-catching quilling flower that adds vibrancy to any room!
Step 2: Cut Out Flower Shape
Are you looking to make your own quilling flower using glitter foam paper sticks? With a few simple materials and supplies, you can create a beautiful handmade quilling flower in no time! In this article, we’ll be focusing on step two of the DIY project: cutting out the flower shape.
In order to cut out the desired flower shape from the glitter foam paper sticks, you’ll need some basic craft tools. You can use scissors or an X-Acto knife for a more precise cut. Be sure to choose scissors that are sharp enough to handle thin materials like glitter foam paper sticks. Once your cuts have been made, it’s time for step three: assemble the flowers into their desired shapes.
By following these easy steps, you’ll be able to create a stunning homemade quilling flower with just a few simple materials and supplies!
Step 3: Arrange Flower Petals
Making beautiful, handmade quilling flowers out of glitter foam paper sticks can be a fun and rewarding activity. Step 3: Arrange Flower Petals is the third step in creating these unique works of art. Begin by cutting foam stick petals into thin strips, ensuring that all petals are the same size and shape for uniformity when arranging them. Next, sort the cut petals according to color and lay them out on a flat surface in groups of three.
To create an interesting layout for each flower, alternate between using small, medium-sized, and large pieces in each grouping. Once all of the petal strips have been arranged to your liking, use a light adhesive to bond them together while they are still laid out on the tabletop. When complete all of the petal arrangements should be neatly aligned with one another – ready to be attached to your flower’s stem!
Step 4: Add Details & Final Touches
If you’re looking to make a gorgeous, handmade flower decoration with glitter foam paper, then this DIY guide is for you. In the fourth and final step of our DIY Glitter Foam Paper Stick Flowers- Handmade Quilling Flower By Glitter Foam Sheet project, we’ll be adding details and giving it the perfect finishing touches. With just a few ordinary craft supplies such as Popsicle sticks, pipe cleaners, scissors, and glitter foam sheets in your arsenal, you can create stunning quilling flowers that will add sparkle to any room or occasion.
To get started on Step 4: Add Details & Final Touches of our project, take your completed quilling flowers and use small pieces of pipe cleaner to attach them onto Popsicle sticks. You can also use colored glue dots or adhesive gems for added sparkle and color.
2. Easy And Simple Handmade Flower With Multi Colored Foam Paper – Making Foamiran Flower For Valentine
Handmade Flowers with Foamiran Paper
If you are looking for an easy and beautiful way to express your love this Valentine’s Day, why not try making some handmade flowers out of foamiran paper? The multi-colored paper is both lightweight and pliable, making it perfect for crafting stunningly realistic faux blooms. Not only can these colorful creations make a great gift for someone special, but they’re also simple enough to construct in the comfort of your own home.
To get started on your one-of-a-kind Valentine’s Day present, all you need are a few basic supplies like scissors or craft knives, foamiran paper or cardstock sheets, floral wire, and tape. With just these few materials you can cut out petal shapes from the foamiran paper and arrange them into lovely flower designs – the possibilities really are endless!
Step 1: Gather Materials
Looking to make a handmade flower with multi-colored foam paper for Valentine’s Day? Making your own Foamiran flowers is easier than you think! The first step to creating this beautiful craft project is to gather the necessary materials. To start, you’ll need some colorful foam paper, scissors, and glue. For added details and dimensions, consider getting scissors in different sizes and shapes.
In addition to these supplies, it can be helpful to have wire cutters or tweezers on hand for cutting the petal shapes accurately. Lastly, you’ll also want a pair of round-nosed pliers if you plan on adding decorations such as beads or buttons onto your flower. With all the essential materials at your disposal, you’re ready to get started!
Step 2: Cut & Shape Foamiran Paper
Transform paper into beautiful, multicolored flowers with the help of foamiran paper! Step two of this simple process is to cut and shape your foamiran paper. Start by cutting the foamiran paper into small petal shapes for your flower. The size and shape of each petal will depend on the type of flower you are making. Utilize a pair of scissors to get precise cuts when needed. To create curved edges like those found on some real flowers, use an iron or heat gun to slightly melt the edge of each petal before arranging them together into a finished flower.
If needed, glue can be used to secure any pieces after forming your flower’s shape. With this easy step two complete, you’re now ready to begin assembling your unique handmade flower with foamiran paper!
Step 3: Assemble the Flower
Making your own handmade flower with foam paper is an easy and creative way to make a special gift or decoration for Valentine’s Day. Step 3 of this simple craft tutorial explains how to assemble the flower using multi-colored foam paper pieces.
Start by placing the centerpiece of the flower onto a flat surface with the patterned side facing up. Next, take one of the three petal pieces and add hot glue around its edges before attaching it to the centerpiece so that they overlap each other slightly. Repeat this process for all three petal pieces, making sure each is placed at different intervals around the centerpiece in order to create a realistic-looking flower. Finally, when all six layers are attached securely, you should have a beautiful handcrafted foamiran flower!
Step 4: Add Details and Embellishments
When decorating for Valentine’s Day, nothing says love like a handmade flower. With the help of multi-colored foam paper, it is easy and simple to make your own beautiful Foamiran flower. Step 4 in this craft project involves adding details and embellishments to the flower for an even more finished look.
To add detail to your Foamiran flower, you can use green floral tape or wire stems. First, wrap the stem with floral tape until you reach the top stem. Then cut off any excess tape at the top and smooth it down with your fingers. The next step is to add color by wrapping colorful ribbons around the stem in a spiral pattern all the way up to the petals of your flower. Finally, you can insert some pearl beads or other decorations into each petal for extra sparkle and personality!
Step 5: Attach to Stems or Ribbons
Valentine’s Day is the perfect occasion to show your loved one just how much you appreciate them. One way to do this is by crafting a handmade flower with multi-colored foam paper. To make it even more special, use ribbons and stems for added charm! This step-by-step guide will help you complete the project and add that final touch of elegance.
Once all five petals are crafted, attach each one to a stem or ribbon of your choice. You can select a single color or pick multiple colors for an eye-catching look. If using a satin ribbon, simply cut it into desired lengths and tie the petals onto each piece. For longer-lasting results, use floral wire instead of ribbon and secure them with tape if needed. Finally, assemble the flowers together for that beautiful bouquet effect!
Conclusion: Finished Valentine’s Flower
3. Learn How To Make Stick Flower With Glitter Foam Sheet – Making Handmade Flower For Valentine’s Day
Crafting Flowers for Valentine’s Day
Valentine’s Day is the perfect time to express your love and appreciation for someone special, and crafting flowers is a great way to do this. For the DIY enthusiast or romantic looking for a creative gift idea, making handmade stick flowers with glitter foam sheets is an easy and fun craft project. It’s also an inexpensive alternative to buying store-bought Valentine’s gifts.
This simple tutorial will show you how to make beautiful stick flowers with glitter foam sheets that are sure to impress that special someone. All you need is some basic materials such as glitter foam sheets, scissors, a glue gun, and of course some colorful embellishments like ribbons or buttons. With a few easy steps, you’ll be able to create gorgeous floral arrangements in no time!
Step 1: Gather Materials
Step 1: Gather Materials is the first step to crafting a beautiful handmade flower for Valentine’s Day. To make this special design, you will need glitter foam sheets, scissors, and glue. These materials are easy to find at your local craft store or online. If ordering online, be sure to give yourself enough time for the items to arrive before Valentine’s Day!
Additionally, it might help to have some inspiration handy in the form of pictures or drawings; this can help guide you as you create your own unique piece of artwork. Finally, set up an area where you can work without distractions so that your focus is on creating a masterpiece! With these supplies gathered and ready to go, you are now one step closer to making a beautiful handmade flower for someone special.
Step 2: Cut & Assemble Foam Sheet Petals
Making handmade flowers for Valentine’s Day can be fun and easy with the help of a few simple materials. Step two in creating this eye-catching DIY craft is to cut and assemble the foam sheet petals. Begin by cutting out multiple petal shapes from the glitter foam sheets, ensuring that all pieces are roughly equal in size.
Once you have enough petals for your desired design, draw a thin line of glue along the edges of each one before layering them onto each other in an overlapping pattern. This will give your flower a 3D look and feel. After assembling the petals, add final touches such as glitter or rhinestones around the edges to enhance their beauty further. With these steps completed, you’re now ready to move on to step three – attaching it to a stick!
Step 3: Attach Petals to Stem
Making handmade flowers for Valentine’s Day is a great way to show your special someone that you care. Step 3, Attaching Petals to Stem, will help make this beautiful craft even more special. In order to attach the petals and stem of your stick flower, you need a few simple supplies: glitter foam sheets and scissors. Begin by cutting out seven petal shapes from the glitter foam sheets in different sizes.
Place each cut-out petal on top of the stem and fold it around so that it sticks firmly against the stem. Make sure to leave some space between each petal for dimensionality when finished. Secure the petals with glue or a hot glue gun as an extra measure if desired. Finally, use decorative tape or ribbon to wrap around the stem between each petal for added texture and color if desired!
Step 4: Add Glitter to Petals
This article will teach readers the fourth and final step in making a handmade stick flower with glitter foam sheets to celebrate Valentine’s Day. Making this craft is an easy and fun way to express your love for someone special, so it’s important that each step is done correctly. In this article, readers will learn how to add glitter to their petals, making them even more beautiful!
Glitter can be added by applying glue with a brush or small applicator bottle directly onto the foam sheet. Make sure to cover the entire surface of the petal evenly with glue – don’t forget corners and edges! Once the glue has been applied, sprinkle generously with glitter until it completely covers all of the petal surfaces. Then press down lightly so that all of the glitters stick securely into place. Allow enough time for drying before using it as part of your handcrafted flower bouquet.
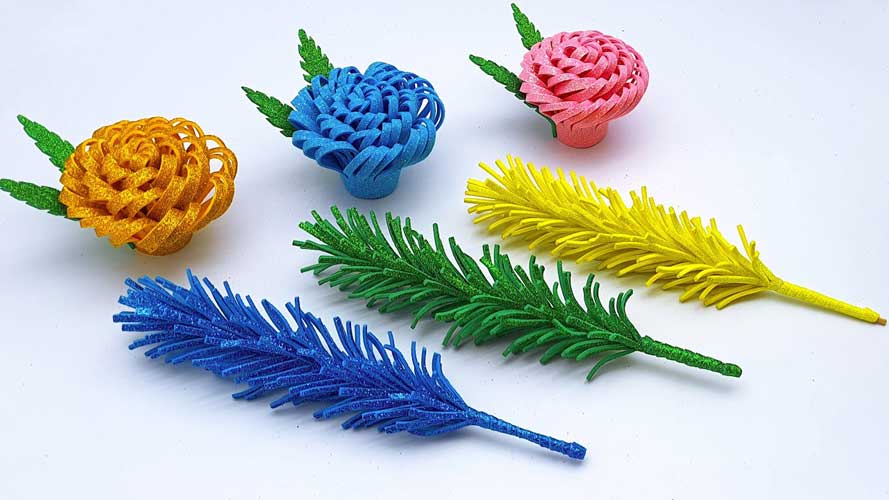
Step 5: Create Leaves and Foliage
Creating realistic-looking leaves and foliage is an essential part of making handmade flowers for Valentine’s Day. To make leaves and foliage, you will need a glitter foam sheet, scissors, a ruler, glue or craft tape, and some wire. Begin by cutting out a leaf shape from the foam sheet using the scissors; use the ruler for accuracy if desired.
You can make a variety of different styles of leaves by cutting out various shapes such as circles or ovals. Then using either glue or craft tape, attach the wire to the back of each leaf so that they can be attached to stems. After attaching all your wires, arrange them in a pleasing composition on top of your stems before wrapping them with floral tape. Making leaves and foliage from glitter foam sheets is an easy way to add depth and dimension to your handmade flowers!
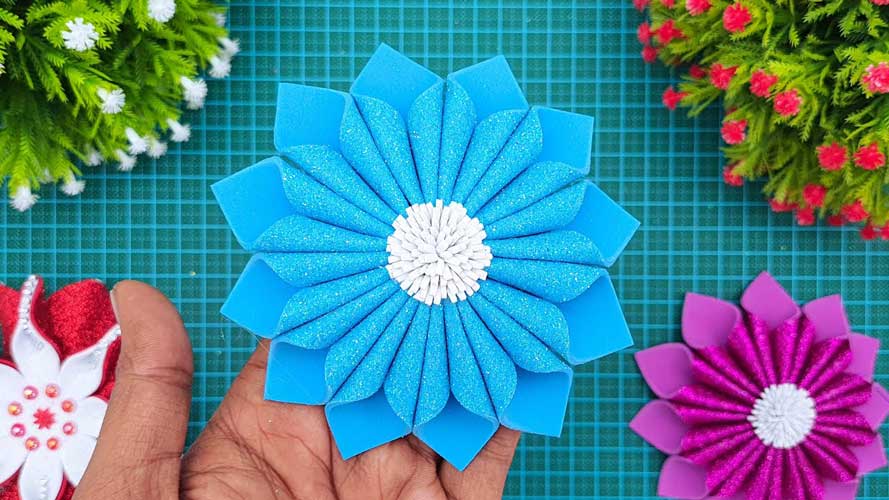
4. Beautiful Glitter Foam Paper Flowers – Valentine’s Day Craft Ideas – Valentine’s Day Gift Flowers
Valentine’s Day Craft Ideas
Valentine’s Day is the perfect time to show your loved ones how much you care. Crafting handmade gifts can be fun and an inexpensive way to express your love. A great way to make a Valentine’s Day gift that will stand out from the rest is by creating beautiful glitter foam paper flowers. This project is easy enough for beginners, yet still looks stunning!
You can use these flowers as decorations around the house or as a special gift for someone close to you. They look so realistic that no one will ever guess they are handmade! With just some basic supplies like foam paper, glitter, and glue, you can craft these beautiful glitter foam paper flowers in no time at all. Start crafting today with this easy step-by-step tutorial on how to make these fabulous Valentine’s Day gift flowers!
Step 1: Gather Materials
Making beautiful glitter foam paper flowers is a great way to show your love to someone special on Valentine’s Day. To make these lovely homemade gifts, you need to gather the right materials.
First, visit your local craft store and pick up some sheets of foam paper in any colors that you like. The thicker the foam paper is, the better it will look when finished. You will also need some components for flower decorations such as glitter glue and sequins in various colors and sizes. Don’t forget to get a pair of scissors, a hot glue gun, and cardstock or construction paper for making stems and leaves too! Lastly, grab some tape or washi tape so you can easily connect your flowers together after assembly.
Step 2: Cut Paper Shapes
Create beautiful glitter foam paper flowers for your Valentine this year with these easy-to-follow craft instructions. Step 2: Cut Paper Shapes. To make the petals of the flower, draw a circle on a piece of glittery foam paper and cut it out with scissors. You can also use cookie cutters to cut out different shapes such as hearts, stars, or other geometrical shapes.
For more intricate designs, you can trace a template onto the foam paper and carefully cut around it with scissors. Securely tape down the template if necessary to avoid slipping while cutting. Be sure to make enough shapes for each flower you plan to create; typically 3-4 per flower is enough depending on the size desired. Now that your paper shapes are ready, it’s time for step 3!
Step 3: Glue & Add Glitter
Are you looking for creative and unique Valentine’s Day gift ideas? Beautiful glitter foam paper flowers are a great option. With only four simple steps, anyone can create these lovely flowers in no time at all. Step 3 is the most fun: glue and add glitter!
First, use a low-temperature hot glue gun to attach the stem of each flower to the center of your cardstock or paper. Once that’s done, it’s time to get the glitter out! Use any type of glitter you like – either loose or stick on will do – and apply it generously to each flower petal. You can make solid glittered petals, or sprinkle different colors together for a more colorful effect. To ensure extra sparkle and shine, coat each petal with a clear adhesive sealant once you’re finished adding glitter.
Step 4: Assemble Flowers
The fourth step in creating beautiful glitter foam paper flowers for Valentine’s Day is to assemble them. This is a fun and creative way to make a festive floral gift for your special someone this Valentine’s Day. It is surprisingly simple and straightforward, so even kids can join in the activity.
First, gather all the pieces of pre-cut shapes from Step 3. Next, use hot glue or craft glue to attach the flower center piece onto the backside of one of the larger petal shapes. Then layer each additional petal shape on top until all five layers are connected together with glue. Finally, carefully apply glitter using either your hands or a brush on both sides of each petal shape until it looks just right!
Step 5: Create Bouquet Arrangement
This Valentine’s Day, why not create a gift that your special someone will never forget? Step 5 of our Valentine’s Day craft ideas is to create a stunning bouquet arrangement from the beautiful glitter foam paper flowers you have already made. With just a few simple supplies, you can assemble a gorgeous bouquet that will be sure to bring a smile to your loved one’s face.
All you need are scissors, ribbon, and glue or tape. Begin by cutting the ribbon into 8-10 inch strands and tying them around each flower stem. Glue or tape the stems together in an attractive bunch and then wrap some more ribbon around the whole group at the point where all of the stems meet. The finished product should be an eye-catching array of glistening flowers in vibrant colors sure to make this Valentine’s Day extra special!


