


Christmas is a time of joy and creativity, and nothing brings out the festive spirit quite like making your own decorations. With Eva Glitter Foam it’s easier than ever to make cute, sparkly snowflakes that will add a touch of winter magic to your home. This article will provide you with step-by-step instructions on how to make unique mini snowflakes with Eva Glitter Foam.
As winter approaches, it’s time to get creative and get into the holiday spirit with some Christmas-themed crafts. Making mini snowflakes is a great way to do just that! Eva Glitter Foam is an amazing craft material that makes making mini snowflakes easy and fun – perfect for kids and adults alike. Whether you’re looking to decorate your home or make some festive gifts, there are plenty of ways to make stylish snowflakes with Eva Glitter Foam.
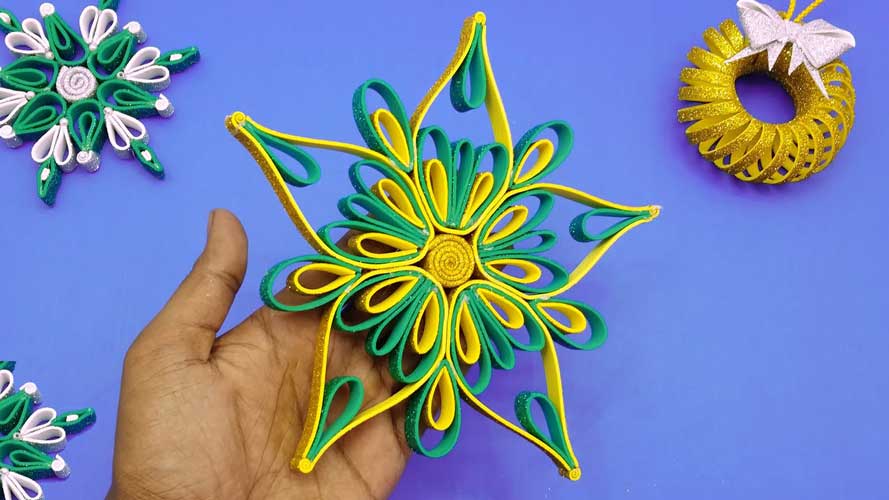
1. Christmas Mini Snowflake Making with Eva Glitter Foam | DIY Xmas Crafts | Christmas Tree Ornaments
Snowflake Making
Snowflake-making is a fun and enjoyable activity for the whole family! This Christmas, create mini snowflakes out of Eva Glitter Foam for extra sparkle. With Christmas tree ornaments in mind, get creative with your snowflake designs and have a blast in the process. It’s easy to make this festive craft with minimal supplies: all you need is Eva glitter foam sheets, scissors, and ribbon.
Cut out shapes from the foam and combine them together to form a unique snowflake design that stands out from the rest! The possibilities are endless when it comes to crafting these beautiful snowflakes – let your imagination run wild and go crazy with colors. Give your craft a personal touch by decorating each one in its own style.
Materials Needed
Are you looking for a fun and crafty way to get into the holiday spirit this December? Look no further than Christmas mini snowflake making with Eva Glitter Foam! This festive DIY Xmas craft is perfect for all ages, and all you need are a few simple materials to make it.
First, of course, you’ll need some Eva Glitter Foam. The foam has an adhesive backing that sticks together easily to create beautiful 3D designs like snowflakes. You can find these in any craft store, or even online from popular retailers like Amazon or Michaels Crafts. Additionally, it’s helpful to have scissors and a ruler handy so that you can measure out your pieces precisely for the most attractive design possible.
Step-by-Step Guide
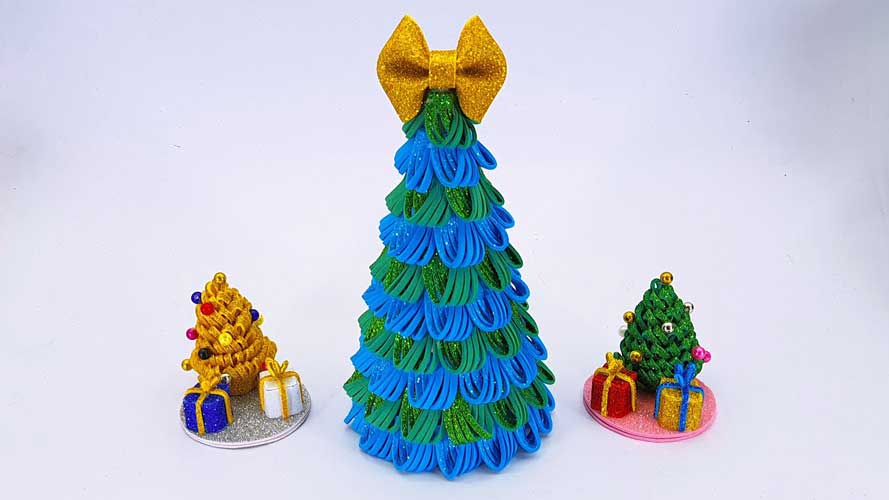
Celebrate the Christmas season with a festive craft project! This step-by-step guide will show you how to create beautiful mini snowflake ornaments for your Christmas tree using Eva glitter foam. These colorful and sparkly decorations are sure to make your home look merry and bright this holiday season. With just a few simple supplies, anyone can become an expert snowflake maker in no time. Let’s get started on these fun and easy Christmas mini snowflake-making projects!
This unique craft is suitable for all ages, so grab the kids and get crafting together! First, select a few sheets of Eva glitter foam in different colors of your choice. Then cut out two half-circle shapes from the foam, making sure they are both identical in size and shape.
Tips & Tricks
With the holiday season around the corner, it’s time to get creative! Making Christmas tree ornaments with Eva Glitter Foam is a great way to get into the holiday spirit. This simple craft project requires minimal materials and produces beautiful mini snowflake decorations for your Christmas tree. Whether you’re making this craft for yourself or with children, you’ll have lots of fun with this easy DIY Xmas activity!
To make your own mini snowflakes with Eva Glitter Foam, start by cutting out small shapes from the foam sheet. You can use scissors or a craft knife to cut out stars, circles, and other festive shapes. Use different colors of Eva Glitter Foam if you want to create multi-colored ornaments. Once all the pieces are cut out, assemble them together carefully using glue and a bit of imagination!
Decorating Ideas
‘Tis the season for getting creative with your holiday decorating! This year, you can easily make Christmas tree ornaments that are sure to sparkle and shine. Eva Glitter Foam is the perfect product for making mini snowflakes that will add a festive touch to your holiday decorations. With its easy-to-use self-adhesive backing, there’s no need for glue or messy materials. Plus, it’s also safe to use on any surface – making it ideal for crafting with kids!
Making beautiful mini snowflake ornaments couldn’t be simpler! All you have to do is cut out shapes from the Eva Glitter Foam sheets and stick them onto any surface. Create special memories this holiday season by inviting your family over and having a craft day where everyone can make their own personalized design.
2. DIY Easter Basket Ideas | How To Make Flower basket With Foam Paper | Hanging Flower Basket Making
DIY Easter Basket Ideas
DIY Easter Basket Ideas can help you make an amazing, unique gift for your loved ones. If you’re looking for something special this Easter season, consider making a personalized flower basket. With the right supplies, like foam paper and glue, it’s easy to create a beautiful hanging flower basket that can be enjoyed by everyone in the family.
This guide will show you how to make a stunning flower basket with foam paper and other materials. We’ll also provide tips for decorating the basket and putting together all of the elements so it looks great when finished. With just a few steps and some creativity, you’ll have an eye-catching DIY Easter basket that will bring joy to all who receive it!
Materials Needed
DIY Easter Basket Ideas are a great way to get creative and bring cheer during the holiday season. You can make your own unique Easter basket with some simple supplies. To make this beautiful flower basket with foam paper, you will need these materials: colored foam paper, scissors, pen or marker, glue gun, glue sticks, thread and needle, thick cardstock paper or board for the base of the basket and a thin pipe cleaner for hanging.
You can find all of these supplies at any craft store or online. Choose colors that match your decorating scheme and create something special for the holiday season. With some creativity, you can easily assemble all the items you need to put together an elegant DIY Easter basket in no time!
Foam Paper Flower Basket
With Easter just around the corner, it’s time to get creative with your DIY Easter decorations. If you’re looking for a unique and fun way to add some festive cheer to your home, why not try making a flower basket out of foam paper? Not only is this project easy and inexpensive, but it also results in an eye-catching decoration that will look great in any room of your house.
Making a flower basket out of foam paper is simple – all you need is colorful sheets of foam paper and basic crafting supplies such as scissors, glue guns, wire cutters, etc. Plus, you can customize the design however you want; from choosing your favorite colors to creating intricate patterns or even adding embellishments. Once the basket is complete, simply hang it up on your wall for an extra touch of springtime charm!
Hanging Flower Basket
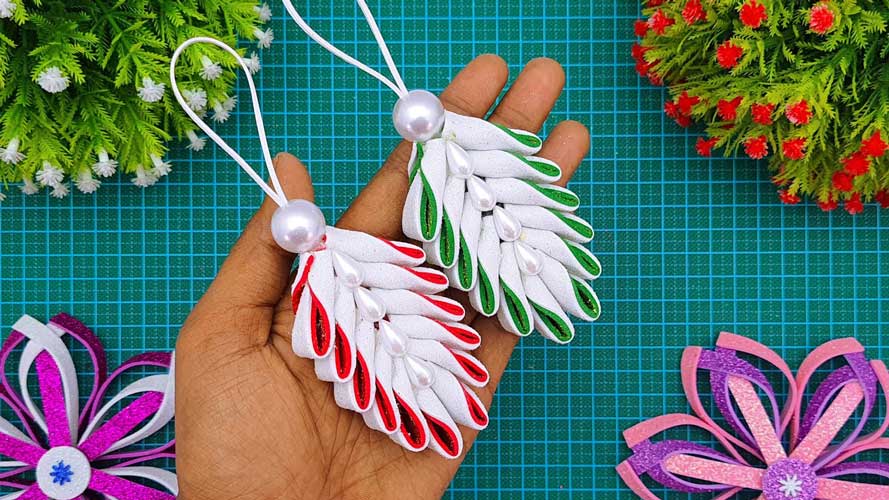
This Easter, it’s time to get creative with your DIY decorations! Make a cheerful and unique hanging flower basket that is perfect for decorating indoors or outdoors. With foam paper, these vibrant blooms can be constructed quickly and easily, making them perfect if you are looking for an easy craft project. Use bold colors to create a stunning display in your home or garden this holiday season.
The fun part of the project is selecting the right foam paper and coordinating ribbons. You will want to choose bright spring colors like yellow, pink, purple, and blue that coordinate with traditional Easter eggs. Once you have gathered all of your supplies, begin by cutting out circles from the foam paper in varying sizes to create petals for each flower. Then glue the petals together before attaching a ribbon on top for hanging.
Creative Additions
Creative Additions: This Easter, take your DIY basket ideas to the next level with these unique flower basket creations! Whether you’re looking for a beautiful hanging flower basket or a fun foam paper design, these fun and festive ideas will be sure to bring joy to your special occasion.
Making an eye-catching Easter basket doesn’t have to be difficult – find out how easy it can be with our simple instructions for making a flower basket with foam paper and for creating an elegant hanging flower basket. With just a few items from around the house and some creative flare, you can make one of these vibrant and colorful designs in no time at all. Be inspired this Easter by adding these creative additions to your DIY baskets!
3. DIY Hanging Flower Decor Easy | Glitter Foam Paper Flower Making Tutorial | Foam Paper Crafts
Crafting Easter Baskets
Easter is a time of renewal and rebirth. It is also a time to share special moments with family and friends, which often involves gifting them with Easter baskets. Crafting Easter baskets can be an enjoyable way to express your creativity while spreading joy. For those looking for fresh ideas on how to create the perfect Easter basket, we have compiled some unique DIY Easter basket ideas that are sure to surprise and delight your loved ones this holiday season.
From making flower baskets out of foam paper to creating beautiful hanging flower baskets, these ideas will help make this year’s Easter celebration extra special! Read on for all the details you need to know in order to craft the perfect Easter basket this season!
Flower Basket With Foam Paper: Supplies & Steps
Are you looking for a fun, creative way to make a flower basket this Easter? Look no further than this delightful DIY project! This article will provide an easy-to-follow guide on how to create an eye-catching hanging flower basket using foam paper.
All the supplies needed are listed below, along with detailed step-by-step instructions that will help you craft the perfect Easter basket in no time. With just a few simple materials and some patience and skill, you can have your own beautiful homemade flower basket ready to hang in time for Easter Sunday. So grab your supplies and get ready to get creative – it’s time to start crafting!
Hanging Flower Basket: Materials & Techniques
Making a hanging flower basket can be an enjoyable and rewarding activity, especially during the Easter holiday. Not only is it a great way to add a bit of festive cheer to your home, but it’s also an easy craft project that almost anyone can do. To make your own unique hanging flower basket, you’ll need some basic materials as well as some more specialized tools and techniques.
You’ll need foam paper for the basket itself and ribbon for the handle, along with artificial flowers in whatever color or style you prefer. You can use glue guns or wire cutters to assemble the pieces together after cutting them out with scissors; however, if you’re looking for something more permanent, adding some hot glue around the edges will ensure everything stays in place.
Time-Saving Tips for Making Easter Baskets
Easter is just around the corner and it’s time to start crafting! Whether you’re looking for a unique DIY Easter basket or just need some time-saving tips, this article has you covered. Here we provide eight easy-to-follow steps that will help you make amazing Easter baskets with minimal effort and time.
From flower baskets made with foam paper to hanging flower baskets, these inventive ideas are perfect for any DIY fan looking to get creative this holiday season. With these helpful tips and tricks, you’ll be able to craft beautiful Easter baskets in no time at all. So gather your materials, pull up a chair, and get ready to make something special!
Creative Decorating Ideas For DIY Easter Baskets
Easter is the perfect time to add some creative decorating ideas to your home. Whether you are crafting a DIY Easter basket for yourself or gifting one to a loved one, there are plenty of ways to make it unique and special. With just a few materials, you can create beautiful hanging flower baskets that will bring life and joy into any room. Here are some inspiring DIY Easter basket ideas that will help you craft an unforgettable gift this season.
Using foam paper and other materials, you can easily craft vibrant flower baskets with pops of color that will brighten up any space in your home. With this simple guide on how to make flower baskets with foam paper, you can design stunning decorations that everyone will love! These unique hanging flower baskets are sure to be the centerpieces of your Easter celebration and fill the room with festive colors.
Alternative Materials to Use in Place of Foam
Creating an Easter basket is a fun and creative way to celebrate the holiday. But finding the right materials can be hard. Foam paper can often be hard to find, or too costly for a one-time project. So, why not look into alternative materials you might have lying around the house?
There are plenty of items that could replace foam paper in your DIY Easter basket projects. For instance, fabric scraps can be used to make a unique and colorful hanging flower basket. Cardboard or poster board could also work for this project; simply cut it into strips and roll them up to form your flowers! Other materials like felt or stiffened ribbons could also be used as petals or leaves on your flower creations. If you need more texture and structure, use wire mesh instead of foam paper to create your Easter centerpiece.
4. DIY Easter Flower For Decorations | Learn How To Make Easy Foam Paper Flowers | Foamiran Flowers
DIY Easter Flowers
This Easter, try creating your own beautiful DIY decorations! Making paper flowers out of foam is a simple and fun project for the whole family. It’s also a great way to freshen up any room with colorful blooms that won’t wilt. With some basic supplies like foam sheets, scissors, and glue you can create realistic-looking flowers in no time. They are perfect for adding a festive touch to your home or as special gifts for friends and family on this special holiday. Get creative with different colors and patterns to make each flower unique. Follow these easy steps to learn how to make gorgeous foam paper flowers with Foamiran – the ideal material for crafting stunning bouquets of blooms!
Materials Needed: Foamiran, Scissors, Glue
Creating beautiful Easter decorations doesn’t have to be time-consuming or difficult. In this article, you will learn how to make easy foam paper flowers with Foamiran – a type of craft material perfect for creating stunning floral displays. To get started, all you need is Foamiran, scissors, and glue.
Foamiran is a special type of craft foam that comes in sheets and can easily be cut into various shapes and sizes without leaving any jagged edges. It’s also lightweight and flexible making it ideal for crafting three-dimensional objects such as flowers. Plus, it comes in an array of vibrant colors so you can customize your creations with whatever color scheme you choose!
Once you’ve gathered all the materials needed–Foamiran, scissors, and glue–you’ll be ready to start crafting these delightful Easter decorations.
Step 1: Cut Petals
This Easter season, get creative and make your own decorations with DIY Easter Flower For Decorations. Making Foamiran Flowers is an easy and fun project that anyone can do. To start, you will need to cut the petals for your flower. Here is step one in this simple guide to creating beautiful Foamiran flowers:
Using foam paper, trace your desired petal shape onto the paper. Once the shape is traced, carefully cut out the petals using scissors or a craft knife. If you are using a craft knife, be sure to have adult supervision or assistance when cutting shapes. When cutting, ensure that all of the petals are identical in size and shape for a symmetrical look when assembling your flower later on. After cutting out all of the petals, you will be ready to move on to step two!
Step 2: Assemble Petals
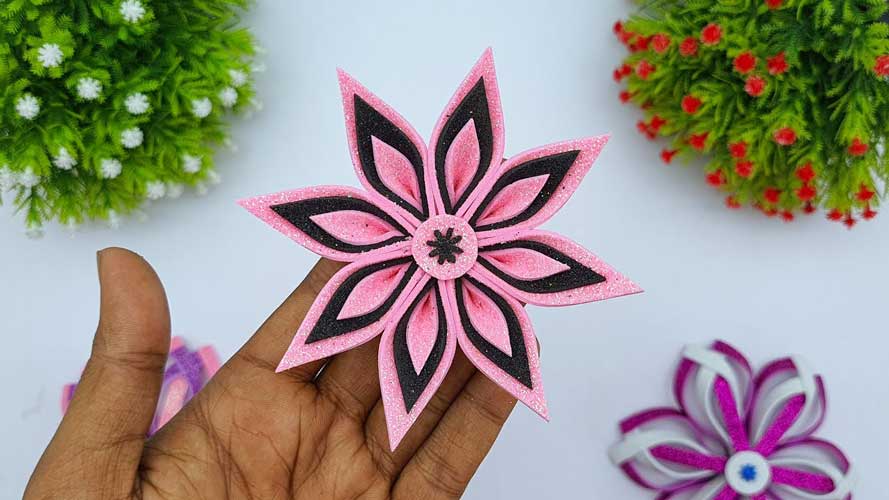
Creating lovely foam flowers for Easter decorations can be a fun and easy DIY project. Step 2 of the craft focuses on assembling the petals of the flower. First, take your large petal shape and cut it into four equal parts. Then cut along each of these pieces to create eight petals for your flower. Once that is complete, you will need to round off all eight edges with scissors or an Exacto knife to give them a more finished look.
Next, you will want to spread the glue around the outer edges of the base of your flower and begin piecing together one petal at a time until all eight are connected in a circle-like formation. Be sure to smooth down any bumps or ripples while assembling so that you have nice even petals on your flower. After all the pieces are attached, let them dry completely before moving on to step three!
Step 3: Create Stamens
Creating stamens is the third step in making your own DIY Easter flower decorations. It’s a great project to get into the spring spirit and would look beautiful in any home! To make your foam paper flowers, you’ll need some craft foam sheets of different colors, scissors, a hot glue gun, and pipe cleaners.
Begin by cutting out a few small circles from the craft foam sheets – these will be your stamen centers. Then make sure to cut out enough petal shapes for each flower. For each petal shape, cut two identical pieces of foam with slits along one side so that you can wrap them around the centerpiece. To finish off this step, use a hot glue gun to attach the petals onto the centerpiece while wrapping it around it to form the stamen shape.
Step 4: Attach Stems
It’s time to move on to the fourth and final step of this DIY Easter flower project. If you are ready to complete your colorful foam paper flowers, then it is time to attach the stems! This simple step is fairly easy and can be accomplished with a few supplies.
Start by finding something that can be used as a stem. A pencil or wooden skewer works just fine and should be cut down to the desired length for each flower before attaching it. Then use hot glue or craft glue to secure the stem firmly in place at the base of the flower’s center hole. After allowing some time for drying, you will have beautiful Foamiran flowers ready for display on your Easter decorations!
Final Thoughts
In conclusion, making a Christmas Mini Snowflake is an easy, fun, and creative way to get into the holiday spirit. Not only does it provide a great outlet for creativity but it also serves as a beautiful decoration for your home. Whether you make them with family members or friends, it’s sure to be a fun activity that will bring joy and cheer to all involved. Crafting these snowflakes may even become part of your yearly Christmas tradition!


