


The holiday season is upon us, and it’s time to start decorating your home with festive, homemade decorations. Making your own Christmas tree ornaments is a fun and inexpensive way to get into the Christmas spirit. These easy DIY Christmas ornaments are perfect for anyone looking for a creative way to decorate their tree this holiday season. With minimal supplies and just a few simple steps, you can create beautiful decorations that will last year after year.
Christmas ornaments are a beloved tradition that brings joy to many households. Every year, people of all ages come together to enjoy the festive decorations and appreciate the beauty of these timeless keepsakes. For some, ornaments represent a physical manifestation of memories past, while for others they are simply an object of admiration. Regardless of where one stands on ornaments, there is no denying their historical significance and widespread popularity during the holiday season.
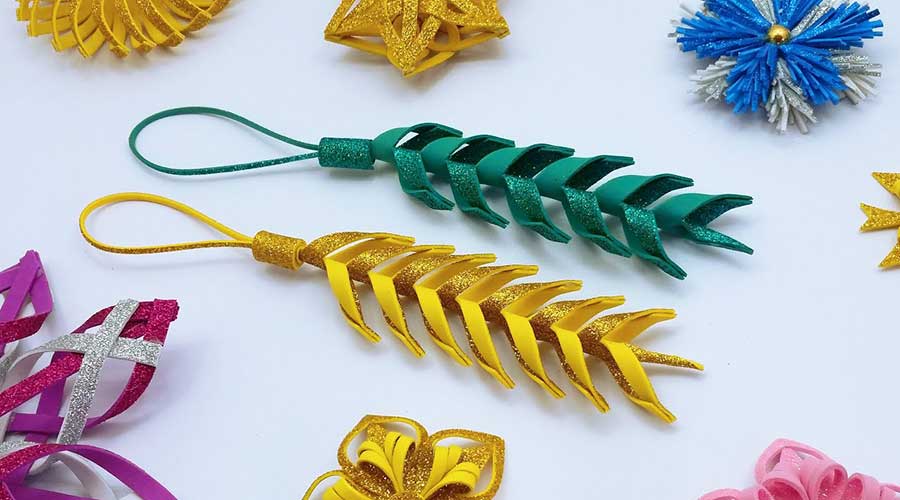
1. 🎄 Christmas Tree Decorations 🎄 Easy DIY Christmas Ornaments | Beautiful Paper Craft Leaves Ideas
Making Christmas Ornaments
The Christmas season is a time for family and friends, but it can also be a lot of fun when it comes to decorating the home. Crafting homemade ornaments to hang on the tree is an easy and enjoyable activity that can involve everyone in the family. This article provides simple instructions for creating beautiful paper craft leaves as decorations for your Christmas tree.
Making these crafty creations does not require any special skills or materials; all you need are some colorful construction paper, scissors, glue, string, and markers. Follow along with our step-by-step guide to creating gorgeous holiday decorations that will add a touch of charm to your tree this year. With just a few basic supplies, you can make stunning DIY ornaments that will be cherished for many Christmases to come!
Easy DIY: Paper Craft Leaves
Decorating a Christmas tree is an exciting holiday tradition. Spruce up your tree this year with easy DIY paper craft leaves! This creative decorations project is perfect for any skill level and can be done in no time.
These festive paper leaves are great accents to your Christmas tree and will make it look like a winter wonderland in no time. With just a few materials, you can create beautiful ornaments that will keep the holiday spirit alive all season long. All you need to get started is paper, scissors, string, glue, and some markers for added color.
Try out these festive decorations today and start crafting gorgeous paper craft leaves that will bring a smile to everyone’s face this holiday season!
Materials: What You Need
If you are looking for something unique and creative to adorn your Christmas tree this year, then why not try making your own decorations? DIY Christmas ornaments can add a personal touch to any holiday celebration. Making beautiful paper craft leaves is an easy and inexpensive way to deck the halls with festive cheer.
In order to make these one-of-a-kind decorations, you’ll need some basic materials. Grab a pair of scissors, construction paper in various colors, glue, glitter or sequins (optional), tinsel or ribbon (optional), and a few other items from around the house – like buttons or pom poms – if desired. With just these simple supplies you will be ready to create lovely leafy embellishments for your tree.
Step-by-Step Guide
It’s the most wonderful time of the year and it’s time to start decorating! Christmas tree decorations are an essential part of the holiday season and with this step-by-step guide, you can easily create beautiful paper craft leaves to adorn your tree. Not only are these ornaments easy to make, but they also add a unique touch of creativity that will make your tree stand out this holiday season. With just a few simple materials, you can quickly transform plain items into festive works of art that bring your Christmas spirit alive.
You don’t need any special skills either; all it takes is some patience and attention to detail. Follow along with our instructions for creating DIY Christmas ornaments from paper leaves and in no time you’ll have a stunning array of decorations for your tree.
Adding More Decorations
When it comes to decorating for the holiday season, nothing beats adding a few extra decorations to your Christmas tree. With just a few supplies and some imagination, you can easily create beautiful paper craft leaves that will brighten up any space in your home. These easy DIY Christmas ornaments are perfect for those who want a creative way to add more color and texture to their tree, without breaking the bank.
Not only do these paper craft leaves look stunning paired with traditional ornaments and garlands but they also make excellent gifts for family members and friends. Plus, you’ll be able to customize them by using various colors of construction paper or cardstock, as well as ribbons and other decorative materials. So go ahead – unleash your creativity this year – and get ready to show off your one-of-a-kind DIY Christmas decorations!
Display Ideas
Decorating for the holidays is a time-honored tradition that many families look forward to each year. If you’re looking for new and creative ways to spruce up your Christmas tree this season, try making some easy DIY ornaments with paper craft leaves. These beautiful decorations are an inexpensive way to bring a festive feel into your home and can be customized to fit any holiday theme or color scheme. With just a few supplies, you can create unique displays that will give your tree a touch of whimsy and charm!
The possibilities are endless when it comes to creating paper craft leaves for Christmas decorations. You can choose from various colors of cardstock or tissue paper and mix in other materials like beads, glitter, sequins, and buttons for extra texture.
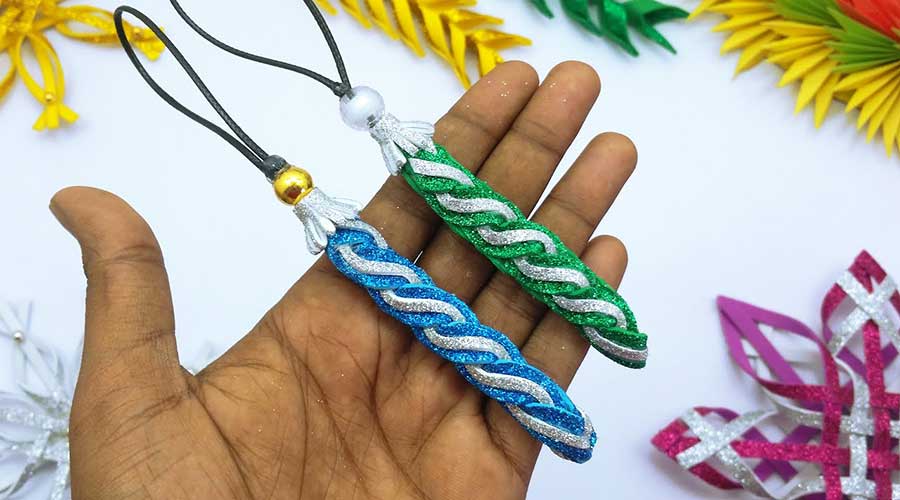
2. Easy Foamiran Christmas Decorations! 🎄 DIY Christmas Tree Ornaments | Hanging Christmas Crafts
DIY Christmas Decorations
Christmas is a time for joy and celebration, and what better way to get into the spirit of the season than with some DIY decorations? This article will show you how to make two easy and fun Foamiran Christmas decorations in no time at all. With just a few basic supplies, you can create beautiful ornaments to hang on your tree or around your home. These items are perfect for any skill level, so even novice crafters can give them a try!
These simple projects use Foamiran – a versatile material that’s easy to work with and comes in many different colors. It won’t break the bank either, as it’s available from hobby stores for very reasonable prices. So grab your supplies and get ready for some festive crafting!
Foamiran Basics
Foamiran is a type of foam material that is widely used to make festive Christmas decorations. It’s easy to work with and requires minimal tools, making it perfect for DIY projects. With just a few supplies you can create beautiful ornaments, wreaths, and other hanging crafts that will last throughout the holiday season.
This article will cover the basics of Foamiran crafting and provide step-by-step instructions on how to make two different types of Christmas tree ornaments. With these simple techniques, you’ll be able to design your own unique decorations in no time! You’ll also get tips on how to add extra sparkle and color for an even more festive look. So grab some Foamiran and let’s get started!
DIY Christmas Tree Ornaments
DIY Christmas Tree Ornaments are a great way to make your holiday season special. Instead of buying store-bought decorations, you can get creative with easy foamiran Christmas decorations and create your own unique hanging Christmas crafts. Foamiran is a lightweight plastic material that makes it incredibly easy to craft beautiful ornaments for your tree. Here’s how you can use it to create two stunning DIY ornaments for the Christmas season!
First, cut out shapes from the foamiran in festive colors like red and green. You can use cookie cutters, scissors, or even paper punches to do this. Then glue the shapes together onto an ornament frame – such as a ribbon or cardboard backing – for extra stability. Finally, embellish them with ribbons, paint, glitter, or anything else that will bring your designs to life!
Hanging Christmas Crafts
Christmas decorations are an integral part of the holiday season, and hanging Christmas crafts can add a special touch to any home. These simple DIY projects will help you create something beautiful for your holiday decor. If you’re looking for some easy and fun ideas for your own hanging Christmas crafts, we’ve gathered together two of our favorites: foamiran decorations and DIY Christmas tree ornaments.
Foamiran is a lightweight foam that comes in many different colors and textures, making it perfect for crafting unique ornaments. With just a few materials like ribbons, glue, scissors and wires, you can create lovely blooms that look great hung up on the walls or as part of wreaths or garland displays. Foamiran also makes great window hangings as well – simply cut out shapes from the sheets of foam and use wire to hang them up!
Creative Ideas for Foamiran Decorations
If you’re looking for creative ideas for Foamiran decorations, then look no further! This article will provide you with two easy projects that are perfect for adding a festive touch to your home this Christmas season. Firstly, we’ll be showing you how to make DIY Christmas tree ornaments using Foamiran – these bright and colorful decorations are sure to lift the mood of any room in your home. Secondly, we’ll demonstrate how to create hanging Christmas crafts using Foamiran – a great way to add a personal touch to any space during the holidays. With these simple yet effective tips, your house will be ready in no time! So let’s get started on our projects and make some lovely Foamiran decorations!
Tips & Tricks
If you’re looking for creative ways to decorate your home this Christmas season, then Foamiran is the way to go! This unique material can be used to create stunning decorations and accessories that will liven up any festive space. Here are some tips and tricks to help you get started on your own DIY Foamiran Christmas crafts.
Foamiran works great for creating 3D objects like tree ornaments, figurines, snowflakes, and stars. Its lightweight structure makes it easy to shape into intricate designs that would otherwise take a lot of time with other crafting materials. To make the most out of Foamiran’s malleability, use an ironing board and an iron set at low heat.
Conclusion
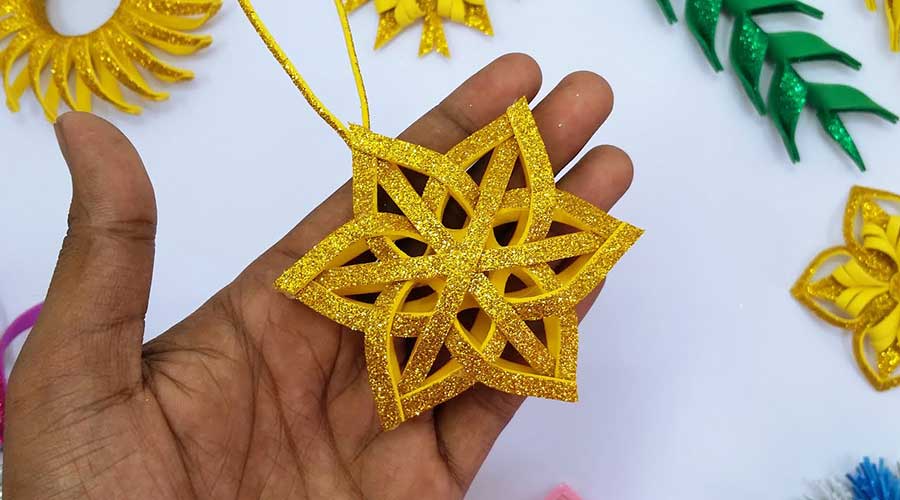
3. Amazing 3D Christmas Star With Glitter Foam Sheet | Christmas Tree Ornaments | Xmas Decor With Star
Making Xmas Ornaments
Making Xmas ornaments is a fun-filled activity that can be enjoyed by the entire family. With just a few materials, you can create amazing 3D Christmas stars with glitter foam sheet Christmas tree ornaments. This easy-to-follow tutorial will help you make your own festive decorations for the holidays in no time! All you need are some foam sheets, scissors, colorful glitter and glue to get started. Cut out the star shapes from the foam sheets and then sprinkle on some of the glitters to create an eye-catching design. Leave it to dry and then use some hot glue or craft glue to attach two stars together – this is where your creativity comes in! You can make all kinds of unique designs with different color combinations and sizes of stars. Finally, attach a ribbon loop at one end for hanging your homemade ornament on your Christmas tree.
Materials: Glitter Foam Sheets
The holiday season is a time for decorations and cheer, so why not spruce up your tree with these amazing 3D Christmas stars made from glitter foam sheets? This bright and cheery craft project is easy to make and looks great when hung on the Christmas tree.
Glitter foam sheets are an ideal material to use when crafting 3D Christmas stars. They are lightweight, durable, brightly colored, and come in many different hues to choose from. Plus, they can easily be cut into shapes with scissors or a craft knife. Best of all, they won’t shed any glittery mess as other embellishments do. And since you can get them in bulk, it’s cost-effective too!
Step 1: Cutting Star Template
This amazing 3D Christmas Star with Glitter Foam Sheet Christmas tree ornaments is the perfect way to add some fun and festive holiday cheer to your home. To get started on this fun project, you will need a few materials, including glitter foam sheets and scissors. Step one of creating these unique ornaments is cutting the star template for each ornament.
The most important thing when it comes to cutting out the stars is to make sure that they are all exactly the same shape and size so that they fit together perfectly once completed. Begin by tracing an equal-sized star onto each sheet of glitter foam twice, then cut them out carefully using scissors. If you have a craft die cutter machine at home, it can be used as well; however, scissors will work just fine too!
Step 2: Arranging Foam Sheets
Step 2: Arranging Foam Sheets is an essential component of creating an amazing 3D Christmas Star with glitter foam sheet Christmas Tree ornaments. Assembling the star requires careful and precise cutting and arranging of the sheets of foam to create a beautiful star-shaped ornament. To begin, separate each foam sheet into three strips; one light blue, one pink, and one silver glitter. Cut the strips into long triangles that measure approximately 4x4x6 cm.
Once you have your triangle shapes cut out, take two of them from each color group and place them together so that they form a diamond shape. Securely hold these two pieces in place with glue on either side near their corners. Then attach the remaining triangle piece to the middle section of your diamond shape by gluing it at its center point.
Step 3: Assembling the Star
The festive season has arrived and what better way to get into the Christmas spirit than to make your own 3D star ornaments with glitter foam sheets? Step 3 of this creative project is assembling the star with all its components and bringing it to life.
To assemble the star, start by attaching two spiky points together using hot glue. Once that’s done, continue attaching more pairs of points until you have a complete shape of a five-pointed star. Make sure all connections are secure so that none of the parts come apart when moved or shaken. Finally, attach two pieces of twine together at each point in order to hang up your beautiful creation! With just a little bit of effort and creativity, you will have an amazing homemade Christmas decoration for your home.
Step 4: Adding Glitter for Sparkle
Adding glitter is the last step to creating a 3D Christmas Star with Glitter Foam Sheet Christmas Tree Ornament. Not only does glitter add extra sparkle and shine, but it also adds texture and style to your ornament. There are several steps you can take when adding glitter to your star ornament. First, gather your supplies such as foam sheets, scissors, a glue gun, the glitter of choice, and a mixing bowl. Start by cutting out the star shape from the foam sheet. Then, use a hot glue gun to attach pieces of the star together before spraying them with adhesive spray or brush on glue for added hold. Place a generous amount of glitter in the mixing bowl then dip each side of the star into it until they are completely covered in glitter. Allow it all to dry before attaching string or ribbon for hanging purposes.
4. DIY Mini Christmas Snowflake With Eva Glitter Foam Sheet – Beautiful Glitter Christmas Snowflakes
DIY Mini Snowflakes
DIY Mini Snowflakes are an easy and fun way to decorate your home for the holidays. With just a few simple materials such as Eva Glitter Foam Sheets, you can create beautiful and sparkling snowflakes. These mini snowflakes make great decorations for windows, walls, or any other areas in your home. You will be surprised how easy it is to craft these unique pieces of festive art!
To get started on your own DIY mini snowflake project, all you need is some glitter foam sheets, scissors, and tape. Cut out small circles from the foam sheet then fold them into a four-pointed star shape by folding each point down the center. Once you have a nice star shape, use scissors to trim off any excess material until it looks like a perfect snowflake.
Materials Needed: Eva Glitter Foam Sheets
The holiday season is a time of joy and cheer, and creating crafty decorations to hang throughout the home can be especially festive. DIY Mini Christmas Snowflake With Eva Glitter Foam Sheet project is an easy way to make beautiful glitter snowflakes that will add sparkle and light to any space for the holidays. To complete this fun craft, Eva Glitter Foam sheets are essential materials needed.
Eva Glitter Foam Sheets come in various colors and sizes with a coating of glitter dust on one side. They are lightweight yet strong enough to hold their shape when formed into the desired design. The foam is also safe for children’s crafts, so it’s perfect for making mini snowflakes that kids can hang around the house or give as gifts.
- Step 1: Cut Snowflake Shape
- Step 2: Cut Details
- Step 3: Glue Together
- Step 4: Add Decorative Elements
- Step 5: Hang Up!
5. How To Make Christmas Snowflake With Glitter Foam Sheet | Beautiful Christmas Snowflake | Xmas Craft
Christmas Snowflakes
Christmas snowflakes are one of the most beautiful decorations for the holiday season. They bring a special sparkle and shine to any home, and making them can be an enjoyable family activity. This article will show you how to make Christmas snowflakes out of glitter foam sheets. You’ll learn how to cut foam sheets into intricate patterns, add some sparkle with glitter glue, and assemble your own unique Christmas snowflake. With just a few supplies and some patience, you can create your own beautiful Xmas craft that is sure to impress friends and family alike. So grab your scissors, foam sheet, and glitter glue, and let’s get started on creating the perfect Christmas snowflake!
Materials Needed
Create a beautiful Christmas snowflake with glitter foam sheets this holiday season! This craft is easy to do and requires minimal materials. All you need is some glitter foam sheets, pencils, scissors, and glue. Glitter foam sheets can be easily found in any local craft store or online. Pencils are used for drawing the patterns on the sheets, while scissors are used for cutting out the shapes. You will also need some good-quality glue to stick all pieces together. Finally, you may also want to have an assortment of ribbons and decorations that you can use to decorate your snowflakes when finished. With these few simple items, you’ll have everything needed to make a stunning Christmas snowflake!
Step 1: Cutting Foam Sheet
Creating a beautiful Christmas snowflake with glitter foam sheet is an easy, fun and creative craft to do during the holiday season. Step one of this Xmas craft is cutting the foam sheet into the desired shapes for your snowflake. To begin, gather all necessary materials such as scissors or a paper cutter, foam sheets in various colors, and any other items you wish to use to decorate your snowflake. Place the foam sheets on a flat surface and start cutting out small circles or any other shape that you would like for your snowflake’s design. Be sure to cut slowly and carefully so that there are no jagged edges when completed. You can also use cookie cutters or stencils as well for more intricate designs if desired. Once done, it is time to move on to step two: assembling the pieces together!
Step 2: Decorating with Glitter
When it comes to making a Christmas snowflake with glitter foam sheets, the second step is where all of the fun begins! Decorating with glitter is an easy and exciting way to make your snowflakes look extra special. First, you need to pick out some nice colored glitter that goes well with your foam sheets. Make sure you have enough for all of your snowflakes so you can get creative and come up with some really beautiful designs. Once you’ve gathered your materials, start by outlining the shape of the snowflake on each foam sheet using glue. This will ensure that all of the glitters stay in place once it’s been applied. Then, start sprinkling on a generous amount of glitter until the entire surface is covered evenly. Keep adding more layers until you’re satisfied with how it looks and then let everything dry overnight before continuing on to the next steps!
Step 3: Making the Design
Creating a beautiful Christmas snowflake out of glitter foam sheets can be an enjoyable and rewarding craft activity. Step 3: Making the Design is essential to creating the perfect snowflake.
This step involves folding, cutting, and gluing your glitter foam sheet into a 6-pointed star design. Once you have folded your foam sheet into an equilateral triangle, you will draw lines connecting each corner of the triangle to its opposite vertex. Cut along these lines with scissors to make three distinct triangles that join together at their points. Glue each point together, forming a six-pointed star shape; this is your completed Christmas snowflake design! With small pieces of remaining glitter foam sheets, use glue or adhesive tape to add decorations around the edges of your finished product for extra pizzazz.
Step 4: Create a Snowflake String
This article provides a step-by-step guide on how to make beautiful and sparkly Christmas snowflakes out of glitter foam sheets. In step four, readers will learn how to create a string of snowflakes that can be used as decorations or incorporated into other holiday crafts.
Making the strings is easy and straightforward. First, cut out several snowflake shapes from the glitter foam sheet. Then, punch a hole in each at the top using either scissors or a pin. Next, attach all of the snowflakes together by threading yarn through their respective holes and tying it into one long strand. Finally, hang up the string wherever desired for an instant bit of festive cheer! It’s an affordable way to brighten up any space for the holidays and requires minimal effort.
Final Thoughts
In conclusion, Christmas ornaments are a special part of the holiday season. They come in all shapes, sizes, and colors to suit any taste and style. Whether it’s for a gift, a decoration for your own home, or an heirloom to pass on to the next generation, these pieces of artistry can add that extra bit of sparkle to the holiday festivities and bring joy for years to come.


