


Welcome to the wonderful world of custom Christmas decor! From festive trees adorned with homemade ornaments to beautiful wreaths made from natural materials, custom holiday decorations can bring warmth and joy to any home. Whether you are creating your own pieces or relying on local artisans, custom Christmas decor is a great way to add a unique touch to your holiday season. It can also be a special way to honor family traditions and bring meaningful memories into your home.
The holiday season is the perfect time to decorate your home with festive decorations that create a warm and inviting atmosphere. Custom Christmas décor can add a unique touch to any home and create personalized memories that last for many years. Whether you’re looking for one-of-a-kind pieces or something more traditional, there are several options available when it comes to customizing your holiday decorations.
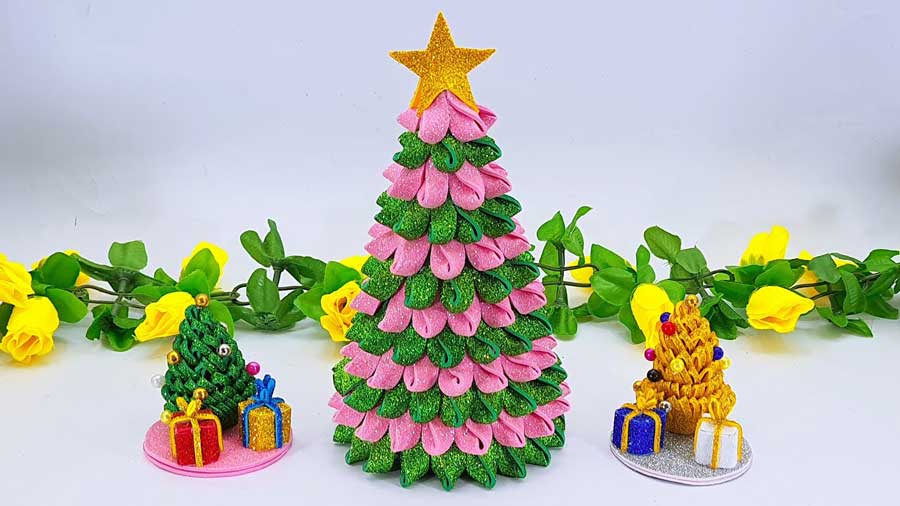
1. Awesome Christmas Tree Making Ideas | Custom Christmas Decor | Beautiful Christmas Tree Ornaments
Christmas is one of the most celebrated and magical holidays of the year. As families gather around the Christmas tree full of memories, decorations, and lights, it is important to create a tree that is both festive and unique. Making Christmas trees can also be a fun and creative process for everyone to partake in. In this article, we will provide awesome Christmas tree-making ideas, custom Christmas decorations, and beautiful Christmas tree ornaments that you can make yourself.
Creative Christmas Tree Ideas
If you’re looking for a way to get creative with your Christmas tree this year, you’ve come to the right place. These awesome Christmas tree-making ideas will have your home feeling festive in no time. From custom decorations to beautiful ornaments, these creative Christmas tree ideas are sure to spread holiday cheer throughout your home.
Start by selecting a unique theme for your tree and use it as the basis for designing the decorations. If you’re going for something traditional, opt for classic red and green ornaments, garlands, and lights. If you’re feeling more adventurous, consider using nontraditional colors like blue and silver or hand-crafted decorations like paper snowflakes and origami stars. The possibilities are endless!
To complete your masterpiece, accessorize with beautiful ornaments such as glass balls, vintage bells, and intricate figurines.
Step 1: Find the Right Tree
Are you looking for creative ways to decorate a Christmas tree this holiday season? The first step in creating the perfect festive display is selecting the right tree. You can decide on a real evergreen or one of the newer artificial versions available. Depending on your budget and how much time you want to spend setting up and taking down, either option can create an amazing result.
When choosing a real Christmas tree, it’s important to think about size and shape. Start by determining what kind of space you have for your tree – will it fit in the corner of a room or along the wall? Once that’s figured out, look for trees with proper symmetry so it looks balanced when viewed from multiple angles. When examining needles, make sure they are soft to the touch and not brittle.
Step 2: Pick Fun Decorations
Christmas tree decorating can be a fun and exciting experience for the whole family. Step two of making an awesome Christmas tree is to pick out some fun decorations! Start by deciding on a theme for your tree. Will it be classic and traditional with red, gold, and green ornaments? Or will it be more modern with sparkly silver, pink, and blue accents?
Once you’ve chosen a theme, search for some decorations that match. Look in stores or online for beautiful handmade Christmas tree ornaments such as glass balls, wooden stars, ribbons, tinsel garlands, fabric figures, and more. You can also make your own custom decorations using materials like felt, glitter glue, and paint. The possibilities are endless when it comes to picking out unique decorations!
Step 3: Place Lights & Ornaments
Now that your tree is standing and fluffed, it’s time to make it sparkle! Step three of making a beautiful Christmas tree is to place lights and ornaments. Lights come in all different shapes and sizes, so choose the ones that will best fit the size and shape of your tree. If pre-lit trees are more your style, be sure to check the wattage of each strand before purchasing – you want enough strands for your desired look without overloading the cord. When stringing lights on a live tree, aim for symmetry by wrapping garland around the base in a spiral pattern towards the top.
Then comes the fun part – hanging ornaments!
Step 4: Add a Topper
Adding the perfect topper to your Christmas tree can be the cherry on top of a great festive display. Your tree has already been decorated with beautiful ornaments and custom decorations, but you need something special at the very top. Here are some ideas for great Christmas tree toppers that will complete your decoration masterpiece.
The most classic choice is an angel or star – these are traditional designs that will always look elegant and graceful atop your Christmas tree. Both come in a variety of sizes and styles so you can pick one that best fits your existing decorations. Alternatively, you could choose a Santa Claus figure for a fun nod to Saint Nick himself! Whatever type of design you pick, make sure it’s securely fastened so it won’t fall off mid-party.
Step 5: Fluff & Accessorize
The holiday season is coming up and you want to make sure your Christmas tree looks amazing! Step 5 of awesome Christmas tree-making ideas are all about the finishing touches: fluffing and accessorizing your tree. To get that perfect look, it’s important to be creative with how you decorate. Don’t be afraid to add unique ornaments, garlands, tinsel, lights, and other decorations. With these special pieces, you can set your tree apart from the rest!
When it comes time to fluff and accessorize your tree, take a moment to consider what type of decorations will best reflect your style. If you prefer a more rustic look – try using wood slices or pine cones as accents. For a traditional feel – use glass or plastic balls in various sizes and colors.
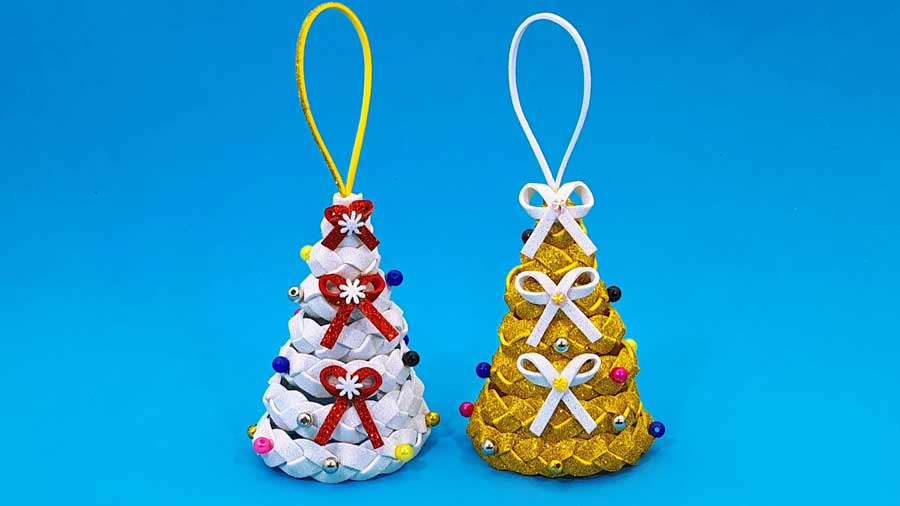
2. DIY Hanging Christmas Mini Tree | DIY Christmas Decoration Ideas! 🎄 Eva Foam Sheet Christmas Crafts
DIY Christmas Decoration Ideas
This Christmas, why not get creative with your holiday décor? Making decorations by hand can be a fun activity to do with the family, and it will also save you money. With just a few items found around the house or easily picked up at craft stores, you can make beautiful and festive decorations for your home that will last for years to come.
One of the most unique DIY decoration ideas is creating a hanging mini tree using Eva Foam Sheets. By cutting out various shapes from the sheets and putting them together, you can form an eye-catching miniature Christmas tree that will add some sparkle to your home. If you are feeling extra adventurous, you could even try adding LED lights to make it glow! Eva foam sheet crafts are easy enough for beginners of any age so why not give it a try this year?
Hanging Christmas Mini Tree
Every holiday season, many people look for new and fun ways to decorate their homes. And if you’re looking for a unique and creative way to spruce up your living space this year, consider making your own hanging Christmas mini tree! This easy DIY decoration is perfect for adding a festive touch to any room in the house.
This project is ideal for those with limited space or who want something small but impactful. You can make this project with just a few simple materials like Eva foam sheets in various colors and adhesive tape, so it’s also great if you’re on a budget. Plus, it only takes an hour or two to assemble – so it won’t take away from your other holiday preparations!
Materials Needed
Are you ready to get creative this holiday season? DIY Hanging Christmas Mini Tree DIY Christmas Decoration Ideas! Eva Foam Sheet Christmas Crafts is an easy and fun way to bring a festive feel into your home. This project requires some basic materials, which are easy to find in any craft store. It’s time to get out the scissors and glue; check out the list of items you’ll need below!
First, start with an eva foam sheet in any color you choose. Cut the shape of a mini tree using scissors or a craft knife. After that, grab a string of battery-operated lights—they will look great in your mini tree! You’ll also need some hot glue, ribbon, and decorations such as glittery stars or snowflakes. Finally don’t forget two cup hooks for hanging your decoration up!
Step-by-Step Instructions
Do you want to get creative and make your own Christmas decorations this year? If so, why not start with an easy DIY Hanging Christmas Mini Tree? This beautiful step-by-step craft is made from Eva foam sheets and will look great hanging in any window or doorway. It’s perfect for those who love to craft but don’t have a lot of time since it’s a quick and easy project that can be done in no time!
This guide will provide you with all the instructions needed to create your very own DIY Hanging Christmas Mini Tree decoration. With just a few simple steps, you’ll be able to put together this beautiful festive decoration that will brighten up any space in your home! All the materials needed are incredibly affordable too, so don’t forget to pick them up before starting this project.
Eva Foam Sheet Crafts
Eva Foam Sheet Crafts are the perfect way to show off your holiday spirit. With its unique texture and easy-to-use design, this craft material is perfect for adding a festive touch to your home decorations. Whether you’re looking for a simple DIY project or something more elaborate, these Eva Foam Sheet Crafts are sure to make an eye-catching addition to any Christmas celebration.
This article will focus on one of our favorite Eva Foam Sheet Crafts: making a hanging Christmas Mini Tree! This easy-to-create decoration will bring cheer and joy into any room in your house. We’ll go through each step of the process, from cutting the EVA foam sheet into shapes to painting and finishing touches that give it that extra special holiday flair.
Tips and Tricks
The holiday season is upon us and DIY Christmas decorations can make any home look merry. From hanging Christmas mini trees to Eva Foam Sheet Christmas Crafts, these tips and tricks will help you create the perfect festive atmosphere this winter.
Do-it-yourselfers of all skill levels can learn how to make a miniature hanging tree out of paper ornaments, twine, and other materials for a simple yet elegant decoration. With some adhesive foam sheets, sparkly beads, and colorful ribbons you can also craft tiny trees from Eva Foam Sheets that are perfect for filling up small spaces with holiday cheer. These fun crafts will take your home decorations to the next level this season!
3. How To Make Christmas Angel – Hanging Christmas Decoration Ideas – DIY Angel-Making Instructions
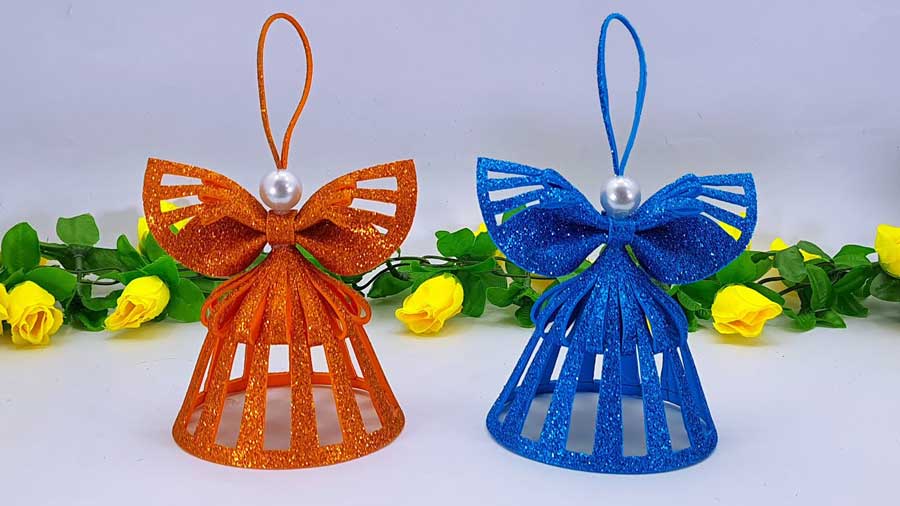
DIY Angel Making
Do you want to give your home a festive touch this Christmas season? Making your own DIY Angel is a great way to show off your creative side and can be done with everyday items from around the house. This article will provide step-by-step instructions on how to make an angel out of paper that is sure to be a conversation starter when guests come over.
All you need are some basic supplies such as white paper, glue and tape, scissors, crayons or markers for decoration and something round for the face such as a button or small piece of foam. With these items in hand, follow along with our tips below and create an angel that will hang proudly in your home!
First, start by cutting out two wings using white paper; each wing should measure approximately 10cm x 5 cm.
Materials: List of Needed Items
Making a Christmas angel is easy and fun to do. To make your own beautiful hanging Christmas decoration, all you need is an assortment of materials that can be found around the house or purchased at a craft store. Here’s a list of items you’ll need to make your own DIY angel:
A piece of card stock or thick paper in white, gold, or silver; scissors; glue; acrylic paint in white and any other colors desired; pieces of thick string or ribbon; markers to decorate the angel face with eyes, nose, and mouth. Optional materials include glitter glue pens, tiny beads for added decorations on the wings, tags for writing messages on the backside of your angel, and small bells for extra jingles when hung up.
Once you’ve gathered all the necessary supplies it’s time to get started creating your festive holiday décor.
Step 1: Forming the Angel’s Body
With the holiday season in full swing, creative minds are turning to unique decorating ideas. One timeless project is the Christmas angel – a beautiful hanging decoration that can be hung from doors or walls. Making your own angel is easy and fun, and it’s a great way to get into the spirit of the season. Step one for this DIY project is forming the body of your angel.
To form your Christmas angel’s body, take some ordinary materials like construction paper, cardstock or foam board and shape them into two triangles facing each other with rounded tips at the top. You can also use these same materials to create wings for your angel; just cut out two identical shapes with curved edges on each side that will fit onto the back of its body.
Step 2: Creating a Head and Arms
Creating a head and arms for your Christmas angel is the second step in making this wonderful holiday decoration. With some basic craft supplies, you can create an angel with a simple yet effective design. To get started, grab a wooden bead for the head and two wire coat hangers for the arms. Alternatively, you could use cardboard cutouts or pipe cleaners if desired.
Once you have your materials ready to go, it’s time to start crafting! First, twist one end of each wire hanger into loops that represent arms and then attach them both to the wooden bead using glue or tape. If using cardboard cutouts or pipe cleaners, simply shape them into arms and secure them with glue or tape in place on the bead as well. You can also add other decorative embellishments such as beads or sequins as desired before moving on to Step 3 of creating this festive holiday decoration!
Step 3: Adding Clothing and Wings
Making a Christmas angel hang as a festive decoration is a fun and easy way to spread holiday cheer. Follow these DIY instructions for making an angel of your own! Step 3 focuses on adding clothing and wings to make your angel look its best.
Begin with the basics: add a dress or robe-like garment to the body of your Christmas angel. You can choose from a variety of fabrics, such as felt, velvet, or linen, depending on the look you’re going for. If you want extra flair and glamour, consider adding some beading or other embellishments. Choose colors that represent the holiday season like reds and greens!
Next up are wings – they’ll give your Christmas angel that extra special touch!
Step 4: Attaching a Hanger
Creating beautiful, homemade Christmas angels is a great way to add special and unique decorations to your holiday décor. Step 4 of the DIY angel-making instructions is attaching a hanger so that the completed angels can be hung from the tree or other areas in your home.
To attach a hanger, you will need some strong thread or thin wire for each angle. Begin by taking about 8 inches of thread and knotting it around the neck area of the angel’s body. Then make a loop in the center of this thread that will act as your hanger. To help secure it further you may want to tie an additional knot at each end of the loop after pulling it tight.
4. DIY Hanging Christmas Mini Tree | DIY Christmas Decoration Ideas! 🎄 Eva Foam Sheet Christmas Crafts
DIY Christmas Decorations
DIY Christmas decorations are a fun and creative way to add a festive touch to your holiday season. If you’re looking for great ideas, try making a hanging mini tree out of Eva foam sheets! This craft is simple and easy, perfect for anyone to make with the whole family. With some help from cardboard cones, colorful paints, glitter glue, pom-poms, and beads, this unique decoration will bring joy to your home during the holidays.
If you want more DIY Christmas decoration ideas that involve Eva foam sheets, there’s plenty of inspiration online. You can make snowflakes or stars with different patterns and colors that are sure to be eye-catching in any room. Get creative by using shapes such as trees or stars cut out from foam pieces or use multiple layers of foam for an even more dazzling look.
Supplies Needed
If you’re looking for a fun and festive way to decorate your home this holiday season, look no further than the DIY Hanging Christmas Mini Tree – a creative and easy-to-create Christmas decoration. To make this charming mini tree you’ll need some basic supplies including colorful Eva foam sheets, scissors, white glue, string or ribbon, felt balls, and other decorations of your choice.
Before beginning the project it’s important to lay out all of your supplies on a flat surface so that they are easily accessible and ready to go! Start by cutting out two small triangles from the Eva foam sheets – these will become the base of your mini tree. Secure both pieces together with white glue and leave them aside to dry as you continue gathering materials for the project. You may also choose to paint one side green or add glitter for extra holiday sparkle.
- Step 1: Cut Eva Foam Sheet
- Step 2: Glue & Assemble Mini Tree
- Step 3: Paint & Decorate Mini Tree
- Step 4: Hang Christmas Mini Tree
5. How To Make Christmas Angel – Hanging Christmas Decoration Ideas – DIY Angel-Making Instructions
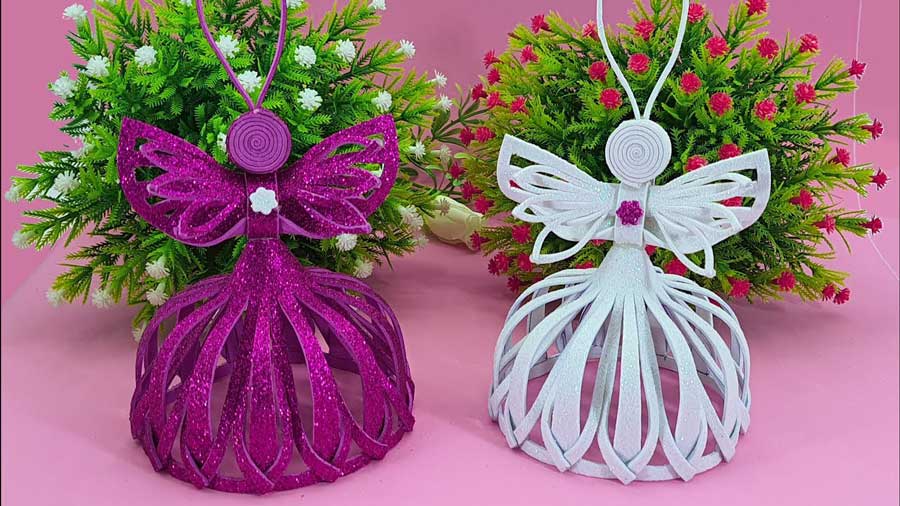
DIY Angel-Making
The Christmas season is a special time of year that brings joy and cheer to many homes. One popular way to celebrate the holiday is by making decorations, such as angels. Angels are a classic symbol of Christmas and make for beautiful decorations in any home. Making your own angels can be both fun and easy with these helpful DIY angel-making instructions.
With just a few materials, you can easily create a beautiful angel decoration to hang in your home this holiday season. You will need fabric or felt, cotton batting, scissors, and thread. First, cut out two identical shapes from the fabric or felt; these will form the body of the angel when sewn together. Then fill each shape with cotton batting so it’s fluffy and evenly distributed throughout the piece. Sew around all edges except one side leaving an opening so you can turn it right side out once filled with batting.
Materials Needed
Making your own Christmas angel decorations is a great way to show off your creativity and spruce up your home for the holidays. With just a few simple materials, you can easily create beautiful festive angels that will be sure to bring a smile to anyone’s face. To make these DIY angel decorations, here are some of the essential items you need:
First, you’ll need some cardboard or thick paper in cream or white. You can use this as the base for your angels and cut it out into different shapes like circles, ovals, rectangles or hearts. You’ll also need scissors and glue sticks to assemble the shape of your angel. Some spare material such as ribbons or buttons also comes in handy when creating details like halos or wings.
Step 1: Make the Base
This Christmas, why not make your own festive decorations? Crafting a beautiful hanging Christmas angel is an excellent way to spruce up your holiday decor. Step one for this project is to make the base of your angel – and it’s easier than you’d think! Start by gathering necessary supplies such as craft paper, scissors, and glue. Next, cut two identical circles from the craft paper; they should be large enough to fit comfortably on the tips of your fingers.
Glue the two circles together at their edges, creating a 3D shape that serves as the foundation for your angel. Finally, cut two strips of paper and place them horizontally across each other in an “X” shape in order to form wings. Now you have everything you need to start making your DIY Christmas angel!
Step 2: Create Wings and Halo
Step 2: Create wings and a halo for your Christmas angel decoration. This simple step will give your angel a more celestial look. The first thing you need to do is cut two wing shapes out of white felt, as this material is lightweight and easy to work with. Then, measure a length of silver ribbon that’s long enough to wrap around the back of the angel’s head and meet at the front where it can be tied into a bow.
Cut one more piece of ribbon in half lengthwise, so that you can use it to make a halo for your angel figure. Using hot glue, attach both wings onto either side of the body before tying the halos just above their heads; this will create an elegant appearance! Finally, finish off your decorative Christmas angel by attaching bells or other festive items to its wings and halo for added sparkle!
Step 3: Gather Decorative Elements
Step 3: Gather Decorative Elements is the third step in making your own Christmas Angel Hanging Decoration. To create this festive decoration, you will need a variety of materials such as colored paper, lace, beads, buttons, and sequins. Additionally, any other decorative items that bring your angel to life are welcome!
To start off with the creative process, choose colors or prints that best match your holiday theme. For example, if you’re using white paper for the wings, select red and green beads for contrast. If you prefer to use lace instead of paper for the wings, pick out colorful yarns or ribbons to decorate it further. With these elements at hand ready to be used in combination with each other will make sure no two angels look alike!
Step 4: Assemble the Angel
This article provides step-by-step instructions for making a Christmas angel from a few simple crafts materials. Step four of the process is to assemble the angel, and this task requires some patience and creativity. Start by using glue to attach the legs to the body. Make sure that they are firmly attached and in a standing position.
You can then use pins or glue to attach wings onto either side of the body at an angle that suits you. If you have chosen to add any additional decorations, such as beads or sequins, now would be the time to secure these with craft glue. A final touch could be adding yarn or pipe cleaners around the neckline for hair. When all of your pieces have been added it’s time to hang up your completed angel decoration!
Step 5: Hang The Angel
Creating your own Christmas angel to hang on your tree is a wonderful way to personalize the holiday season. With just a few simple materials and steps, you can make a festive and beautiful angel that will bring joy to your home. Step 5: Hang The Angel is an important step in the process of creating this unique decoration.
To hang the completed angel, use a thin piece of thread or string that won’t be too noticeable or detract from the beauty of the ornament. Thread it through each of the four sides at about halfway up from where they meet and tie a sturdy knot at each end. Hang the finished product on your chosen spot on the Christmas tree for all to admire! Make sure to secure it with enough slack so that it’s easy for everyone to reach out and touch their very own handmade Christmas angel!
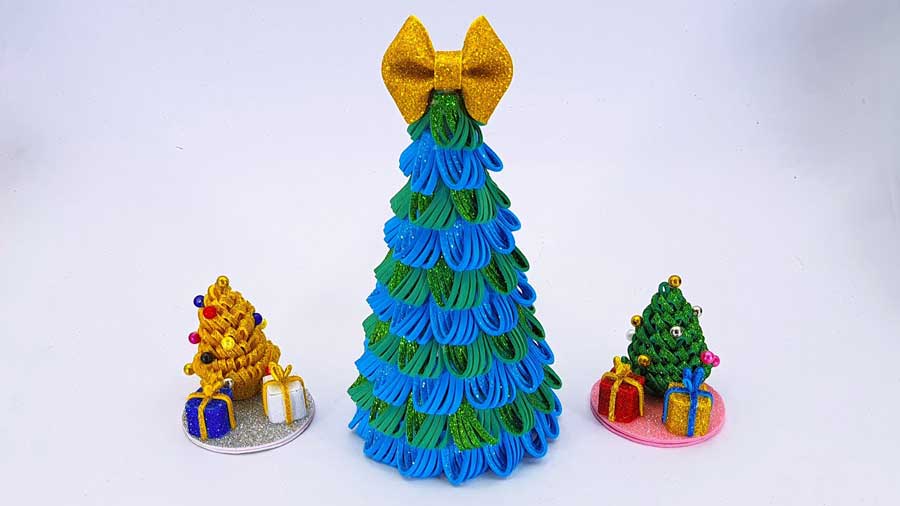
6. How To Make Christmas Tree | Christmas Decoration Ideas | DIY Christmas Tree With Glitter Foam Sheet
DIY Christmas Tree
This is the season to decorate your home with DIY Christmas trees! Creating a festive holiday atmosphere in your home doesn’t have to be expensive or complicated. This article will show you how to make a beautiful and unique Christmas tree from glitter foam sheets, perfect for adding a touch of sparkle and holiday spirit to your living space.
This step-by-step guide demonstrates how easy it is for anyone with minimal crafting skills to construct an eye-catching Christmas tree. With just some simple materials such as glitter foam sheets, glue, and scissors, you can create a stunning tree that will look great in any space. Plus, this decoration is reusable year after year so you can enjoy it every winter season! So gather up these supplies and follow along with these instructions to make your own one-of-a-kind DIY Christmas tree.
Step 1: Gather Supplies
Making homemade Christmas decorations is a great way to show off your festive spirit and add a personal touch to your holiday decor. To make a glittery foam sheet Christmas tree decoration, you will need just a few supplies that can be found at any craft store.
Step 1: Gather the following supplies: foam sheets in various shades of green, gold foil or glitter, scissors or an X-Acto knife, hot glue gun and sticks, felt for the tree base, and ribbon for hanging. Foam sheets are lightweight materials that are easy to cut into shapes with scissors or an X-Acto knife—perfect for making Christmas decorations! Felt provides stability to the bottom of your decoration while gold foil or glitter adds sparkle and shine when glued onto the foam sheets. Finally, use ribbon as a way to hang up your masterpiece once it’s finished.
Step 2: Cut Foam Sheet
If you want to make a unique Christmas tree decoration this holiday season, try making a DIY Christmas tree using glitter foam sheets. This project is simple and can be completed in just a few steps. Step 2: Cut Foam Sheet is the second step of the process.
To begin, choose one or two sheets of foam sheet with glitter designs on them. Grab some scissors and start cutting out various shapes that will become decorations for your DIY Christmas tree. The shapes could include stars, snowflakes, hearts, circles – whatever you like! Make sure each shape has an even side so that it fits nicely on the branches of your homemade tree. You may need to use an X-Acto knife if you’re cutting intricate patterns or designs into the foam sheet.
Step 3: Glue Foam to Shape
Making your own Christmas tree decoration is a fun and creative way to customize your holiday décor. Glue foam is one of the key steps in making a DIY glitter foam sheet Christmas tree, allowing you to create an eye-catching 3D tree.
To start this step, cut the desired shapes out of the glitter foam sheet with scissors or a craft knife. Using hot glue, attach the pieces together to form a cone-like shape that serves as the base for your tree. Ensure that all edges are secured tightly before continuing on with your design. For added stability, use clamps to hold each piece together while the glue dries completely. Once finished, leave it aside until ready to move on to further decoration steps such as adding beads or other embellishments for extra sparkle and shine!
Step 4: Decorate with Glitter
When it comes to creating Christmas decorations, there is nothing quite like the sparkle and shimmer of glitter. For those looking to add a touch of glamour to their holiday decorating, step 4 in making your own DIY Christmas Tree with Glitter Foam Sheet is all about adding some sparkle!
To achieve that perfect festive look, start by cutting out shapes from the foam sheet such as stars and snowflakes which can be used for decorating. Once you have your desired shapes cut out it’s time to get glitzy! Coat each shape in glue before sprinkling generously with glitter. Be sure to cover every inch of the shape with an even layer of glitter for maximum impact when hung on your tree. Use different colors of glitter such as gold, silver, and bronze for a truly eye-catching result.
Step 5: Add String Lights
Christmas is an exciting time of year, and what better way to get in the holiday spirit than by creating your own unique Christmas tree decorations? Step 5 of this tutorial will show you how to take your DIY Christmas Tree with Glitter Foam Sheet to the next level by adding string lights for extra sparkle. Not only is it easy to do, but it adds a personal touch that will help make your home extra festive.
Adding string lights to a DIY project is straightforward and requires only minimal supplies. All that’s needed are some battery-operated LED string lights in any color or design you like – perfect for adjusting the mood of your decorations! To attach them, simply use hot glue or E6000 glue along the edges of each branch on your glitter foam sheet tree. Finally, light up your creation with a flick of a switch and admire the twinkling results!
Final Thoughts
In conclusion, Custom Christmas Decor adds a personal touch to the holiday season. Whether it’s a personalized ornament, a special greeting card, or a one-of-a-kind piece of art, custom Christmas décor is sure to bring delight and nostalgia to your home. With so many options available, you can make memories that will last for years to come. Let this holiday season be filled with joy and cheer by making the most of custom Christmas decorations!


