


The holiday season is fast approaching, bringing with it the joyful anticipation of time spent with family and friends. Christmas Decoration Ornaments are a key part of this joyous celebration, providing a festive atmosphere and warm sentiments associated with the holiday season. Ornamental decorations are an essential component of any successful Christmas décor, adding sparkle and glimmer to the festivities.
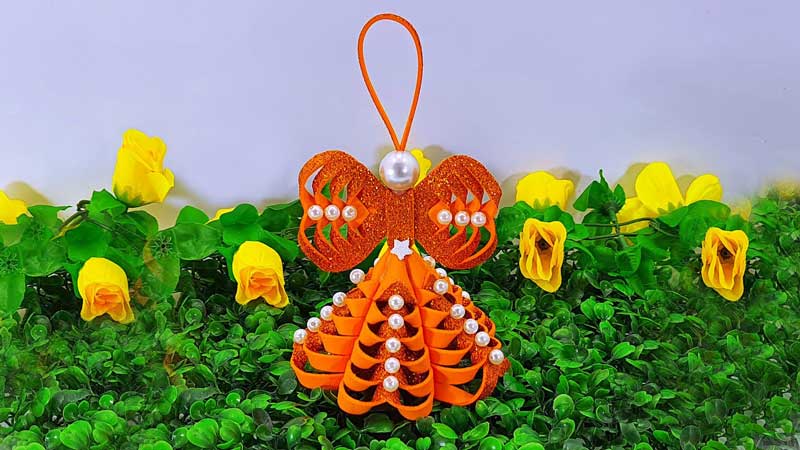
The holiday season is upon us and the Christmas Decoration Ornaments are out in full force. Everywhere you look, glimmering lights twinkle in windows, snowflakes hang from trees, and jolly Santas deck the halls. But one of the most eye-catching decorations of all is the glitter paper angel.
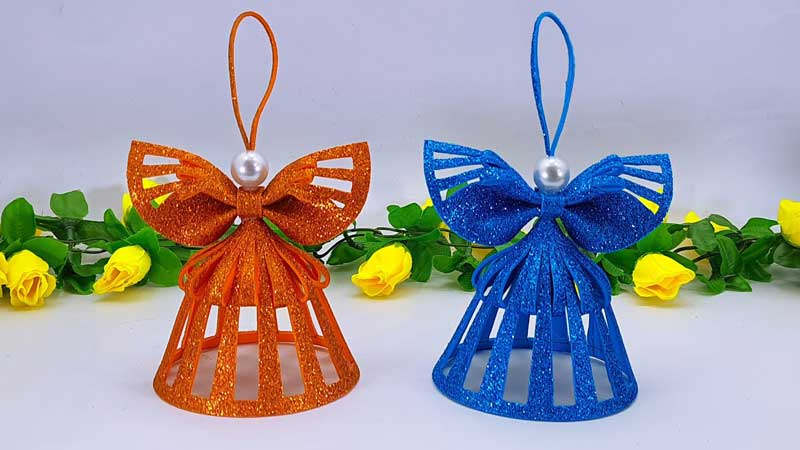
This unique ornament adds a touch of sparkle to your home decor. Made with special reflective paper that catches even the slightest light source, these delicate angels create a beautiful display when hung on any Christmas tree or mantlepiece. The angels range from small tabletop pieces to larger versions for hanging up high. They come in various colors and sizes so you can find one that suits your style perfectly!
Make this festive season extra special with a glitter paper angel – it’ll be sure to make your home look merry and bright!
1. Christmas Angel | Christmas Decoration Ornaments With Glitter Paper Angel | Hanging Christmas Crafts
Christmas Decoration Ornaments is just around the corner, and it’s time to start decorating! To make a beautiful Christmas decoration ornament using glitter paper angels, there are some essential materials needed.
To begin the project, gather up cardstock paper in white or different colors of your choice; scissors; a pencil; glitter glue; silver or gold metallic thread for hanging the ornament; and a black marker for drawing facial features. Make sure to use good quality cardstock that won’t tear too easily when cutting out shapes. Scissors should be sharp enough so that you can cut out small intricate pieces with accuracy. The glitter glue should be non-toxic and easy to squeeze out of the container without leaving any mess behind.
Step One: Creating the Angel Body
How to make a beautiful angel ornament for your Christmas tree this holiday season? Creating the perfect angel from glitter paper can be easy and fun! Step one in the process is creating the body of the angel.
Start by cutting out two identical circles from your choice of glitter paper. Make sure that these circles are larger than you want your finished angel to be, as they will shrink when folded. Once you have two identical circles, fold each circle in half and then unfold them again. Take one circle, pinch it in the middle and then flip it over. Repeat this same step with your second circle. Finally, clip or staple the two sides together at their pinched points to create an even-looking body shape for your paper angel. Now you’re ready to decorate!
Step Two: Adding Angel Wings
Decorating your home for the holidays can be a fun and memorable experience. With a few simple materials and some creativity, you can make beautiful decorations that your family will treasure for years to come. One of our favorite holiday decoration projects is creating glitter paper angels. In this article, we’ll take you step-by-step through the process – starting with Step Two: Adding Angel Wings.
To add wings to your angel ornament, first cut two wing shapes out of the silver glitter paper or cardstock. Then attach them to the backside of the angel with glue or double-sided tape. Be sure to position them symmetrically so your angel looks balanced from all angles! Once secure, use an X-ACTO knife to shape the wings into a curved shape if desired.
Step Three: Decorating with Glitter
Making a Christmas decoration ornament with glitter paper angels is an easy and fun way to liven up your holiday decor! Step three in this process is all about decorating with glitter.
Once you’ve cut out the shapes of your angel, it’s time to add some sparkle and shine to the design. Start by adding a small amount of glue around the edges of your paper shape. Then, sprinkle on some glitter liberally. This will cover any areas that may not have been perfectly covered by glue. Be sure to tap off any excess glitter when finished so that it doesn’t get all over everything else! Put aside for drying before moving on to step four.
For extra sparkle, consider using large-grain or iridescent glitters for maximum aesthetic appeal.
Step Four: Atta Christmas is a time of celebration and joy, and decorating your home with festive decorations can make the holiday season even more special. One of the most popular decorations during the Christmas season is ornaments, and one of the most creative ideas for an ornament comes in the form of a glitter paper angel. This article will explore how to craft such an amazing ornament, as well as offer tips on how to make it look its very best.
Christmas is just around the corner and it’s time to start creating decorations for the festive season. One fun craft project to try is making glitter paper angels. These angel ornaments are easy to make and a great way to get your home looking festive this year! Step four of the paper angel creation process is attaching a hanger.
To begin, you will need some thread or thin fishing line. Cut two lengths that are each 3-4 inches long and tie them together in a knot at one end. Thread the knot through a hole in the top of your glitter paper angel while pulling gently on both ends of the thread so it doesn’t tear through the paper. Once it’s securely threaded through, create another knot at that end of the thread so it doesn’t come undone easily.
2. Attractive Christmas Snowflakes For Party Decorations – Christmas Snowflake With Glitter Foam Paper
Christmas Snowflakes
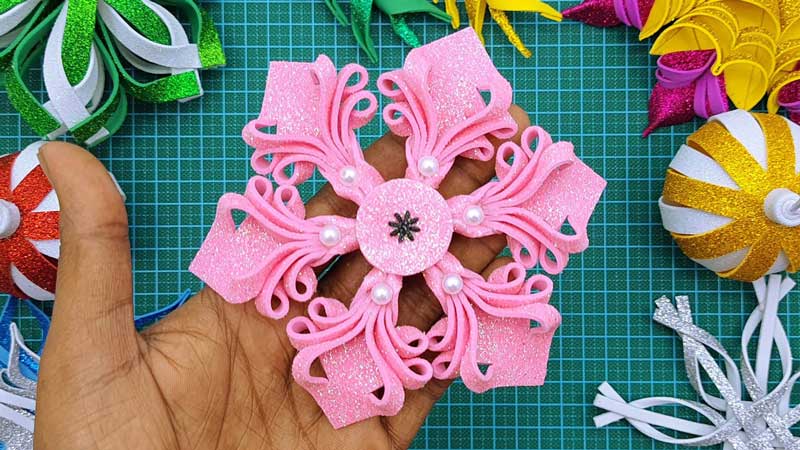
Christmas snowflakes offer a beautiful and classic way to decorate for the holidays. With so many different colors, shapes, and sizes available, it’s easy to find the perfect snowflake decoration for any Christmas celebration. Glitter foam paper is one of the most popular materials used to craft attractive and festive Christmas snowflakes. Not only are they visually appealing, but these lightweight decorations can also be hung from ceilings or walls with ease.
To make your own glitter foam paper snowflakes for party decorations this holiday season, start by cutting out a basic shape in white foam paper – such as a star or circle – then cut various sizes of small triangles from a sheet of glittery colored foam paper. Attach the triangle pieces to the main spacer using glue or double-sided tape and let dry before adding it to your décor.
Materials: Glitter Foam Paper
Are you looking for the perfect craft project to decorate your home in time for the holidays? Glitter foam paper is an easy and attractive material that can be used to make Christmas snowflakes – perfect for a festive party decoration. It’s quick and simple, with no advanced crafting skills needed! All you need is some glitter foam paper, scissors, and a bit of imagination. The fun part is in creating unique snowflake designs; when two sides are glued together, these sparkly creations will look beautiful on any tree or window display.
Glitter foam paper comes in many different colors, so you can get creative with adding extra sparkle to your decorations. You could go traditional with white snowflakes or add some festive cheer by using reds, greens, and blues. And don’t forget metallic silver or gold!
Crafting Steps: Cut, Glue, and Create
Christmas is the season for giving, and nothing drags out the festive spirit quite like a handmade decoration. If you’re looking for a special crafty project to do with friends or family this holiday season, look no further – crafting Christmas snowflakes out of glitter foam paper is fun and easy! With just three simple steps – cut, glue, and create – you can easily make attractive decorations that will bring your home alive with seasonal cheer.
This guide will help you learn how to make beautiful snowflakes from glitter foam paper. You’ll need scissors and some craft glue to get started. Cut the foam paper into your desired shape – it could be circles or even squares if you wish – then piece them together in whatever design makes your heart sing! Use a dab of glue on each piece so that they stay together when hung up around the house later on.
Customization Options: Colors, Sizes
This Christmas season, make your holiday decorations even more special with custom snowflakes made with glitter foam paper. These festive and stylish decorations are the perfect addition to any party or event. They come in many sizes and colors, so you can choose a look that fits your style and decor.
These snowflakes can be customized to fit any color scheme or design aesthetic. Whether you’re looking for an elegant winter white snowflake or a bold pop of color to brighten up the room, these foam paper creations have something for everyone. You can choose from standard sizes all the way up to large snowflakes, making it easy to create a beautiful backdrop for your holiday celebrations. Plus, the glitter element adds sparkle and shimmer for an extra-special touch.
Benefits of Using Foam Paper: Durable
When it comes to decorating for the holidays, Christmas snowflakes made from foam paper are an attractive, durable option. Foam paper is a lightweight material that can be used for a variety of crafts and decorations. It is easy to cut out into intricate shapes like snowflakes and provides added dimension when using glitter or foil accents. Not only does foam paper look great, but it is an incredibly durable material that won’t rip or tear easily.
Foam paper also has an inherent stickiness which allows you to easily adhere it onto any surface without needing glue or tape. This makes creating your own Christmas decorations even easier because all you need to do is cut out the foam paper shape, press it onto the wall or window and you’re done! You can even use multiple pieces of foam paper to make more complex designs with ease.
Ideas for Usage: Wall Hangings, Place Settings
The holiday season is the perfect time to get creative with decorations. If you’re looking for a unique way to spruce up your Christmas party, then consider using Christmas snowflakes made of glitter foam paper. These beautiful pieces can be used as wall hangings, place settings, and more. They add an extra touch of sparkle and shine to any room.
Creating your own Christmas snowflakes from scratch isn’t difficult. All you need is glitter foam paper, scissors, and glue or tape. Simply cut out shapes from the glitter paper in various sizes and layer them together onto a piece of cardstock for a 3D effect. Make sure to leave some extra space between each layer so that light can pass through the pieces when hung on walls or ceilings.
3. How To Make Christmas Angel 🎄 | Homemade Christmas Crafts | Angel For Christmas Decorations 🎄
Christmas Angel Homemade Craft
Crafting a Christmas Angel is the perfect way to add an extra touch of holiday cheer to your home this season. Whether you’re looking to spruce up the mantle or decorate the tree, a homemade angel is sure to bring out the festive spirit. With just a few simple materials, it’s easy to make your own unique angel that will look great as part of any Christmas decorations. In just a few steps, you can create an adorable angel that everyone in your family will love! Follow these instructions and learn how to make the perfect Christmas Angel Craft for any occasion.
Supplies: Materials Needed
Christmas is a time for creating and sharing beautiful decorations. One of the most beloved Christmas decorations is the homemade Christmas angel. This craft can be completed with a few simple, affordable supplies that are easy to find.
The materials needed for this festive craft include white or cream felt, scissors, a glue gun, and glue sticks, polyester stuffing material or pillow batting, gold cord trim or ribbon, basic sewing supplies (needles and thread), and an iron-on transfer pen. You may also want to include some decorative beads or glitter depending on how elaborate you would like your finished product to look. With these materials in hand, you will be ready to make an enchanting homemade Christmas angel decoration!
Step 1: Body Construction
Creating a homemade Christmas angel is a great way to get into the holiday spirit and add a personal touch to your home decor. This simple guide will show you the easy steps needed to make an angel for your own Christmas decorations.
The first step in creating this project is body construction. To begin, gather up some white craft foam and cut out two identical body shapes roughly 8 inches tall by 4 inches wide. Ensure that both pieces are symmetrical so the finished product looks even on all sides once it’s assembled. Next, use adhesive glue or fabric tape to attach them together at the edges, taking care not to leave any gaps between them. Finally, cut out a small piece of foam for the head shape and attach it securely onto the body with more glue or tape. Now your angel’s frame is ready!
Step 2: Finishing Touches
Once the basic shape and body of your Christmas angel is complete, it’s time for Step 2: Finishing Touches. This step will take your homemade Christmas craft from good to great! Here are a few ideas to help you add that extra special something:
First, choosing a color palette will be key to bringing your angel to life. Consider what colors represent the holiday season best for you—perhaps traditional reds and greens, or some more non-traditional blues and purples? Once you decide on the colors, use fabric paints or markers to add accents of holly leaves and berries, swirls of snowflakes, stars or bows. If you really want to get creative, consider adding some glitter too!
You can also enhance your angel’s look with accessories like wings made from poster board cut out in feather shapes sprayed with glitter spray paint.
Step 3: Decoration Ideas
Decorating with homemade Christmas angels is an easy and fun way to bring festive cheer into your home. Step three of creating the perfect Christmas angel decoration involves coming up with creative ideas for how to decorate it.
Begin by exploring different color combinations for the fabrics you have chosen for your angel. Incorporate bright colors like red, green, or gold that are often associated with the holiday season, or keep things classic and go for a white and silver combination. You can also add special details such as sequins or ribbons to make your angel truly unique.
Next up is deciding where to place your handmade Christmas angel once it’s complete.
Step 4: Accessories to Enhance Angel
Christmas is just around the corner, and it’s time to start crafting your very own handmade angel! This simple craft can be used as a centerpiece for the holiday season. In this fourth step of creating an angel, we will discuss how to add accessories that will enhance your design.
The possibilities are limitless when it comes to adding accessories to your angel. You can use ribbons, fabric flowers, buttons, and other small trinkets to give your angel a unique look. Additionally, you can add bells or jingle bells for extra sound effects. Adding a few feathers here and there also gives your angel some extra texture and dimension. To complete the look, you could also add some glitter or sequins for a sparkly effect that would really make your design stand out!
Step 5: Final Assembly of Angel
The final step in making a beautiful homemade Christmas craft angel for decorations is the assembly. It’s important to take your time and make sure that all pieces fit together correctly before beginning the project. With careful attention, you can create a beautiful angel that will bring joy and delight to those who view it.
To begin, lay out all of the pieces that have been cut and painted according to instructions from steps 1-4. Position them on a flat surface so they are easy to work with as you assemble them into an angel shape. Start by joining the wings together then move on to assembling the arms and legs, followed by the head and body. Assemble each section carefully using glue or tape where necessary until all parts are attached together. Finally, add any remaining paint details such as eyes, hair, or clothing accessories depending on your design preferences.
4. Awesome Christmas Tree Making Ideas | Custom Christmas Decor | Beautiful Christmas Tree Ornaments
Christmas Tree Decor
With the holiday season upon us, it’s time to start thinking about decorating your Christmas tree. Whether you’re looking for an elegant and classic design or something more unique and creative, there is plenty of awesome Christmas tree-making ideas available! From custom decorations and beautiful ornaments to traditional garlands, these simple projects will make your holiday truly special.
For those who prefer a rustic look, try adding some burlap ribbon and wooden accents to your tree. This will create a cozy atmosphere while still giving off a festive vibe. If you’re feeling crafty, you can also make your own decorations using items like pinecones, twine, and felt. For a modern twist on tradition, consider adding strings of clear lights or colorful paper stars instead of tinsel or garland.
Decorating Basics
Decorating for the holidays can be daunting but with these simple basics, you’ll have your home turned into a winter wonderland in no time. Whether you’re looking to make awesome Christmas tree-making ideas, custom Christmas decor, or beautiful tree ornaments, there are some essential tips and tricks that will help get you started. First and foremost is choosing the right tree; if it’s too wide it won’t fit in the doorframe, if it’s too tall it won’t fit on your ceiling–make sure to measure twice before getting your perfect holiday centerpiece.
Next up is keeping a theme throughout the entire room; don’t mix traditional red and green with classic whites unless absolutely necessary. Make sure all of your decorations match each other so everything looks well-coordinated!
Creative Tree Suggestions
Are you looking for creative and unique ways to decorate your Christmas tree? Look no further! This article is here to provide awesome Christmas tree-making ideas, custom Christmas decorations, and beautiful Christmas tree ornaments that will make your holiday season even more special.
Whether you’re looking for a classic green evergreen with red bows, or something completely out of the ordinary such as an upside-down tree, this article can help you craft a one-of-a-kind masterpiece. Get ready to explore the possibilities of custom Christmas trees with modern twists on traditional themes. From using unexpected materials such as paper mache or burlap ribbon to adding an array of colorful lights and decorations to create a festive setting – there are lots of creative possibilities when it comes to crafting your own special holiday centerpiece.
Unique Ornaments
Having unique ornaments on your Christmas tree is a great way to give your home a festive and personal touch. Whether you’re looking for an easy DIY project, a special heirloom, or just something different than the traditional decorations this season, there’s an ornament out there for you. From 3D printed ornaments to homemade salt dough creations, here are some of the most beautiful and unique Christmas tree ornaments that will make your holiday décor stand out from the rest.
You can find all kinds of fun and interesting ornaments at craft stores, online shops, and even thrift stores. If you’re feeling creative this holiday season, try making your own custom designs with paper mache and paint, wood slices painted with festive patterns, or even glittering snow globes!
5. DIY Hanging Christmas Mini Tree | DIY Christmas Decoration Ideas! 🎄 Eva Foam Sheet Christmas Crafts
DIY Mini Tree
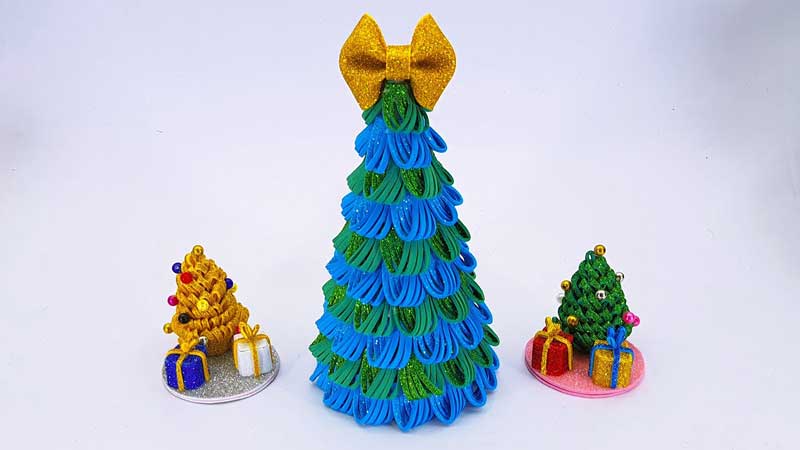
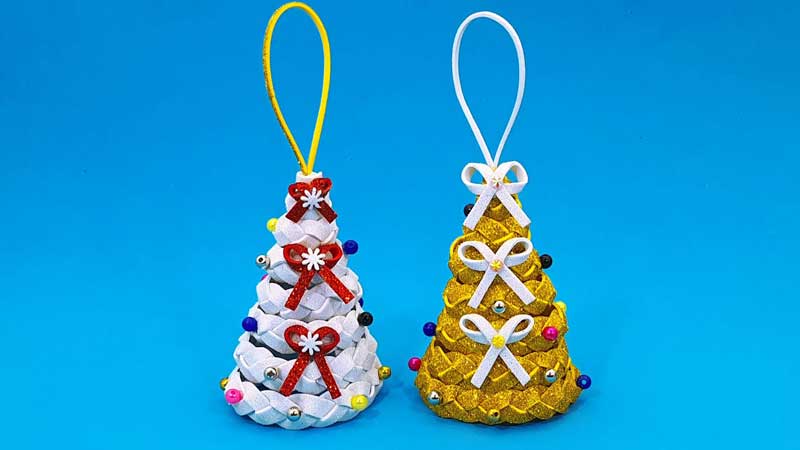
Christmas is just around the corner and it’s time to start sprucing up your home with some festive decorations. If you’re looking for an easy yet effective way to add a bit of holiday cheer, then why not try making your own DIY Mini Tree? This adorable hanging Christmas tree requires very few supplies – just some colorful Eva foam sheets, thread, and a few simple tools – and will be sure to bring a smile to anyone who sees it.
Creating this crafty little tree is simpler than you might think! All you need to do is cut out the desired shapes from the Eva foam sheet, use thread or yarn to tie them together in layers (as if creating a pom-pom), and hang it up wherever you want! It’s fun for kids too – they can help customize their own mini trees with different colors and sizes of foam pieces.
Materials: Eva Foam Sheets
This DIY Hanging Christmas Mini Tree is the perfect addition to any home for the holiday season. It’s an easy and fun craft idea that will bring a cozy, festive atmosphere into your home. The main material used in this project is Eva Foam Sheets, and they are easily accessible and affordable. Here’s a list of items you need to get started: Eva Foam Sheets (2 or 3mm thick), scissors, glue gun or hot glue sticks, glitter spray paint or paint of your choice, ribbon, hole punch & string or twine.
Making this Mini Tree is simple to do with just a little time and effort. You can personalize it however you like by adding glitter spray paint or any other color of paint for extra sparkle and shine!
Step 1: Cut the Pieces
Creating a festive decoration for your home this holiday season can be a fun and creative opportunity. Making DIY Christmas decorations is a great way to get into the holiday spirit while also saving money. If you’ve never created your own Christmas decorations before, Eva Foam Sheet Christmas Crafts are an excellent place to start! The first step in this exciting process is cutting the pieces needed to make your very own Hanging Christmas Mini Tree.
A hanging mini tree requires two large triangles and two small triangles made out of an Eva Foam Sheet. Measure the desired size of each triangle and draw it onto the sheet with a pencil or pen. Then, using scissors or an X-acto knife, begin cutting along the lines until all four shapes are complete. For extra support, you may wish to glue on thin strips of craft foam along each edge after completing the cuts.
Step 2: Assemble & Glue
Are you ready to assemble your Christmas mini-tree? This fun project is the perfect way to display your favorite holiday memories and decorations. With just a few easy steps, you can make a beautiful DIY hanging Christmas mini tree using Eva foam sheets!
In this article, we’ll walk you through Step 2: Assembling and gluing the pieces together. Start by gathering all of your supplies including: 2-3 colors of Eva foam sheets, scissors, glue gun or hot glue sticks, and any additional decorations like ribbons or bells. Cut the foam sheets into small strips that form the shape of a cone when arranged in alternating colors. Place the strips on top of each other in piles until you’ve filled up the entire cone shape. Once everything is arranged properly, it’s time to start gluing!
Step 3: Paint & Decorate
Paint and Decorate your DIY Hanging Christmas Mini Tree with Eva Foam Sheet Christmas Crafts!
Bring the holiday cheer to your home in a fun and creative way by making a beautiful hanging mini tree out of Eva foam sheets. In this step, you will get to customize the look of your mini tree—from adding color to glitter, to sequins! Your craftsmanship will delight family and friends as they admire your work. To start off you will need some acrylic paint and brushes (or sponge brushes) that are used specifically for painting on foam surfaces. Start by painting the entire tree one color or multiple colors depending on what look you desire. After letting it dry, add a coat of glitter for extra shine.
Step 4: Hang & Enjoy
If you’ve completed the first three steps of creating a DIY Hanging Christmas Mini Tree from Eva Foam Sheet, then congratulations! You are now ready for the fourth step: Hang & Enjoy. It is time to display your beautiful handmade decoration and enjoy its festive charm for the holiday season. Begin by finding an area in your home with plenty of space to hang your mini tree ornaments. Make sure it is somewhere that will be visible and able to be admired by family, friends, and guests during the holidays.
Once the perfect spot has been found, then it’s time to start hanging your decorations by attaching string, twine, or ribbon to each ornament. When complete, admire your masterpiece and enjoy its beauty throughout this wonderful time of year. This DIY Hanging Christmas Mini Tree is sure to bring plenty of holiday cheer into any household!
6. How To Make Christmas Angel – Hanging Christmas Decoration Ideas – DIY Angel-Making Instructions
Angel Making Basics
Making Christmas angels is a fun holiday craft that can be enjoyed by all ages. From children to adults, making an angel out of fabric or other materials is a creative way to decorate your home for the holidays. This article will provide the basics for making a beautiful angel decoration for your Christmas tree or mantelpiece.
Using simple supplies such as ribbon, felt, and embroidery floss, you can easily make an angel in just a few steps. After gathering your supplies, start by cutting out two circles from fabric or felt in different sizes – one large and one small – to form the body and head of the angel. Next, add details with embroidery floss including wings and facial features like eyes and mouth. Finish off the project with a ribbon halo attached around the head of your homemade angel!
Gather Supplies
Create the perfect Christmas decoration with this easy-to-follow guide on how to make a hanging Christmas angel. This charming and festive homemade ornament will bring delight to your home during the holiday season. To get started, gather all of the materials you need for this project. You’ll need supplies such as felt, fabric glue, scissors, beading cord or thin wire, and thin craft foam sheets in white and silver colors (or other colors you like). For an extra special touch, collect some small bells or sequins to decorate your angel. With these supplies on hand, you’re ready to begin crafting!
Create the Body
Are you looking for a unique way to bring the holiday spirit into your home this Christmas? If so, why not create a beautiful Christmas angel decoration? This craft is not only fun and easy to make, but it also adds an extra bit of magic to your Christmas decor. You don’t need to be an expert crafter either – all you need is some basic crafting materials and a little creativity! In this guide, you will learn how to make a lovely hanging angel with ease. From gathering the materials and creating the body, we’ve got everything covered – so let’s get started!
Add Wings, Face, and Hair
This holiday season, add some extra sparkle to your home with a creative DIY project – making an angel out of paper and other materials. This easy-to-follow guide will teach you how to make the perfect Christmas angel, with wings, a face, and even hair! You’ll be able to customize your Christmas angel according to your preferences and create a hanging decoration that is completely unique. Whether you’re looking for something special for yourself or a loved one, this craft project can be done by anyone regardless of age or skill level. So get ready to have some fun as you learn how to make an angel from scratch – it’s sure to bring some cheer into your home this holiday season!
Create Special Details
Creating special details for the holiday season is a great way to add some flair and fun to your Christmas decorations. An easy and unique way to do this is by making a DIY Christmas angel. With only a few simple materials, you can craft a beautiful hanging decoration for your home that will evoke the spirit of the holidays. Whether you are looking for an original gift idea or just want to spruce up your own living space, this DIY project is perfect for anyone who wants to make something special this Christmas season. With our helpful instructions, you’ll be able to easily create an impressive angel with wings that sparkle and shine!
Final Thoughts
In conclusion, Christmas Decoration Ornaments are a festive way to bring holiday cheer into your home. With a variety of shapes, sizes, and styles to choose from, there’s something to fit everyone’s taste and style. Not only do they make great gifts, but they also act as reminders that the season of giving is here! So why not take some time this holiday season to choose the perfect ornament for yourself or give it away as a gift?


