


The holidays are just around the corner and it’s time to start thinking about how you’ll decorate your home for Christmas. If you’re looking for some creative ways to add a festive touch to your holiday decor, consider hanging decorations! From classic wreaths and garlands to unique homemade creations, there’s a wide variety of options when it comes to hanging Christmas decorations. In this article, we’ll explore some of the best ideas for adding a bit of holiday cheer.
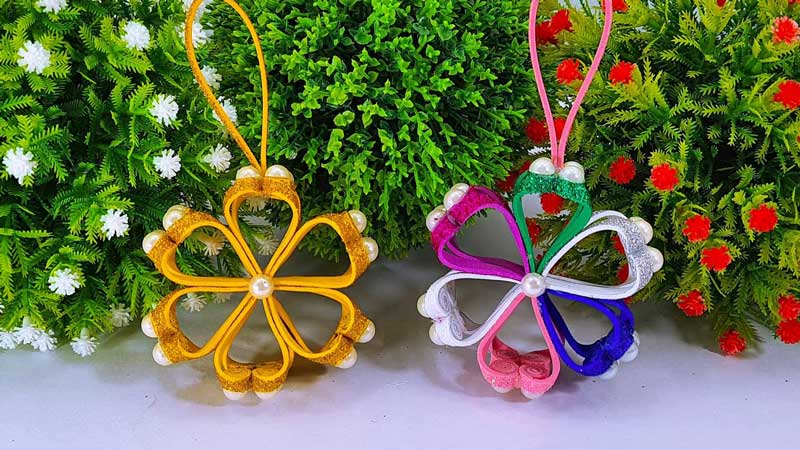
The holiday season brings with it a lot of cheer and festive decorations. One of the most popular decorations is the hanging Christmas snowflake. If you’re looking for something unique and creative, why not try making your own? With a glitter foam sheet, you can make a homemade Christmas snowflake that will be sure to wow your guests. Not only is this craft fun to make but it’s also an affordable way to decorate your home for the holidays.
1. Homemade Christmas Snowflake With Glitter Foam Sheet | Hanging Christmas Decoration Ideas
Get Creative
This time of year is the perfect time to get creative. Christmas decorations are one of the best ways to add festive holiday spirit to your home and make it feel warm and cozy for your friends, family, and guests. If you’re looking for a fun craft project that can help you bring in some extra holiday cheer, then consider making your own homemade Christmas snowflake with glitter foam sheets. This easy-to-make hanging decoration will add eye-catching detail to any room or window that will be sure to sparkle and shine throughout the season.
Not only is this project quick and simple, but it requires a few materials as well. All you need is a piece of glitter foam sheet cut into a snowflake shape (or any other shape!
Supplies Needed
Christmas decorations are an essential part of the holiday season. For a truly unique and creative way to decorate your home this year, make your own homemade Christmas snowflake with a glitter foam sheet! This easy-to-follow tutorial will have you enjoying a beautiful, handmade hanging decoration in no time. To get started, you will need some basic supplies including foam sheets, scissors, a ruler, glitter glue, and thread.
For the snowflake itself, you’ll need to begin by cutting out 8 equal triangles from the foam sheet. Use a ruler to measure each triangle equally and carefully cut them out with scissors – be sure to keep all of the triangles exactly the same size for the best results. Once all 8 pieces are completed you can use the glitter glue to add sparkle and shimmer for that festive look.
Step 1: Cut Snowflake Shapes
Homemade Christmas decorations are a great way to add a unique touch to your holiday decor. If you’re looking for an easy and fun project that will make your home look extra festive, try making snowflakes from glitter foam sheets! This easy DIY project is perfect for kids of all ages and makes beautiful hanging decorations. To get started, the first step in this homemade Christmas snowflake craft is cutting out the shapes.
Using scissors or a craft knife and cutting mat, cut various shapes like stars, pentagrams, circles, and hexagons from your glitter foam sheet. You can also draw the shape onto the foam beforehand with a pen if it helps you visualize what you’re going to be creating! To create intricate patterns that resemble real-life snowflakes, use small detailed shapes such as triangles or diamonds when cutting out your pieces.
Step 2: Glue Pieces Together
It’s time to move on to the second step of crafting your very own homemade Christmas snowflake with glitter foam sheets. After cutting out all the pieces, you’re now ready to glue them together! Glue is essential in order to make sure that your decorations stay on for years to come.
To start off, grab a bottle of craft glue and apply a thin layer onto one piece of the decoration. Place another piece on top and press firmly so that it sticks – repeat this process with all remaining pieces. Make sure not to use too much glue as it might create an uneven surface and won’t look nice when hung up! Once finished, leave the snowflake aside and wait a few minutes for the glue to dry before moving on to the next step.
Step 3: Attach Ribbon For Hanging
Step 3: Attach Ribbon For Hanging is the final step in creating a homemade Christmas snowflake with a glitter foam sheet. This unique and creative hanging Christmas decoration idea will add an extra sparkle to any home during the holiday season. All that’s needed are some scissors, glitter foam sheets, glue, and the ribbon of your choice. To begin, cut the chosen ribbon into two equal lengths and tie them together into a loop at one end. When done correctly this should create enough space for you to hang your completed snowflake ornament from it when finished. With the ribbon securely attached to each side of the snowflake ornament using glue or tape, you can now hang it up proudly and admire your festive creation!
Step 4: Add Glitter and Embellishments
This homemade Christmas snowflake is a great way to show off your festive spirit. With glitter foam sheets, you can make a beautiful hanging decoration that will bring holiday cheer to any space. Step 4 of the process is adding glitter and embellishments, which gives it that special sparkle and glimmer.
Add some extra pizzazz with little pieces of shiny beads, sequins, or charms for a unique and fun look. Glitter glue pens are also perfect for this step as they allow you to draw intricate detailing on the snowflake’s surface. When using glitter foam sheets, make sure to use an adhesive like Mod Podge to secure each piece in place before applying the glitter and embellishments. This will ensure that all of your hard work does not flake away!
2. Easy and Beautiful Christmas Snowflake Making Instructions – DIY Homemade Christmas Mini Snowflakes

Crafting Fun for Christmas
With the holiday season quickly approaching, it’s time to get creative and craft some festive decorations. Christmas snowflakes are an easy way to add a touch of winter wonderland to your home. With these simple instructions, you can make beautiful homemade mini snowflakes that will help spread some holiday cheer throughout your home.
This DIY project is perfect for anyone looking for a fun and easy activity to do with their family or friends. All you need is paper, scissors, and glue – supplies easily found in any household! Once complete, the vibrant colors of these homemade mini snowflakes will bring life into any space while creating lasting memories with those who join in on the crafting fun. Not only are they great decorations but also thoughtful gifts for loved ones near and far!
Materials Needed
Creating beautiful mini snowflakes for the Christmas season is an easy and fun DIY activity. All you need are a few simple materials to make your very own homemade decorations! To get started, you’ll need some construction paper in colors of your choice, a pair of scissors, glue, glitter, sequins or other embellishments. Additionally, you may want to have on hand some markers or crayons to add extra detailing if desired.
These materials can easily be found at local craft stores or even stocked up in the home supplies aisle of your favorite grocery store. Once you have all the items needed, it’s time to start crafting these miniature snowflakes! With a little bit of creativity and patience, you’ll soon have beautiful handmade decorations ready for display in no time at all!
Step 1: Fold the Paper
It’s that special time of year again when everyone is looking for ways to make their homes sparkle and shine! Crafting homemade Christmas snowflakes is a great way to get into the holiday spirit. These unique snowflakes can be used as decorations or even given away as gifts. This article will provide easy and beautiful instructions on how to make your very own mini Christmas snowflake with just a few simple materials.
The first step in this DIY project is to fold the paper. Start by folding a square piece of paper diagonally in half, then do it again so you have four equal triangles. Now fold each triangle back towards the center of the paper creating smaller triangles that should fit inside each other perfectly when folded correctly – similar to origami techniques.
Step 2: Cut Out Snowflake Design
Making Christmas snowflakes is an easy and fun craft activity that can be enjoyed by people of all ages. Step 2 in creating a beautiful, homemade mini snowflake involves cutting out the desired design. To begin, you will need scissors, white paper, and a ruler. Trace your snowflake design onto the paper using the ruler to ensure straight lines. Once your design is traced, it’s time to start cutting! Taking care to use precise movements, cut along each line of your traced pattern with your scissors until you have removed all unnecessary paper around the shape. After completing this step, you should have a unique and detailed snowflake ready for decorating! With just a few simple steps, you can create beautiful homemade mini-Christmas snowflakes in no time at all!
Step 3: Unfold and Enjoy!
Creating your own miniature snowflakes is easier than you think! The third and final step of the process will have you ready to admire your work in no time. After folding and then cutting out your paper snowflake, it’s time to unfold and enjoy!
First, carefully undo all the folds you made in Step 2. Once all of your folds are undone, gently hold one side of the paper between two fingers and pull outwards away from the center until a complete snowflake shape appears. Now is the fun part – marvel at how beautiful and unique your creation is! With all its intricate details, it’s sure to be one-of-a-kind.
The best part? You can save these creations for years to come as a reminder of what special memories were created while making them.
Variations on Snowflakes
Christmas is a time to get creative and make decorations that can brighten up any home. Making your own snowflakes is an easy and fun way to do just that – and you don’t need any special equipment either! In this article, we’re going to show you how to make beautiful homemade Christmas mini snowflakes with simple instructions and materials. Not only will these be a great addition to your holiday decorations, but they also come in many different variations so you can customize them however you’d like. Whether you want classic white paper versions or brightly colored plastic ones, there are plenty of options for creating the perfect snowflake for your Christmas celebration. So get ready for some festive fun as we take a look at the best variations on Christmas snowflakes!
Tips for Successful Snowflakes
Are you looking for tips to help you make beautiful and unique snowflakes this holiday season? With just some paper, scissors, and a little creativity, you can turn ordinary pieces of paper into gorgeous snowflakes that will bring cheer and joy to your home. Here are helpful tips for successful snowflake making so you can create the perfect Christmas decorations.
To begin with, it’s important to use high-quality paper as a base for your snowflakes. This will ensure that they look great when cut out and won’t tear or rip easily. Different weights of tissue or construction paper work the best. You can also experiment with different colors to give your decorations more vibrancy! When cutting out shapes for your snowflakes, be sure to use sharp scissors that won’t snag the material and ruin its shape.
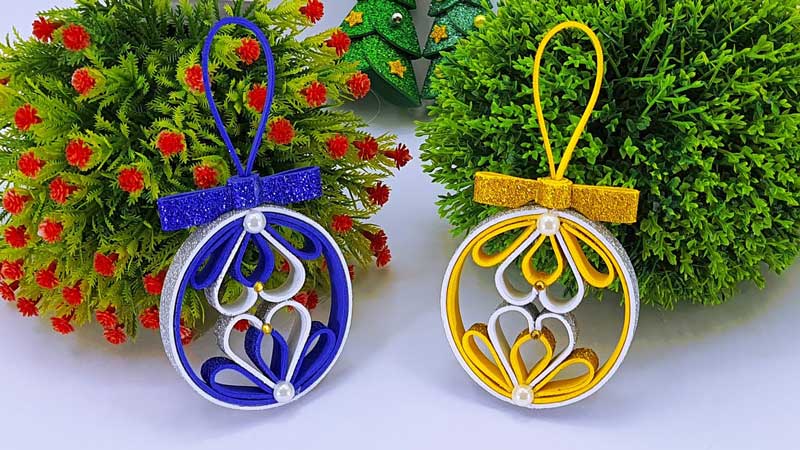
3. DIY Hanging Christmas Snowflake Decoration | Homemade Christmas Tree Ornaments With Eva Glitter Foam
Christmas Tree Ornaments
Christmas tree ornaments add a touch of magic to your holiday celebration. Whether you choose to buy store-bought decorations or make them yourself, it’s easy to find the perfect ornament for your Christmas tree. This year, why not try something unique and crafty and make some homemade Christmas tree ornaments? With just a few supplies like Eva glitter foam, string, scissors, and glue, you can create beautiful hanging snowflake decorations that will bring the spirit of Christmas into your home. These homemade ornaments are perfect for adding an extra bit of sparkle and festivity to any Christmas tree. Not only are they easy to make but also require minimal effort – so even if you’re new to crafting you can still make these beautiful decorations in no time! Let’s get started on this DIY project that will bring some extra cheer into your home this holiday season.
Materials: Eva Glitter Foam Sheet
This festive season, add a touch of sparkle to your home with this easy DIY hanging Christmas snowflake decoration. The main material used in this tutorial is Eva glitter foam sheet – a lightweight yet sturdy foam that’s great for creating all kinds of decorations. The sheet comes in various colors, allowing you to choose the perfect match for your home décor. It’s also very easy to work with and can be easily cut into any shape you like. With a few simple steps, you can create beautiful homemade Christmas tree ornaments that will truly make your holiday season even more special!
Steps: Cutting Snowflake
Creating a beautiful, festive Christmas snowflake is easy with this step-by-step guide! All you need to get started is some EVA glitter foam paper and a pair of scissors. This homemade snowflake would look great hanging from your Christmas tree or displayed on a mantle. In just eight simple steps, you’ll have the perfect holiday decoration for your home.
First, draw out the shape of your snowflake on the EVA glitter foam paper using a pencil or marker. Next, use scissors to carefully cut out each piece of the design so that it looks symmetrical and attractive when finished. Once all pieces are cut out, attach them together using glue or tape. To add an extra special touch, arrange colorful sequins in between each piece of the snowflake before attaching them together to create a unique look.
Decorating the Snowflake
Decorating the Snowflake – For a unique and festive touch to your holiday decorations this year, create a beautiful snowflake ornament to hang from your Christmas tree. These homemade ornaments will be a special addition to the traditional Christmas decor in any home. With just a few simple materials like Eva Glitter Foam, you can easily make these DIY Hanging Christmas Snowflake Decorations for your own family’s holiday celebration.
Making these snowflakes is an enjoyable and creative activity for adults and kids alike! The process of cutting out the pieces for each snowflake and assembling them together makes it fun for everyone involved. Once finished, you’ll have an eye-catching piece of art that will look stunning on any Christmas tree or hung up around the house.
Hanging the Snowflake
The holiday season is almost upon us, and it’s time to begin decorating for Christmas. If you’re looking for a special, homemade way to bring some festive cheer into your home this year, consider making a DIY hanging snowflake decoration. This easy-to-make project is perfect for anyone with some basic crafting supplies and a bit of creativity. It uses Eva glitter foam, an affordable material that can be found in most major craft stores or online retailers. The result is dazzlingly beautiful; an eye-catching snowflake ornament that will shimmer from the tree or hang as a window decoration!
This particular craft project requires only basic materials such as scissors and glue pieces of Eva glitter foam together in the shape of a snowflake. You can use white foam for traditional decorations or go wild with colors like red and green to add extra sparkle to your creation.
Variations: Different Shapes, Colors
Making your own Christmas decorations is a fun and creative way to make your home look festive for the holidays. This DIY Hanging Christmas Snowflake Decoration Homemade Christmas Tree Ornaments With Eva Glitter Foam project gives you the ability to customize the size, shape, and color of your snowflakes so they can match any type of holiday decor.
You can start by cutting out different shapes from the foam sheets – circles, triangles, or pentagons – and then overlaying them on top of each other in a snowflake pattern. Once you have cut out your desired shape, use glitter foam glue to adhere them together for a sparkly effect. You can also paint different colors onto the foam if you want it to stand out even more!
4. 🎄 New Year’s Toy On A Christmas Tree 🎄 | Christmas Decoration Ideas | DIY Christmas Tree Ornaments
Supplies:
As the song goes, it’s the most wonderful time of the year! Get into the holiday spirit and make your own unique Christmas tree ornaments with this simple DIY guide. All you need is a few basic supplies and a little creative spark to create beautiful decorations that will bring joy to your home this holiday season.
A successful Christmas tree decoration project starts with gathering all of the necessary supplies. Start by grabbing some colorful pieces of felt, scissors, tape, glue, string, or ribbon for hanging purposes, markers for drawing details on your ornaments, and any other materials you’d like to work with such as sequins, pom-poms, and glitter. Once you have all these items on hand then it’s time to get creative!
Making a Toy Ornament:
Start your New Year’s celebration off with a special, handmade toy ornament for your Christmas tree. Whether you are looking for a personalized gift or something fun to do with the kids, making a toy ornament is an easy and affordable way to spruce up your holiday decorations.
Making a toy ornament requires a few supplies and just a little bit of time and creativity. Start by gathering some lightweight materials like fabric, felt, or craft foam. You’ll also need scissors, glue, thread, and stuffing material such as cotton batting or polyester fiberfill. Then get creative! Cut out shapes that represent toys like teddy bears, cars or dolls then sew them together at the edges leaving an opening at the top for stuffing.
Decorating the Tree with Toys:
The holidays are just around the corner and what better way to get into the spirit than by decorating your Christmas tree with some festive toys? From classic decorations to modern craft ideas, there is something for everyone when it comes to creating a beautiful holiday display. Whether you’re looking for something traditional or unique, these DIY Christmas tree ornaments can help you make your home even merrier this season.
Start by selecting a toy that will bring joy and excitement on Christmas morning. Look through other family members’ collections, take a trip down memory lane and choose an old favorite, or search thrift stores for vintage items that still have character. Once you have chosen your toy of choice, transform it into a festive ornament with paint and glitter to add some sparkle to your tree.
Different Types of Toys:
Different types of toys can make for a fun and memorable Christmas experience, especially when it comes to decorating your own Christmas tree. The holiday season is the perfect time to bring out traditional toys like stuffed animals and board games, but there are also plenty of new options that can help transform your home into a winter wonderland. From DIY ornaments to handmade decorations, these different types of toys allow you to show off your creative side and get into the festive spirit!
One type of toy that makes a great addition to any Christmas tree is an ornament. Ornaments come in all shapes and sizes and can be customized with names or pictures. They’re also fairly inexpensive, so they won’t break the bank if you want to go all out on decorations this year. For those looking for something more unique, why not try making some homemade creations?
Creative Ideas for Christmas Toy Ornaments:
Christmas is the perfect time of year to get creative and spruce up your tree with unique decorations. One way to do this is by making homemade toy ornaments for your Christmas tree. Not only are these creative ornaments easy to make, but they will also bring a fun, festive touch to your holiday decor.
To create these ornaments, you can start out with items like miscellaneous toys from around the house, paintbrushes and paints in various colors, ribbons, and glitter – all of which you can find at any craft store. With some creativity and imagination, you can use these materials to turn regular toys into festive decorations! For example, an action figure can become a snowman ornament with just some glue and a few coats of white paint; while plush animals can easily be transformed into reindeers with some red paint and glitter.
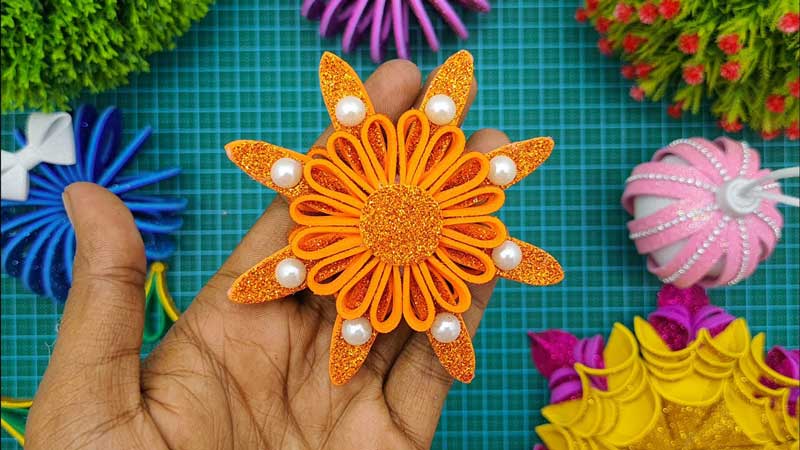
5. Amazing Christmas Snowflakes Making Instruction | Custom Christmas Decor With Eva Glitter Foam Sheet
DIY Holiday Decoration
DIY Holiday Decoration: Make Amazing Christmas Snowflakes with Eva Glitter Foam Sheets
This holiday season, why not try a unique and fun craft project? Making your own Christmas decorations is a great way to get creative and add a personal touch to the holidays. With some simple tools and materials, you can create beautiful snowflakes using Eva Glitter Foam Sheets. Not only are these snowflakes easy to make, but they look fantastic when hung as decorations or even given as gifts! They are sure to become an instant hit with family or friends. All you need is a pair of scissors, glitter foam sheets, and instructions for making amazing Christmas Snowflakes. Once you’ve cut out your desired shapes from the foam sheets, all that’s left is to arrange them into the perfect decorative centerpiece for your holiday celebration!
What You Need: Eva Glitter Foam Sheet
Are you looking for a simple and creative way to add extra sparkle to your Christmas decorations? Then Eva Glitter Foam Sheet might be exactly what you need! This lightweight, easy-to-manage material can be used in a variety of ways, from making custom snowflakes to creating special festive garlands.
Eva Glitter Foam Sheet is an ideal craft material for the upcoming holiday season. It has a number of practical advantages, such as being lightweight so it’s easy to work with and store away when not in use. The glittery finish of the foam sheet also adds that little bit of magic that transforms ordinary decorations into something special. It is also very flexible and can be cut into different shapes and sizes, allowing you to make all kinds of unique Christmas decorations.
Step 1: Prepare Template
This holiday season, wow your friends and family with a custom Christmas snowflake made from Eva Glitter Foam Sheets. Crafting beautiful snowflakes from glitter foam sheets is easy, fun and makes a stunning addition to any holiday decorations. Step 1 in the process of making amazing Christmas snowflakes is preparing the template.
Before you begin cutting out your snowflake shape, it’s important to have a clear idea of what you want the end product to look like. To get started, use scissors or an X-ACTO knife to cut out simple shapes such as stars and circles in different sizes from the foam sheet. Once you have all these pieces cut out, arrange them together on top of each other until they form the desired design for your custom snowflake.
Step 2: Trace Template Onto Foam Sheet
Christmas is the time of the year to get creative and make your own decorations. This Amazing Christmas Snowflakes Making Instruction will show you how to customize a beautiful snowflake with Eva Glitter Foam Sheet. Step two of this process is to trace the template onto a foam sheet.
Start by cutting out the template that you have chosen for your snowflake and place it on top of the foam sheet. Make sure that you secure it in place using some tape, so it doesn’t move around as you are tracing with a pencil or pen. Slowly trace out the shape, keeping your hand steady and consistent until you have completed all lines. Once finished, carefully remove the template from underneath and there should now be an impression left behind on the foam sheet which is ready for cutting out!
Step 3: Cut Out Snowflake Shape
We all know that making Christmas snowflakes is a fun and creative way to spend time with your family around the holidays. The third step in creating amazing Christmas snowflakes from Eva Glitter Foam Sheets is cutting out the desired snowflake shape. With this foam material, it is easy to use scissors or craft knives to make any intricate designs imaginable.
For those who may not be as confident in their cutting abilities, there are many pre-made snowflake shapes available online or at craft stores which can then be glued on top of the glitter foam sheets for an extra sparkly effect. Once the desired shape has been cut out and decorated, it will be ready to hang up as part of an incredibly festive holiday display!
Step 4: Add Details With Markers
Christmas is the time of year to get creative with decorations. One great way to do this is by making custom snowflakes from Eva glitter foam sheets. Crafting a beautiful snowflake can be done in just four simple steps! Step 4, Adding Details with Markers, is where you will bring your project to life.
Adding detail with markers can be done in a few different ways. You could use colored markers to trace the outline of the snowflake and fill it in, or you could draw on details such as holly leaves and berries or other decorative patterns. Alternatively, if you have an intricate pattern that won’t fit inside your design, you can also use white-out pens or fabric markers to write on names or phrases around your edges!
Final Thoughts
In conclusion, Christmas decorations can be fun and creative when you add your own personal touch. Whether it’s using a variety of colors, textures, or shapes, these hanging Christmas decoration ideas will surely make your home stand out this holiday season. These ideas can also be used to create an atmosphere of coziness and cheer for yourself and your family. So why not get started now? Start decorating and adding those special touches that are unique to you and your home!


