


Christmas time is fast approaching and as the days get colder, it’s time to start thinking of festive decorations. One fun way to spruce up your living space for the season is by making homemade Christmas snowflakes. This craft is great for both children and adults alike and can easily be personalized to fit any holiday decor. Whether you want to hang them in your window or decorate a tree, these handmade Christmas snowflakes are sure to bring out the holiday spirit!
Christmas is a time for joy and celebration, and what better way to share the holiday cheer than by making your own Christmas snowflakes? This easy-to-follow handmade Christmas craft is perfect for kids of all ages and skill levels, allowing them to create unique snowflakes that they can proudly display. All you need is some paper, scissors, and glue.
1. Christmas Snowflakes Making Tutorial – Make Your Own Christmas Snowflakes – Handmade Christmas Craft
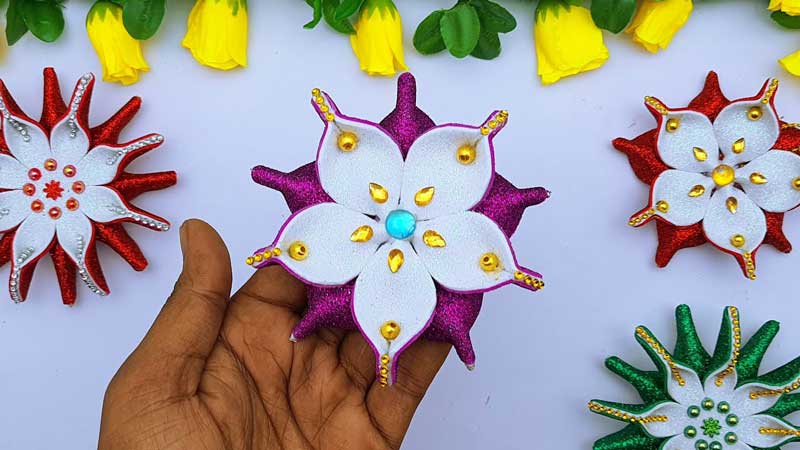
Make Your Own Christmas Snowflakes
Christmas is a wonderful time to get creative and make special decorations that transform a room into the holiday spirit. Making snowflakes for Christmas can be a fun activity for all members of the family, no matter their age. With just some paper, scissors, and a bit of imagination, you can create beautiful snowflakes that will become cherished memories of past holidays.
This article will teach you how to make your own Christmas snowflakes as part of your personalized Christmas décor. You’ll learn which materials are needed, how to cut out the different shapes and designs in the paper, and how to assemble your handmade creations together. Whether you’re creating delicate sculptures or 3D models with extra flourishes such as glitter and paint, this tutorial will help you make festive paper crafts that everyone can enjoy!
Materials Needed
We all know that the holidays can be a hectic time of year, but crafting handmade decorations can provide an ideal way to decompress and celebrate the season. Making your own Christmas snowflakes is an easy and fun way to get into the holiday spirit! To make your very own festive snowflakes, you will need several supplies.
First off, you will need some paper. Construction paper or regular printer paper both work well for this project. You’ll also need scissors and some tape or glue to attach the pieces together. If you want to get creative with your snowflakes, you might also want to consider grabbing some markers or crayons so that you can add color or draw special designs on them.
Step One: Cut the Paper
Making your own Christmas snowflakes is a great way to get into the holiday spirit! The process of creating these beautiful decorations is surprisingly simple. Step one in any handmade Christmas craft is to cut the paper. Start by cutting a piece of white construction paper into an even square or circle shape, depending on what type of snowflake you want to make. If you’d like a more intricate design, you can use scissors with different blade sizes and shapes for added texture.
Be sure to have enough space around the edges so that no parts get accidentally cut off. This will give your snowflake its desired look and provide stability when it’s hanging up on display later on. With the right tools and techniques, cutting the paper for your snowflake decoration can be fun as well as fulfilling!
Step Two: Fold and Cut
With Christmas just around the corner, it’s time to start crafting for the holidays! Making your own snowflakes is a great way to get into the holiday spirit. Step two in this handmade Christmas craft is folding and cutting.
To begin, fold a piece of white paper diagonally twice in both directions so that you have an X-shape. You can then cut off any extra paper that hangs off the edges. Make sure to save these pieces as they can be used later on during the craft! Once complete, unfold your paper and you should be left with an X-shape crease pattern visible on both sides of your sheet of paper.
The next step requires some scissors! Cut shapes out along each crease line – this could be small snips or larger cuts – whatever looks best to you is ideal!
Step Three: Unfold the Snowflake
This article will teach you how to make your own Christmas snowflake decorations. Step three of the process is unfolding the snowflakes and giving them a unique personality. This can be done with simple materials like scissors, tape, and glitter. Handmade snowflakes are a great way to make your home look festive during the holiday season!
Start by cutting out 4-6 identical paper shapes to use as your snowflake base. Make sure that each shape has six points so that it looks like a regular star when unfolded. Then fold the paper in half and cut small details into the center of each piece, making sure not to cut all the way through. Unfold each piece carefully and you will have several unique designs for your handmade snowflakes! Finally, add some extra sparkle by taping or gluing glitter onto each one before hanging them up around your house.
Step Four: Add Decorations
When it comes to Christmas crafts, making your own snowflakes is a classic way to get into the spirit of the season. This easy-to-follow guide will have you crafting homemade snowflakes in no time! Step four of the process is adding decorations.
Once your snowflake has been cut out, use glitter paint or glue and extra pieces of paper to add fun decorations. For a more elegant look, use tiny pearls or beads and glue them onto the snowflake for some sparkle and shine. If you’re feeling creative, try cutting out smaller shapes from colored paper and gluing them around the edges of the snowflake for added detail. Give yourself plenty of time to let each decoration dry before moving on to step five!
2. Beautiful Christmas Tree Ornaments – DIY Hanging Christmas Ball Making Ideas – Xmas Decoration Ideas
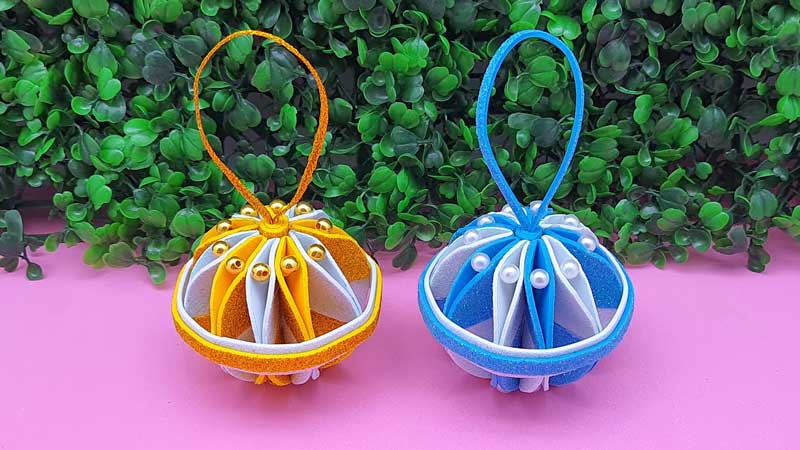
Beautiful Tree Ornaments
The holiday season is here, and nothing says Christmas like beautiful tree ornaments. Whether you choose to go with the classic store-bought decorations, or you prefer a more creative approach, there are plenty of ways to make your own stunning tree decorations. DIY hanging Christmas balls are a great way to give your tree that special sparkle this year. With a few simple supplies and some creativity, you can create unique ornaments that are sure to become family heirlooms in no time.
Making your own unique tree decorations doesn’t have to be complicated–all you need is glue, paint, glitter, and balloons of various sizes. Begin by blowing up your balloons and tying off the end securely so they won’t deflate while working on them.
Materials Needed:
Decorating a Christmas tree is one of the most enjoyable and rewarding activities during the holiday season. If you’re looking for some creative ways to spruce up your tree this year, why not try making some gorgeous DIY hanging Christmas ball ornaments? Here are some materials you would need to make these beautiful decorations:
First, you’ll need colorful sheets of paper. These should be enough so that you can create multiple sizes and shapes of ornaments. You will also need scissors or a paper cutter to help shape the papers into your desired shapes. To make sure your creations stay together, it’s good to have a glue gun on hand as well as ribbon or string for hanging purposes. Additionally, you might want to get some glitter pens and paints for further decoration if desired. Finally, don’t forget about adding beads or sequins for an extra sparkly touch!
Step 1: Making the Ball
Creating beautiful Christmas ball ornaments can add a special touch of festivity to any home for the holidays. If you’re looking for a fun and easy craft project, making your own hanging Christmas balls is the perfect way to get into the holiday spirit! Step 1 in this DIY project is all about making the actual ball that will be hung from the tree.
For this step, gather supplies like foam balls, glue, acrylic paint, and glitter of various colors. You’ll also want to pick up some ribbon or twine for hanging them later when they’re finished. Start off by taking one foam ball at a time and gluing it on pieces of yarn or other materials with hot glue until it’s covered completely. Let it dry before adding a coat of paint in any color you like.
Step 2: Assembling the Ball
As the holiday season approaches, many of us are looking for ways to make our homes look extra special. That’s why we created this comprehensive guide to making beautiful Christmas tree ornaments. Step two in this guide is assembling the ball – a fun and easy activity that requires just a few supplies.
To begin, you’ll need to gather your materials: felt sheets in various colors and sizes, scissors, thread and needle, cotton batting, glue gun, and glue sticks. Once you have everything together it’s time to get started! Cut out circles from the felt sheet that will become the panels of the ball. To create dimension for each panel fold them in half using your scissors as a template before stitching them together with thread and needle. For an added decorative touch, put some cotton batting between each piece before stitching them together.
Step 3: Hanging and Decorating
Once you have created your beautiful Christmas tree ornaments using the DIY hanging Christmas ball-making ideas, it is time to hang and decorate them. Step three of creating your own unique decorations involves setting up your tree and adorning it with handmade ornaments. To begin, choose a spot that can accommodate a nice-sized tree, set it up in a stand, and secure it with screws. Once the tree is standing tall, you can start to hang the ornaments.
Start by evenly spacing out larger pieces first then fill in around them with smaller ornaments so that no area of the tree looks sparse. Be sure to not overload one side so that any lights added will be visible from all angles. Additionally, if possible let natural light enter through windows for extra ambiance as this will help bring out the true beauty of each ornament piece.
Tips for Best Results
Creating a festive and beautiful Christmas tree is an important part of the holiday season! To make sure you have the best results, it helps to know some useful tips for creating your own DIY hanging Christmas ball ornaments. With a little bit of creativity, you can create amazing decorations that will bring joy to your home this season. Here are some great tips for getting the best results when making your own Christmas ornaments.
First off, start by selecting quality materials for your ornaments. Choose materials such as felt, burlap, cotton fabric, and ribbon in festive colors to give your creations a vibrant look. You’ll also need a sturdy thread to secure each ornament together – be sure to choose one that won’t break easily!
3. How To Make Christmas Snowflakes | Christmas Snowflakes Making Ideas | Hanging Christmas Snowflakes
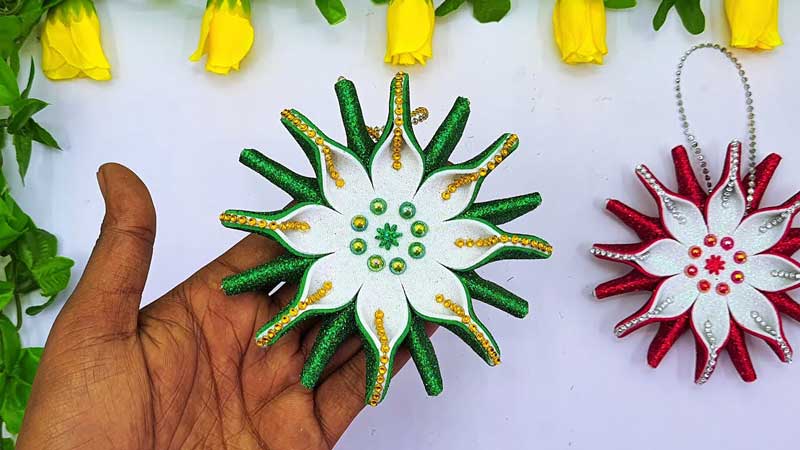
Making Christmas Snowflakes
Christmas is the perfect time of year to share special holiday decorations with loved ones, and snowflakes are a wonderful way to add a festive touch. Whether you’re looking for ideas for making hanging Christmas snowflakes or just want to get creative in the kitchen, this article has everything you need to know about how to make beautiful Christmas snowflakes.
With some patience and simple supplies such as construction paper, scissors, glue, and glitter, you can create unique decorations that will bring lots of cheer throughout the holidays. From classic cutouts to intricate designs and colorful displays – making your own Christmas snowflakes can be an enjoyable craft activity for all ages! With these helpful tips, you’ll be able to create stunning snowflake designs in no time at all. So what are you waiting for?
Materials: Needed Items
Christmas snowflakes are a festive decoration for the holiday season. There are many different ways to make snowflakes, but all of them require some basic materials. Crafting supplies such as scissors, paper, and glue can be used to create beautiful hanging decorations to add a touch of winter wonderland charm to any interior.
To make Christmas snowflakes, the most essential items needed are paper and scissors. Depending on how intricate the design is, other tools such as tweezers or toothpicks may come in handy when trimming off small pieces of paper. Glue can also be useful when sticking delicate parts together during assembly and hot glue guns can help with attaching loops at the back for easy hanging. Sequins or glitter can also give an extra sparkle to these unique creations that will bring joy into any home this holiday season!
Methods: Step-by-Step Instructions
Creating Christmas snowflakes is a classic holiday tradition that brings a touch of winter-time magic to your home. This article provides step-by-step instructions on how to make beautiful hanging Christmas snowflakes from simple materials like paper and scissors. In just a few easy steps, you will learn how to create eye-catching decorations for the home that will be sure to add some winter wonderland charm this holiday season.
To begin, you’ll need white or light-colored paper, scissors, and glue or double-sided tape. Use the paper to make six evenly sized triangles by folding it in half twice and then cutting along the creases. Unfold them and join each triangle together in an even circle by taping or gluing the ends together.
Decoration: Ideas for Hanging Snowflakes
Christmas is the perfect time to add a festive touch to your home. With all the joy and cheer of the season, snowflakes make for an ideal decorative accent. Whether you choose to hang them from your ceiling or windowpanes, there are plenty of creative ways you can bring these wintery decorations into your home this holiday season.
Snowflakes come in all shapes and sizes, so it’s important to consider what look you want to create before deciding on how to hang them in your space. If you’re looking for a simple option, paper cut-outs or snowflake garlands may be just what you need. But if you want something more eye-catching, 3D foam snowflakes or lighted strings may be better suited for the job!
Uniqueness: Making it Personal
The holiday season is a time of celebration, and one of the most special decorations is Christmas snowflakes. From windowsills to ceilings, these snowflakes can add a touch of festive spirit to any home or office. But if you’re feeling creative, why not think outside the box and make your own unique Christmas snowflakes? This article will provide several tips for making your own personalized hanging Christmas snowflakes with ease.
From picking out the right materials to cutting the perfect shapes, each step of the process can be tailored to create a truly unique set of snowflakes. Whether you want them to match a certain color scheme or reflect a particular theme, there’s no limit to what you can create with some creativity and patience. You could even use old scrapbook paper or fabric from an old dress – whatever material suits your needs!
Creative Ideas: Adding Extra Flair
As the holiday season rolls around, it’s time to start planning for Christmas decorations. One of the most iconic decorations associated with Christmas is the hanging snowflake. Whether you’re looking for a simple way to add some extra charm or want something more elaborate, there are plenty of creative ideas out there to make your own unique snowflakes. From using intricate paper-cutting techniques and stencils to repurposing everyday materials like buttons and beads, you can let your imagination run wild when creating these classic winter beauties. Here are some fun ways to add extra flair and sparkle to Christmas snowflakes this year.
4. Glitter Foam Paper Christmas Tree Making Ideas – DIY Christmas Tree Decoration Ideas – Xmas Tree
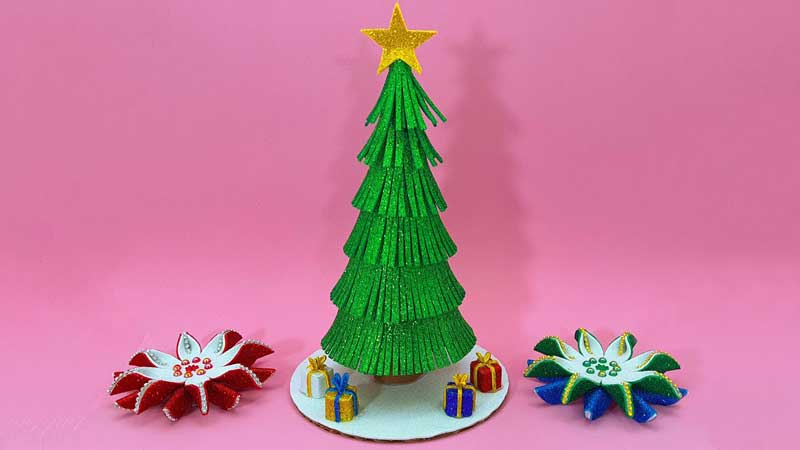
Glitter Foam Paper Christmas Tree
Create special holiday decorations with a unique DIY project – make your own Glitter Foam Paper Christmas Tree! Quick and easy to craft, this modern paper tree is the perfect way to add a sparkly touch to your festive home décor. Great for kids and adults alike, this fun project can be completed in just a few simple steps.
Begin by choosing foam paper in any color you like. With the help of scissors or even an Exacto knife, cut out triangles of various sizes to create the tiers of your tree. Place them in order from smallest at the top, to largest at the bottom for a realistic look. To give it some sparkle, cover each triangle with glitter glue or sprinkle glitter over the adhesive paper so that each piece looks sparkling and new.
Step 1: Gather Materials
Are you looking for a fun and creative way to decorate your home for the holidays? Try making a glitter foam paper Christmas tree! This simple DIY project is perfect for those looking to make their own decorations without spending too much money. With just a few materials, you can add some festive cheer to your holiday décor.
The first step in creating this sparkly masterpiece is to gather the necessary materials: glitter foam paper, scissors, double-sided adhesive tape and ruler. When selecting your glitter foam paper colors, consider choosing traditional holiday shades such as red, green, and gold, or go wild with unique hues like purple and blue. The options are truly endless when it comes to this crafty endeavor! Once you’ve gathered all of your supplies, it’s time to get started on crafting your very own sparkling Christmas tree decoration.
Step 2: Cut and Glue Foam Paper
If you are looking for a unique and fun way to add festive cheer to your Christmas decorations this year, then look no further than making your own glitter foam paper Christmas tree. With just a few simple steps, you can create an eye-catching holiday centerpiece that will be sure to impress everyone. Step two of the process requires cutting and gluing together the foam paper pieces.
Start by taking one of the foam sheets and cutting it into strips that are all the same length. Once all of your strips have been cut out, turn them upside down so the wrong side is facing up. Then glue each strip onto another sheet of foam paper in a tree-like shape. Make sure all sides are connected firmly before continuing on with step three.
Step 3: Add Glitter and Embellishments
Step three of the Glitter Foam Paper Christmas Tree Making Ideas is all about making your tree shine. Adding glitter and embellishments to the paper tree will make it stand out even more! To start, find fun, festive colors and textures that fit your holiday theme. Then, pour some glitter onto a flat surface or tray, and use scissors to cut shapes from the foam paper.
For example, if you want snowflakes on your tree you can use a snowflake punch tool to create them quickly. Finally, take each shape and dip it into the tray of glitter before pressing it onto the Christmas Tree. Repeat this process until your entire tree is covered with beautiful decorative pieces! With these simple steps, you’ll have an eye-catching Christmas decoration in no time!
Step 4: Create a Stand for the Tree
For this fourth step of making a Glitter Foam Paper Christmas Tree, you will need to create a stand for the tree. This is an easy and creative way to make sure your tree stays secure and upright during the holiday season. To begin, you will need two wooden boards that are slightly longer than the width of your tree, some screws or nails, and glue. Start by screwing or nailing the two boards together in an “L” shape at one end, creating a stable base for the tree.
Next, apply glue to both ends of each board so they stick together firmly and allow it to dry. Lastly, place your foam paper tree onto the stand you have created and then your project is complete! By following these simple steps you can create an attractive stand for your glitter foam paper Christmas tree that will last through many festive seasons.
Step 5: Final Touches and Decorations
Decorating for the holidays is one of the most exciting things about Christmas and what better way to show off your seasonal spirit than with a DIY glitter foam paper Christmas tree? Step five of this festive craft is all about final touches and decorations!
This step begins by adding any extra detailing or sparkle needed to finish off your tree. Glitter on some areas, or add ribbons or bows in different colors. If you want to make it even more festive, try adding small pieces of faux snowflakes, stars, or other festive pieces. You can also add small LED lights throughout the branches for a beautiful nighttime display.
Once you’ve added any extra ornamentation, check that all of the foam pieces are securely attached and everything looks good before displaying your masterpiece!
5. Christmas Tree Decoration Ornaments – Homemade Christmas Craft Item – Handmade Christmas Balls
Crafting Homemade Ornaments
Crafting Homemade Ornaments is a great way to get into the holiday spirit and create a one-of-a-kind atmosphere in your home. When it comes to Christmas tree decorations, homemade ornaments can bring an extra special touch of joy and excitement. Whether you’re looking for something unique or searching for the perfect gift, creating these handmade Christmas balls is sure to be a hit! With just some basic materials like paint, glitter, scissors, glue, and other craft items, you can easily make your own beautiful personalized decorations.
You can make designs that are traditional or modern – whatever suits your festive style! The possibilities are endless – there’s no limit when it comes to crafting your own homemade ornaments this holiday season. So gather up all the necessary materials and start making your very own Christmas tree decoration items today!
Materials Needed
Christmas is a time of joy and celebration, and one way to get into the festive spirit is by making your own decorations. From handmade Christmas balls to homemade Christmas crafts, there are plenty of ways to make your home look extra special this holiday season. To make these beautiful homemade decorations, here’s a list of materials you will need for creating your very own Christmas tree decoration ornaments:
First and foremost, you will need various sizes of Styrofoam balls which can easily be found in any craft store. You may also want some glue sticks or other adhesives for attaching the different decorative items onto the balls. Additionally, it would be helpful to have some paints or markers so that you can customize the colors of your handmade ornaments.
Steps to Making Christmas Balls
Are you looking for a fun and creative Christmas craft project? Look no further than handmade Christmas balls! Making your own ornaments is a great way to get festive and show off your creativity. This easy-to-follow tutorial will walk you through the simple steps of making homemade Christmas balls that you can hang up on your tree or use in other holiday decorations. All it takes is some basic materials, such as Styrofoam balls, glitter, paint, and glue. With just a few supplies and a little bit of time, you’ll have beautiful handmade decorations that will give your home an extra special touch this holiday season. So grab some supplies and get ready to make some festive decorations!
Christmas is the most wonderful time of the year, and it’s never complete without a beautiful Christmas tree. Decorating your tree with homemade ornaments is a great way to make the holiday season special. Making handmade Christmas balls for your tree is an easy way to create unique decorations that will add character and charm to your home.
These fun ornaments can be crafted from many different materials, such as paper, fabric, yarn, felt, feathers, and even buttons. Depending on what you have at home already and how much time you want to spend crafting them, you can customize these decorations any way you like! They also make great gifts for family and friends – everyone will love their personalized look. Whether you choose simple designs or intricate details, these homemade Christmas balls are sure to become cherished memories for years to come. Decorating Ideas and Techniques
Final Touch
In conclusion, handmade Christmas crafts are an excellent way to show your holiday spirit. They can turn simple home decor into something special and unique. Whether you’re creating decorations or gifts, handmade crafts make the perfect addition to any Christmas celebration. Plus, making craft projects with family members is a great way to spend quality time together. So this year, get creative and make your own handmade Christmas crafts! Enjoy the process of bringing joy to your friends and family this holiday season.


