


It’s the most wonderful time of the year and what better way to celebrate than by crafting some gorgeous DIY Christmas angel ornaments? These ornaments are easy to make and only require a few simple supplies. All you need is glitter foam paper, scissors, wooden sticks, glue, and some creativity. You can make these ornaments with your kids as a fun holiday activity or make them as gifts for friends and family.
The holiday season is upon us, and it’s a great time to find creative ways to brighten up your home! With these easy DIY Christmas angel ornaments made with glitter foam paper, you’ll be able to add an extra special sparkle to your decorations. Not only are these ornaments fun and simple to make, but they also require just a few basic supplies that can easily be found at any craft store.
How To Make Angel For Christmas | Easy DIY Christmas Angel Ornaments With Glitter Foam Paper
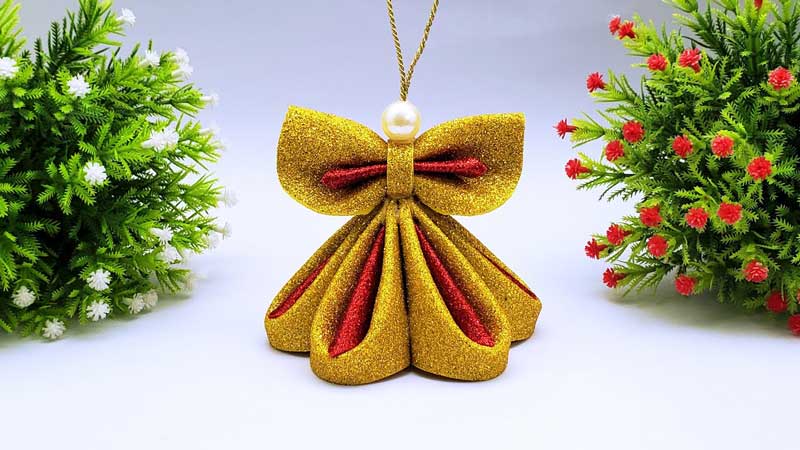
Make Christmas Angels
With the holiday season quickly approaching, it’s time to start thinking about creative ways to decorate your home and get into the Christmas spirit. Making Christmas angels is a fun and easy project that will help you bring some festive cheer into your home. These beautiful ornaments can be hung on trees, wreaths, or even around the house for a touch of festive magic.
Making these gorgeous angels is simple and affordable – all you need is some glitter foam paper and a few basic craft supplies like scissors, glue, and ribbon. With just a few steps, you can make beautiful angel ornaments that are perfect for the holidays. Whether they’re used as decorations or given away as gifts, these angelic creations will be sure to put a smile on everyone’s face this Christmas season!
Step 1: Gather Materials
A homemade Christmas angel ornament is a great way to add a personal touch to your holiday decorations. It’s quick and easy to make, too! All you need is some glittery foam paper, scissors, glue, and a few other simple materials. Here are the steps to get started on making your own DIY Christmas angel ornaments: Step 1: Gather Materials.
To make your own DIY Christmas angel ornament, you will need some glittery foam paper in various colors, scissors, a glue stick (or hot glue gun if desired), a pencil with an eraser top for tracing circles of different sizes, a ruler, and some twine or ribbon for hanging. You can find all these items at art supply stores or online craft shops. Once you have all the necessary materials gathered up it’s time to start creating!
Step 2: Cut Out Angel Shape
Step 2: Cut Out Angel Shape is the next step in creating a unique and beautiful Christmas angel ornament with glitter foam paper. Glitter foam paper can be found at most craft stores, and it comes in a variety of colors to fit any decorating needs. To cut out the angel shape, use scissors or an X-acto knife to carefully trace the desired shape onto the paper. Taking your time while cutting will ensure that all edges are smooth and even so that when it is glued together it looks seamless. For best results, draw a shape on one piece of paper and then trace it onto other pieces for uniformity; this will also help make sure that all pieces fit together perfectly when assembling them later. Finally, be sure to cut extra pieces just in case some get damaged or need replacing.
Step 3: Add Glitter and Decorations
Once your Christmas angel ornament is cut out, it’s time to get creative. Step three of making an easy DIY Christmas angel ornament with glitter foam paper involves adding decorations. Begin by using a variety of colors of glitter to paint the wings and body of the angel. You can also add a few sparkles and crystals for extra shimmer and shine. For more texture and dimension, try adding ribbons, buttons, or other decorative items around the edges or in different parts of the design.
Using glue or double-sided tape, you can attach various materials to your foam paper angel such as feathers, sequins, beads, or pom-poms for a fun accent. If you are feeling creative, try writing names on the angels with permanent markers so each person in your family has their own special version this holiday season!
Step 4: Attach to Twine or Ribbon
Creating an angel for Christmas can be a fun and easy project. Step 4 of the process involves attaching your newly created angel ornament to twine or ribbon. This can be done by using glue, tape, or thread. You can choose whatever material works best for you and your unique design.
If you are using glue, apply it evenly onto the back of your crafty creation. Then, attach the twine or ribbon securely to ensure it stays in place while hanging on a tree branch or window ledge. For added reinforcement, use clear tape over the twine or ribbon in order to make sure it is extra secure.
Thread is another option to hang your angel ornament with ease and elegance.
Step 5: Hang Up the Angel Ornaments
For the fifth and final step in crafting your beautiful DIY angel ornaments for Christmas, you must hang them up! To do this, you can use a clear thread or fishing line. Start by cutting a piece of thread approximately one foot long and tie a loop at one end of it. Then, poke two small holes in the top of the ornament just above the head with scissors. Finally, take the loose ends of the threaded loop and string it through both holes so that it is secure but not too tight – be sure not to pull too hard!
Once all your angels are securely hung up on your tree or around your home, they will bring an extra touch of sparkle to any holiday décor. Hang them near a window to catch some sunlight and watch as they twinkle against festive garlands and wreaths.
Glitter Paper Snowflake | Diy Crafts | Beautiful Snowflake Ornament Making Ideas
Glitter Paper Snowflake
Creating a beautiful snowflake ornament out of glitter paper is an easy, fun, and inexpensive way to add some winter sparkle to your home. Glitter paper snowflakes are a great project for the whole family to get involved in, and can be used as decorations or even hung up as unique gifts. With just a few simple supplies and some imagination, you can create wonderful works of art that will last for years.
This craft project does not require much in the way of materials; all you need is two pieces of white cardstock, craft glue, scissors, and glitter paper. Start by folding one piece of the cardstock into thirds lengthwise and then cut along the folded edges – this will form your snowflake’s petals.
Materials: Glitter paper, scissors, markers
It’s amazing what you can do with a few simple materials like glitter paper, scissors, and markers. With these materials, crafting enthusiasts of all ages can create beautiful snowflake ornaments to decorate the home for the holiday season! In this article, we will show you how to make your own unique and eye-catching snowflakes in a few easy steps. From cutting shapes out of glitter paper to adding intricate details with markers, we will provide you with plenty of ideas and inspiration for creating custom snowflakes that are perfect for adorning your Christmas tree. So grab those materials, get creative, and join us on our journey of making beautiful snowflake ornaments!
Step 1: Cut out a snowflake shape
Making a beautiful snowflake ornament for your Christmas tree is an easy and fun craft project. The first step in making a glitter paper snowflake is to cut out a shape that looks like a flake. You can trace around a template of the design, or create your own unique snowflake freehand. All you need is some paper, scissors, and some glitter to get started!
You can use regular white copy paper, card stock paper, or even waxed parchment if you want to make it sturdier. If you are using regular white copy paper, consider cutting out two identical shapes – one will be the base layer with no sparkle and the other will have all of the glitzy glitters on top of it. Once you’ve cut your shape out neatly (or as close to neatly as possible!
Step 2: Embellish with glitter paper and markers
This next step in the glitter paper snowflake ornament-making process is sure to bring a bit of sparkle and shine to your personalized creation. Embellishing with glitter paper, markers and other craft supplies is an easy way to make your snowflake stand out. Glitter paper can be found at any craft supply store but if you’re feeling adventurous, you can always make your own! To start, cut out several pieces of glitter paper in a variety of shapes and sizes. Then use markers or glue to attach the pieces together. Alternatively, punch holes into the edges of each piece of glitter paper so they fit together like puzzle pieces. This will ensure that your snowflake has greater stability when hung on the wall or tree! Finally, grab some ribbon or thread and tie it around the middle to give it a finished look – voila!
Step 3: Create an ornament hanger
Making your own snowflake ornaments at home is a great way to get into the holiday spirit and add some sparkle to your decorations! The third step in the process of making these beautiful, glittery ornaments is creating an ornament hanger. To do this, you’ll need thin wire such as jewelry wire, needle nose pliers, and a pair of scissors. Cut two pieces of wire that are about 4 inches long each. Using the needle nose pliers, curl both ends of each piece of wire into small loops. Slide one loop through the top of each snowflake shape until it hangs securely on the other loop. Now your ornament is ready to be hung up in all its sparkly glory! If you’d like even more bling for your decorations, you could also add some beads to each end of the wire loops before closing them with the pliers.
Step 4: Hang and enjoy!
Are you looking for the perfect way to bring a little sparkle and shine to your holiday decorations? Look no further than these easy-to-make glitter paper snowflake DIY crafts! With just a few simple supplies, you can create beautiful snowflake ornaments that will add a touch of whimsy and elegance to your holiday decor. In this article, we’ll show you step-by-step how to make these stunning snowflakes in four easy steps. Step 4: Hang and enjoy!
Once your snowflake is complete, it’s time to hang it up and admire your handiwork! Attach the string or ribbon of your choice onto the back of the snowflake using glue dots or other adhesives. If desired, you can also add extra decorations such as tiny beads, sequins, bells, etc., for an extra special look.
DIY Christmas Tree | 3D Christmas Tree Making With Paper | How To Make A X-Mas Christmas Tree
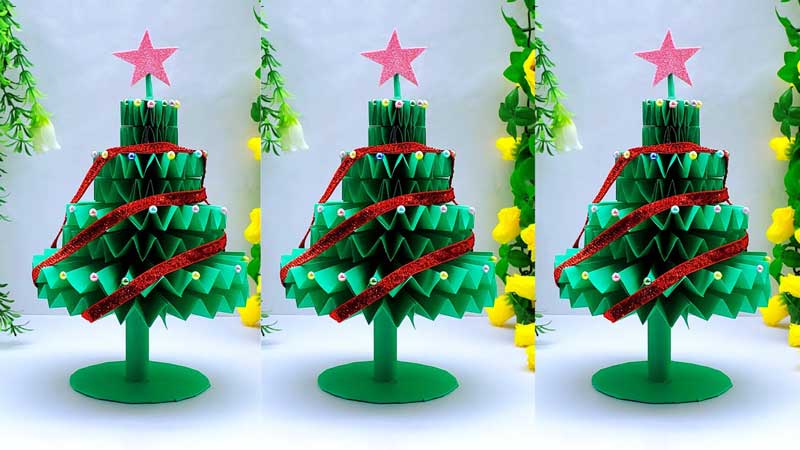
DIY Christmas Tree
Decorate your home this holiday season with a homemade 3D Christmas Tree! Making a DIY Christmas tree is an easy and cost-effective way to add festive cheer to any room. It requires only some basic materials like paper, scissors, glue, and string to create a unique 3D effect.
This article will provide step-by-step instructions on how to make your own X-Mas Christmas tree out of paper. All you need is patience, creativity, and some time! Whether you’re looking for something special for the holidays or just want to spruce up your home’s décor, making a DIY Christmas tree has never been easier. Get ready for an afternoon of fun; you’ll be amazed at what you can create with some simple supplies!
Supplies Needed: Paper, Glue, Decorations
The holiday season is right around the corner and it’s time to start thinking about decorations. If you want to create something special this year, why not try making a 3D paper Christmas tree? All you need are some basic supplies and a bit of creativity for a festive decoration that will be both fun and easy to make.
In order to make this 3D Christmas tree, there are only three main supplies needed: paper, glue, and decorations. Paper comes in many sizes and colors so you can choose your favorite or combine several different types together for an interesting effect. The glue will help hold everything together while decorations such as ribbon, glitter, or even stickers can provide the finishing touches to make your tree look perfect. With these supplies in hand, you’ll be ready to get crafting!
Step 1: Cut & Fold the Paper
Crafting a 3D Christmas tree with paper is a fun and easy project for the whole family. Step One in making this festive decoration is to cut and fold the paper. Start by cutting your construction paper into small strips of any desired length, from 4 inches to 8 inches long. Make sure each strip has two straight sides so they will be easier to fold. For extra stability, you can use card stock instead of construction paper.
Once all the strips are cut, it’s time to start folding them into triangles or “V” shapes. You can do this by first folding one side across the other, then flapping up one end and tucking it inside itself near the center crease of your triangle or “V” shape.
Step 2: Assemble Tree
Want to give your home a festive feel this holiday season? Why not try making your very own 3D Christmas tree with paper? Creating a 3D Christmas tree is an easy and cost-efficient way to add some holiday cheer. Step 2 of the process is to assemble the tree, so let’s get started!
To begin assembling your X-mas tree, start by taking out all the supplies you will need: tape, scissors and pre-cut paper strips. Make sure that all the pieces are cut in even lengths. Once you have everything ready, take one of the paper strips and make loops at both ends until they form a circle. Secure each loop with a piece of tape to keep them together. Repeat this process for all other paper strips until you have enough pieces to construct your desired-sized tree.
Step 3: Add Decorations
If you’re looking for the perfect way to add a personal touch to your Christmas tree this year, DIY 3D paper Christmas trees are an ideal choice. Not only can you create a unique and customized design that will stand out from all of the store-bought options, but it’s also surprisingly easy and affordable to make. After following Steps 1 and 2 of our guide on how to make a 3D paper Christmas tree, it’s time for Step 3: Add decorations!
Start by selecting an array of colors, textures, and sizes so that there is plenty of variety when decorating your tree. Standard craft supplies like ribbons, glittery pom poms, stars, or butterflies work great. To add even more detail and texture choose materials with various shapes such as snowflakes or candy canes – they’ll really stand out against your handmade creation!
Final Steps: Display & Enjoy!
Creating a 3D Christmas Tree with paper is a fun and creative way to get into the festive holiday spirit! With some cardstock, glue, scissors, and colorful decorations, you can create your own homemade masterpiece. And when all the hard work of cutting and decorating is done, it’s time to put on the finishing touches: displaying and enjoying your DIY tree.
Once your tree has been fully decorated with its festive ornaments and garland you’ll need to find a safe place to display it where everyone can admire its beauty. Choose an area near other Christmas displays such as stockings hung on the mantle or mistletoe hanging from the door. Then set up your tree so that it will be seen by visitors in all its glory! You might even want to consider adding a few more decorative lights around your finished tree for extra sparkle.
Final Thoughts
In conclusion, Christmas Angel Ornaments are a wonderful addition to any holiday decor. They come in a variety of shapes, sizes, and colors to suit every taste. Not only will they enhance your holiday decorations, but they also make meaningful gifts for family, friends, co-workers, and even teachers. Adding an angel ornament to your decorations will bring peace and goodwill to all who visit your home over the holidays.


