


Looking for fun and easy paper toy making ideas? Look no further! In this post, we’ve rounded up the four best paper toy making ideas that are sure to provide hours of entertainment for kids and adults alike. From simple origami figures to intricate paper sculptures, these ideas are perfect for all skill levels. So grab some paper and let’s get crafting!
1. How To Make 3D Paper Fish | DIY Moving Paper Toy Fish
Making a 3D paper fish is a fantastic alternative if you’re searching for a creative and enjoyable craft project. You can make a distinctive and vibrant decoration that is ideal for giving any area some individuality with just a few materials and some simple folding techniques. We’ll walk you through the process of creating your very own 3D paper fish in this post.
Materials:
- Colored paper (in at least two different colors)
- Scissors
- Glue
- Pencil
- Ruler
Step 1: Choose your paper colors First, choose two colors of paper that complement each other. You will need one sheet of each color. We recommend using brightly colored paper for the body of the fish and a more muted color for the fins.
Step 2: Cut out the fish body Take the brightly colored paper and fold it in half. Use a pencil and ruler to draw a half-fish shape along the folded edge. Cut out the shape with scissors, making sure to cut through both layers of paper. When you unfold the paper, you should have a symmetrical fish shape.
Step 3: Cut out the fins Take the second sheet of paper and cut out the fins. You will need two identical shapes for the side fins, and one larger shape for the tail fin. To make the tail fin, fold the paper in half and cut out a half-triangle shape along the folded edge.
Step 4: Fold the fins Fold the fins in half lengthwise, then gently crease them along the middle. This will give them a more 3D appearance when you attach them to the fish’s body.
Step 5: Attach the fins Using glue, attach the side fins to the body of the fish, one on each side. Then, attach the tail fin to the back of the fish’s body. Be sure to only apply glue to the folded edge of the fins, so that they stick out from the fish’s body.
Step 6: Add details Using the second color of paper, cut out a small triangle shape for the fish’s mouth. Attach it to the front of the fish’s body using glue. You can also use a black marker to draw eyes on the fish.
Step 7: Finish and display Once the glue is dry, gently bend the fins outwards to give the fish a more 3D appearance. Your paper fish is now complete! Display it on a shelf or attach a string to the top and hang it from the ceiling.
Making a 3D paper fish is a fun and easy craft project that is perfect for kids and adults alike. With a little creativity, you can customize the fish with different colors and patterns to make it truly unique. So grab some paper and start folding – you’ll be amazed at what you can create!
2. DIY Paper Bat That Fly Like A real Bat | Paper Toy Making
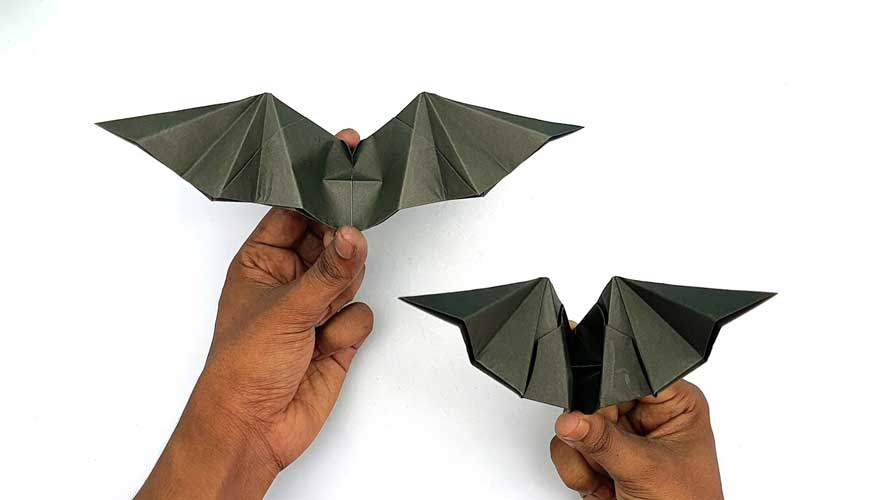
Making a Homemade paper bat that flies like a real bat is a terrific alternative if you’re searching for a fun and creepy craft project. A distinctive and resembling bat that flaps its wings when launched into the air may be made with only a few materials and some simple folding techniques. You may construct your own paper bat by following the instructions on this page.
Materials:
- Black construction paper
- Scissors
- Pencil
- Ruler
- Glue
- Tape
- String
Step 1: Cut out the bat body Start by cutting out a rectangular piece of black construction paper, measuring approximately 10 inches by 4 inches. Fold the paper in half lengthwise, then draw the outline of a bat body on one side of the folded paper. Cut out the bat body, making sure to cut through both layers of paper.
Step 2: Cut out the wings Using the remaining black construction paper, cut out two identical bat wings. These should be shaped like long, skinny triangles, with a curved edge that will attach to the bat’s body. The wings should be slightly wider than the bat’s body.
Step 3: Fold the wings Fold the wings in half lengthwise, then use a pencil to lightly score a line down the middle. This will help the wings fold more easily and give them a more 3D appearance when they flap.
Step 4: Attach the wings Using glue or tape, attach the wings to the bat’s body along the curved edge. The wings should be positioned so that they extend beyond the top and bottom of the bat’s body. Allow the glue to dry completely.
Step 5: Add details Using scissors, cut out two small ears from the remaining black paper. Attach them to the top of the bat body using glue or tape. You can also use white or yellow paper to cut out the eyes and teeth for the bat, and attach them using glue.
Step 6: Attach the string Cut a piece of string approximately 12 inches long. Fold it in half, then attach it to the top of the bat body using glue or tape. Make sure the string is centered so that the bat will fly straight when you throw it.
Step 7: Test your bat Hold the bat by the string and throw it into the air like you would a paper airplane. The bat should flap its wings as it flies, just like a real bat! You may need to adjust the position of the wings or the weight of the bat (by adding a small amount of tape or glue) to get it to fly correctly.
Making a DIY paper bat that flies like a real bat is a fun and unique craft project that is perfect for Halloween or any time of year. With a little creativity, you can customize your bat with different colors and patterns to make it truly unique. So grab some paper and start folding – you’ll be amazed at what you can create!
3. How To Make Paper Mini Toy Bus | Paper Craft Easy Ideas
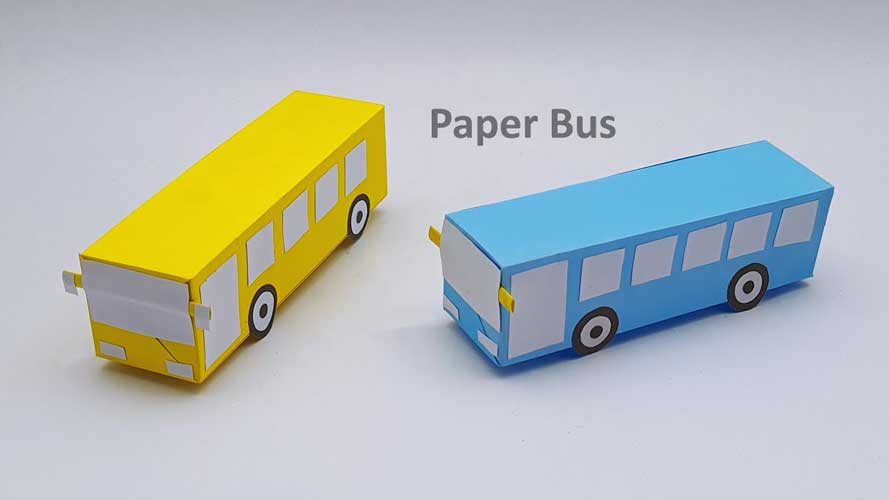
Making a paper miniature toy bus is a terrific alternative if you’re searching for a simple and entertaining craft project to do with children. You can make a cute and colorful bus that’s ideal for playtime with just a few materials and some simple folding and cutting skills. We’ll walk you through the process of creating your very own paper miniature bus in this post.
Materials:
- Colored paper (in the colors you want for your bus)
- Scissors
- Pencil
- Ruler
- Glue
Step 1: Cut out the bus body Start by cutting out a rectangular piece of colored paper, measuring approximately 6 inches by 2 inches. Fold the paper in half lengthwise, then draw the outline of a bus body on one side of the folded paper. Cut out the bus body, making sure to cut through both layers of paper.
Step 2: Cut out the wheels Using the same colored paper, cut out four small circles for the wheels of the bus. You can make these any size you like, but they should be roughly the same size as each other.
Step 3: Attach the wheels Using glue, attach the wheels to the bottom of the bus body. Make sure they are evenly spaced and aligned so that the bus will stand up straight.
Step 4: Add details Using the remaining colored paper, cut out windows, doors, and any other details you want to add to your bus. You can use different colors of paper for these details to create a more colorful and playful look. Attach the details to the bus body using glue.
Step 5: Create the bus roof Cut a rectangular piece of colored paper that is approximately 3 inches by 1 inch. Fold the paper in half lengthwise, then fold each side in towards the center crease. This will create a roof for the bus. Attach the roof to the top of the bus body using glue.
Step 6: Create the bus seats Cut a rectangular piece of colored paper that is approximately 2 inches by 1 inch. Fold the paper in half lengthwise, then fold each side in towards the center crease. This will create a seat for the bus. Repeat this step to create as many seats as you want for your bus. Attach the seats to the inside of the bus body using glue.
Step 7: Add the finishing touches Using a pencil, draw any additional details you want to add to your bus, such as headlights, taillights, or a license plate. You can also use stickers or markers to add more color and personality to your toy bus.
And that’s it! With just a few simple steps, you can create a cute and colorful paper mini-toy bus that’s perfect for playtime. You can make as many buses as you like, and even create a whole fleet of different colored buses. This is a great craft project for kids of all ages, and it’s sure to provide hours of fun and imaginative play. So gather your materials, get creative, and see what kind of fun and colorful buses you can create!
4. How To Make Paper Plan That Fly like A Bat | Cool Design Origami Bat Plane
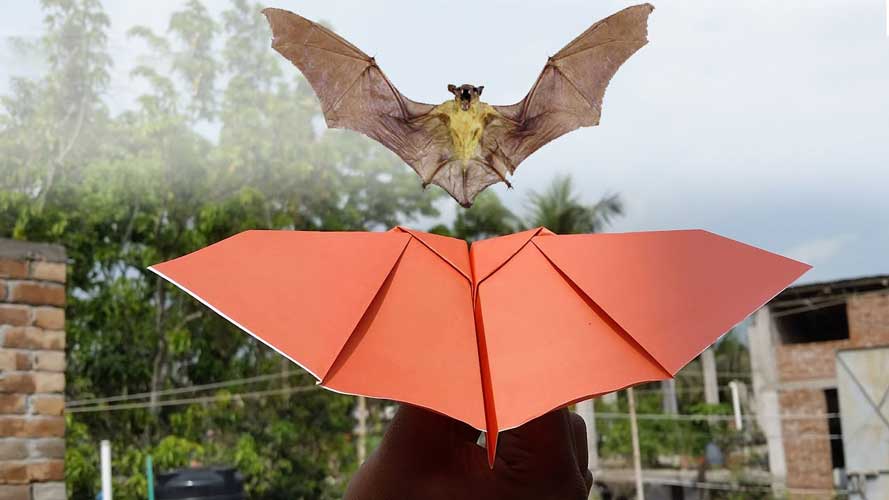
Make a paper airplane that flies like a bat if you’re searching for a simple and entertaining craft project to do with children. You can make a distinctive and aerodynamic paper plane that soars through the air with ease with just a few materials and some simple folding techniques. We’ll walk you through the process of creating your very own paper airplane that flies like a bat in this post.
Materials:
- A sheet of paper (8.5 x 11 inches)
- Scissors
- Pencil
- Ruler
Step 1: Fold the paper in half Start by folding the sheet of paper in half lengthwise, creasing the fold with your fingers. Then unfold the paper so that it’s flat again.
Step 2: Make the wing flaps Fold the top corners of the paper down towards the center crease so that they meet at the middle of the paper. This will create two wing flaps that point downwards.
Step 3: Fold the wing flaps Fold the wing flaps back up again, so that they are perpendicular to the body of the plane. Then fold them down again, this time so that the top edge of each flap lines up with the top edge of the paper.
Step 4: Make the bat wings Fold the paper in half diagonally, so that one corner of the paper meets the opposite edge. Then fold the paper in half diagonally again, so that the other corner of the paper meets the opposite edge. Unfold the paper, and you should see a diagonal crease running from each corner of the paper to the opposite edge.
Step 5: Cut the bat wings Using scissors, cut along the diagonal creases that you just created in Step 4. This will create two bat wing shapes that are attached to the body of the plane.
Step 6: Fold the bat wings Fold each bat wing up along the top edge of the paper, so that it sticks up above the body of the plane. Then fold each wing down along the bottom edge of the paper, so that it creates a crease that runs parallel to the body of the plane. This will create a slight upward curve in the wing, which will help the plane to fly.
Step 7: Add the finishing touches Using a pencil, draw any additional details you want to add to your bat plane, such as eyes or fangs. You can also experiment with different folds and shapes to see how they affect the flight of your paper plane.
And that’s it! With just a few simple steps, you can create a unique and aerodynamic paper plane that flies like a bat. This is a great craft project for kids of all ages, and it’s sure to provide hours of fun and imaginative play. So gather your materials, get creative, and see what kind of bat planes you can create!


