


Handmade paper toys are unique creations that offer a delightful experience to both children and adults. Crafted using various techniques and materials, these toys carry an endearing charm that cannot be replicated by their mass-produced counterparts. The process of creating handmade paper toys involves using recycled paper, glue, and sometimes additional materials such as paint, markers, and fabric. The paper is carefully cut and folded into intricate shapes and designs that bring the toys to life.
1. How To Make Paper Baby Shark | Handmade Paper Toy Fish Easy
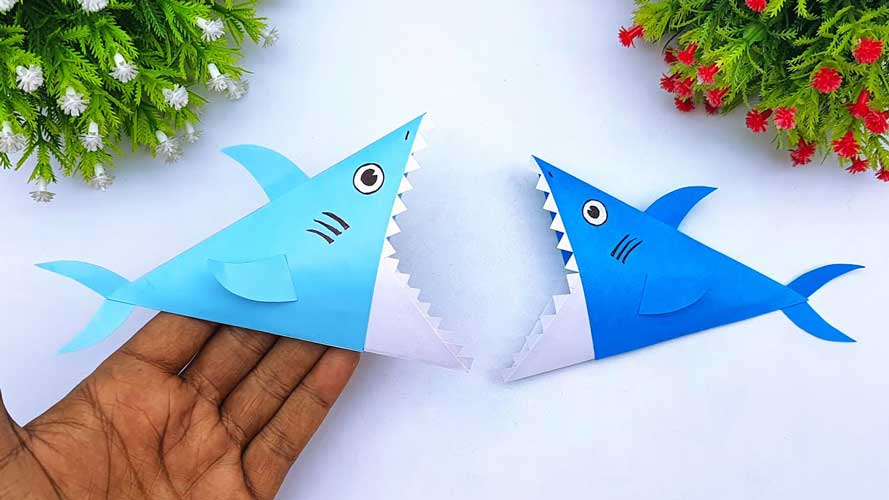
Handmade paper toys are a fun and creative way to spend an afternoon. Creating a paper toy fish is a simple and enjoyable activity that both kids and adults can enjoy. In this step-by-step guide, we’ll show you how to create your own handmade paper toy fish.
Materials:
- Colored paper or cardstock
- Scissors
- Glue
- Marker
- Pencil
Step 1: Draw the fish outline on colored paper or cardstock. The outline can be a simple shape, such as a circle, or a more complex design. Make sure the fish is large enough to hold the details of the toy, but not too big that it will be difficult to handle.
Step 2: Cut out the fish outline using scissors. Be careful to cut the outline as accurately as possible, as this will affect the overall look of the toy.
Step 3: Using a pencil, draw the details of the fish on the cut-out shape. This could include the eyes, fins, and scales. Make sure that the details are proportionate and look balanced.
Step 4: Cut out the details of the fish using scissors. For the eyes, you can use a hole punch or draw a circle and cut it out with scissors.
Step 5: Glue the details onto the fish shape. Start with the larger details, such as the fins and tail, and then work your way to the smaller details.
Step 6: Use a marker to draw any additional details or features, such as stripes or spots. This is a great way to add extra character to the toy.
Step 7: Allow the glue to dry completely before playing with your new paper toy fish. You can use it as a decoration or a toy to play with.
Creating a handmade paper toy fish is an easy and enjoyable activity that can be done with just a few simple materials. The possibilities for designs are endless, and you can let your imagination run wild with different colors, shapes, and details. Making paper toys is also a great way to develop fine motor skills and creativity, making it an ideal activity for children. So why not try making your own paper toy fish today?
2. Learn How To Make Paper Flapping Bird | Handmade Origami Bird Easy Instructions
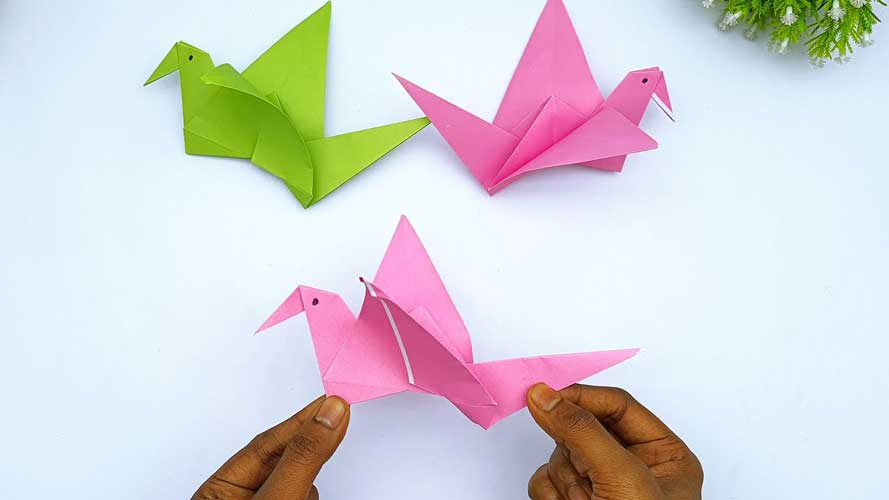
Making paper-flapping birds is a fun and engaging activity that can be enjoyed by both kids and adults. In this step-by-step guide, we’ll show you how to create your own paper-flapping bird.
Materials:
- A square piece of paper (colorful paper works well)
- Scissors
- Marker
Step 1: Take the square piece of paper and fold it in half diagonally to create a triangle. Then unfold the paper and fold it in half diagonally in the opposite direction. Unfold the paper again, and you should have two crease lines forming an X on the paper.
Step 2: Take one corner of the paper and fold it up to the center point where the two crease lines intersect. Repeat this step with the other corner of the paper, so the two corners meet at the center point.
Step 3: Fold the paper in half, so the two corners are now on the outside of the fold.
Step 4: Take one of the top corners and fold it down to the bottom of the paper. Do the same with the other top corner. Then unfold the paper and turn it over.
Step 5: Take one of the sides of the paper and fold it inwards to the center crease line. Repeat with the other side of the paper, so the two sides meet at the center line.
Step 6: Fold the paper in half along the center crease line.
Step 7: Fold one of the top corners down to the bottom of the paper, and then repeat with the other top corner.
Step 8: Take the top layer of the paper at the bottom of the model and fold it up along the crease line. Then flip the paper over and repeat on the other side.
Step 9: Turn the paper over and fold the wings down at a slight angle. Make sure the wings are evenly matched in size and shape.
Step 10: Draw eyes and a beak on the front of the bird using a marker.
Step 11: Hold the bird at the bottom and gently pull down and release to make the wings flap.
Creating a paper flapping bird is an easy and enjoyable activity that can be done with just a square piece of paper. The possibilities for designs and colors are endless, and you can let your imagination run wild with different shapes and details. Making paper toys is also a great way to develop fine motor skills and creativity, making it an ideal activity for children. So why not try making your own paper-flapping bird today?
3. Origami Butterfly Making Without Glue, Tape & scissor
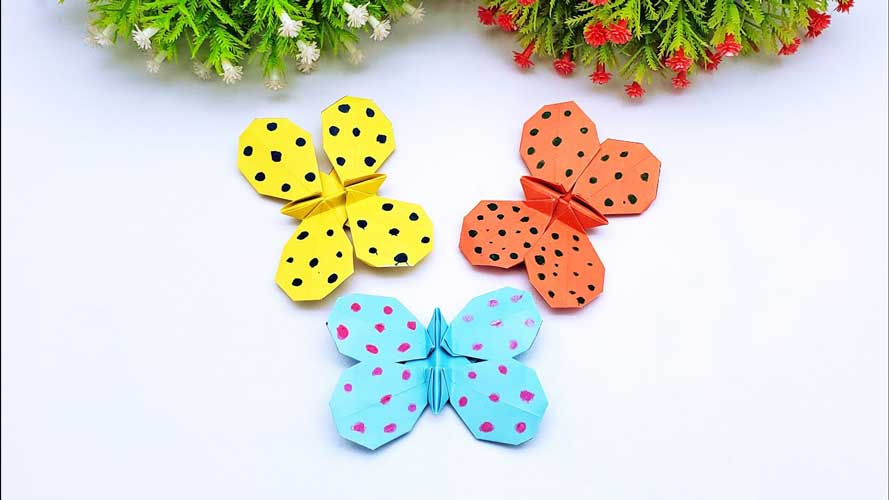
Origami is the Japanese art of paper folding and is a fun and engaging activity that can be enjoyed by both kids and adults. In this step-by-step guide, we’ll show you how to create your own origami butterfly without the need for glue, tape, or scissors.
Materials:
- A square piece of paper
Step 1: Take the square piece of paper and fold it in half diagonally to create a triangle. Then unfold the paper and fold it in half diagonally in the opposite direction. Unfold the paper again, and you should have two crease lines forming an X on the paper.
Step 2: Take one corner of the paper and fold it up to the center point where the two crease lines intersect. Repeat this step with the other corner of the paper, so the two corners meet at the center point.
Step 3: Take the top layer of the paper at the bottom of the model and fold it up along the crease line. Then flip the paper over and repeat on the other side.
Step 4: Take the top layer of the paper at the bottom of the model and fold it up along the crease line again. Then flip the paper over and repeat on the other side.
Step 5: Take the top layer of the paper at the bottom of the model and fold it up along the crease line one more time. Then flip the paper over and repeat on the other side.
Step 6: Take the top layer of the paper at the bottom of the model and fold it up along the crease line once more. Then flip the paper over and repeat on the other side.
Step 7: Take one side of the paper and fold it inwards to the center crease line. Repeat with the other side of the paper, so the two sides meet at the center line.
Step 8: Take the top layer of the paper and fold it down along the center crease line. Then flip the paper over and repeat on the other side.
Step 9: Take the top layer of the paper and fold it up along the center crease line. Then flip the paper over and repeat on the other side.
Step 10: Take the top layer of the paper and fold it down along the center crease line once more. Then flip the paper over and repeat on the other side.
Step 11: Take the top layer of the paper and fold it up along the center crease line one more time. Then flip the paper over and repeat on the other side.
Step 12: Open up the flaps at the top of the model to reveal the butterfly wings.
Creating an origami butterfly without the need for glue, tape or scissors is an easy and enjoyable activity that can be done with just a square piece of paper. The possibilities for designs and colors are endless, and you can let your imagination run wild with different shapes and details. Making origami is also a great way to develop fine motor skills and creativity, making it an ideal activity for children. So why not try making your own origami butterfly today?
4. How To Fold Easy Paper Magic Wand | Easy To Make Star Shape Wand

Making a paper magic wand can be what you need if you’re seeking a simple and enjoyable craft project to do with your children or to bring a little touch of enchantment to your own life. We’ll walk you through every step of how to fold a simple paper magic wand in this tutorial.
Materials:
- One sheet of square paper (any size will do)
- Optional: markers, stickers, glitter, or any other decorative materials
Step 1: Start with your square sheet of paper. Fold the paper in half from top to bottom, creasing it in the center.
Step 2: Unfold the paper and fold it in half from left to right, creasing it in the center. You should now have two creases intersecting in the center of your paper, creating four quadrants.
Step 3: Take the top right corner of the paper and fold it down to the center of the paper where the two creases meet. Repeat with the top left corner, folding it down to the center.
Step 4: Take the bottom right corner and fold it up to the center of the paper. Repeat with the bottom left corner, folding it up to the center. You should now have a shape that looks like a kite or diamond.
Step 5: Fold the left and right sides of the diamond towards the center crease, making sure to keep the creases nice and sharp.
Step 6: Fold the top layer of the paper down towards the bottom of the wand. This will create a little pocket.
Step 7: Take the bottom layer of the paper and fold it up towards the top of the wand. Tuck the edge of the paper into the pocket you created in step 6.
Step 8: Optional: decorate your magic wand with markers, stickers, glitter, or any other decorative materials you may have.
Step 9: Your paper magic wand is now complete! Wave it around and make some magic.
Making a paper magic wand is a fun and easy activity that can be done with just a sheet of paper and some creativity. Not only is it a great way to spend time with your kids, but it’s also a great stress reliever and a way to bring a little bit of magic into your day. So why not give it a try? With just a few folds, you can create your own wand and start casting spells.


