


Looking for a fun and easy way to keep yourself or your children entertained? Look no further than paper toys! These simple but delightful creations can be made with just a few materials, and provide hours of fun for people of all ages. In this blog post, we’ll explore the four best easy paper toy ideas that are perfect for anyone looking to get started with this delightful craft. Whether you’re a seasoned pro or a beginner, these ideas are sure to spark your creativity and provide you with hours of fun and enjoyment. So grab your scissors, glue, and paper, and let’s get started!
1. How To Make Paper Flying Boat | Handmade Paper Boat That Floats
Paper boats are a classic childhood toy that many people have made at some point in their lives. But have you ever tried making a paper-flying boat? This simple yet fun toy is easy to make and will provide hours of entertainment for children and adults alike. In this step-by-step guide, we’ll show you how to make your very own paper-flying boat.
Materials:
- A sheet of rectangular paper (preferably A4 or letter size)
- Scissors
- Glue or tape (optional)
Step 1: Start with a rectangular piece of paper and fold it in half vertically. Then, unfold it and fold the top two corners down to meet the center crease, creating a triangle shape at the top.
Step 2: Next, fold the paper in half again horizontally, bringing the bottom edge up to meet the top edge. This will create a small crease at the bottom of the paper, which you can use as a reference point later.
Step 3: Take the top layer of the paper on the right side and fold it down along the center crease, so that the top edge of the paper lines up with the bottom crease you made in step 2. Repeat this on the left side, so that both sides of the paper are folded down to meet the center crease.
Step 4: Flip the paper over and fold the top edge down to the bottom edge, creasing it firmly. This will create a long rectangular shape with two triangular flaps sticking out at the top.
Step 5: Take the right flap and fold it upwards, along the diagonal crease created in step 3. Repeat this on the left side, folding the flap upwards along the diagonal crease.
Step 6: Now, fold the bottom edge of the paper up to meet the diagonal crease created by the two flaps in step 5. This will create a small triangle shape at the bottom of the paper, which will become the boat’s keel.
Step 7: Fold the paper in half horizontally, bringing the bottom edge up to meet the top edge once again. Make sure to crease the paper firmly along the center fold.
Step 8: With the folded edge facing downwards, fold the triangular flaps at the top of the paper down towards the back of the boat. These flaps will act as wings to help the boat fly.
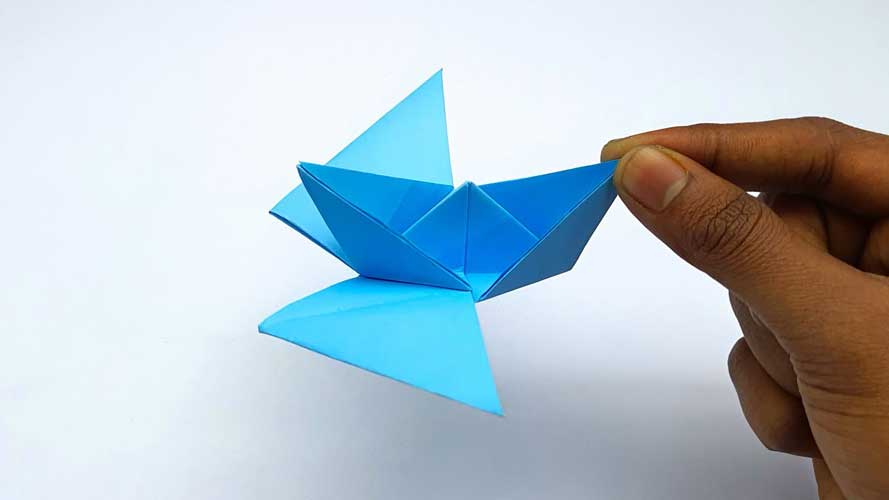
Step 9: Finally, gently open up the boat by pressing on the sides and the bottom triangle, creating a pocket in the center of the boat. You can adjust the wings as needed to make sure they are level and symmetrical.
Your paper-flying boat is now ready to take to the skies! To make it fly, hold the boat from the bottom and throw it gently forwards, like a paper airplane. Adjust the wings as needed to make sure the boat flies straight and level. You can also experiment with different types of paper and decorations to make your boat unique and personalized.
2. How to Make Paper Toy Gun That Go Very Fast | Easy Paper Toy Ideas
As kids, many of us played with toy guns, pretending to be cowboys or soldiers. But have you ever tried making your own paper toy gun that goes very fast? With a few simple materials and some creativity, you can create a fun and exciting toy that will provide hours of entertainment. In this step-by-step guide, we’ll show you how to make a paper toy gun that goes very fast.
Materials:
- A rectangular piece of paper (preferably A4 or letter size)
- Scissors
- Tape
- Pencil
- Ruler
Step 1: Start with a rectangular piece of paper and fold it in half vertically. Then, unfold it and fold the top two corners down to meet the center crease, creating a triangle shape at the top.
Step 2: Next, fold the paper in half again horizontally, bringing the bottom edge up to meet the top edge. This will create a small crease at the bottom of the paper, which you can use as a reference point later.
Step 3: Take the top layer of the paper on the right side and fold it down along the center crease, so that the top edge of the paper lines up with the bottom crease you made in step 2. Repeat this on the left side, so that both sides of the paper are folded down to meet the center crease.
Step 4: Fold the paper in half again, bringing the left side over to meet the right side. Make sure to crease the paper firmly along the center fold.
Step 5: Take the top layer of the paper on the right side and fold it down along the diagonal crease created in step 3. Repeat this on the left side, folding the flap downwards along the diagonal crease.
Step 6: With the paper still folded in half, fold the bottom edge up to the center fold. Make sure to crease the paper firmly along the bottom edge.
Step 7: Unfold the paper and cut along the center fold line, stopping about 1 inch from the top of the paper.
Step 8: Fold the paper back in half, with the cut edge facing upwards. Then, fold the two triangular flaps at the top of the paper down towards the back of the gun, creating a point at the top.
Step 9: Fold the bottom edge of the paper up towards the center of the gun, creating a handle. Use tape to secure the handle in place.
Step 10: Cut a small notch in the back of the gun, where the two sides meet. This will help the gun shoot paper bullets.
Step 11: To make the bullets, cut small rectangular pieces of paper and roll them up tightly. Insert the bullets into the notch at the back of the gun.
Your paper toy gun is now ready to go very fast! Hold the gun with one hand on the handle and the other hand on the bottom of the gun. Quickly pull back on the paper bullets and release them to shoot them out of the gun. The bullets should fly out at a high speed, making the toy gun a fun and exciting activity.
3. How to Make a Paper Boat that Floats on Water | Origami Speed Boat Making Ideas
Making a paper boat that floats on water is a classic childhood activity. It’s a fun and easy craft project that can be done with just a few materials. Whether you want to make a paper boat for your kids to play with or just for yourself, it’s a great way to spend a rainy afternoon. In this step-by-step guide, we’ll show you how to make a paper boat that floats on water.
Materials:
- A rectangular piece of paper (preferably A4 or letter size)
- Scissors
- Pencil
- Ruler
Step 1: Start with a rectangular piece of paper and fold it in half vertically, so that the short ends meet. Make sure to crease the paper firmly along the center fold.
Step 2: Unfold the paper and lay it flat with the crease facing up. Then, fold the top two corners down to meet the center crease, creating a triangle shape at the top.
Step 3: Fold the top edge of the paper down along the bottom of the triangle shape, so that the top edge lines up with the bottom of the triangle. Make sure to crease the paper firmly along the fold.
Step 4: Flip the paper over and repeat step 3 on the other side. This will create a diamond shape at the top of the paper.
Step 5: Take the right and left sides of the diamond and fold them inwards along the center crease, so that they meet at the bottom.
Step 6: Take the bottom edge of the paper and fold it up towards the top, creating a triangle shape at the bottom. Make sure to crease the paper firmly along the fold.
Step 7: Unfold the bottom edge of the paper and use the scissors to cut along the crease you just made in step 6, stopping at the center fold.
Step 8: Fold the two flaps created by the cut upwards along the crease, so that they form the sides of the boat.
Step 9: Take the bottom edge of the paper and fold it upwards again, this time along the edge of the flaps. Make sure to crease the paper firmly along the fold.
Step 10: Unfold the bottom edge of the paper and gently push the sides of the boat outwards, so that the boat takes shape. Make sure that the sides of the boat are perpendicular to the bottom, to ensure that it floats properly.
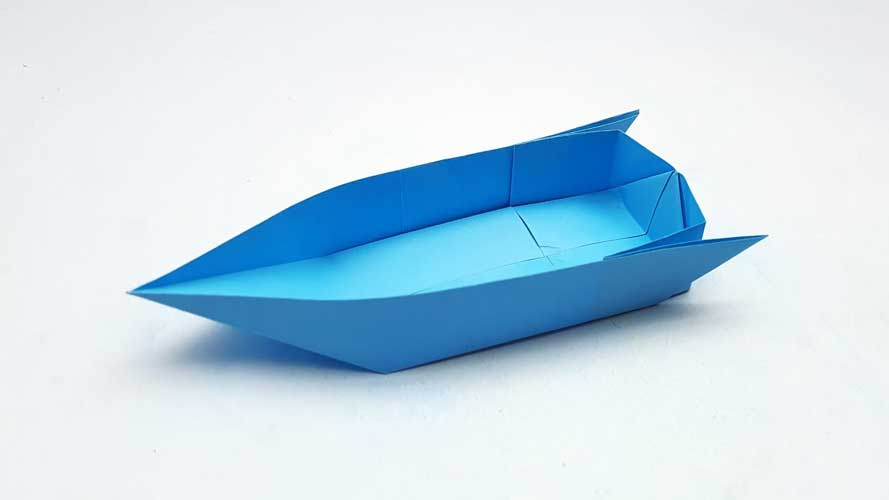
Step 11: Turn the boat over and fold the top edges of the sides down, creating a lip around the top of the boat. This will help to keep water out and prevent the boat from sinking.
Your paper boat is now complete and ready to float on water! To test it out, find a shallow basin or bathtub and fill it with water. Gently place the boat on the surface of the water and watch as it floats.
4. How To Make Paper Flying Airplane | Handmade Paper Plane Making Tutorial
Making a paper airplane is a classic childhood activity that can be enjoyed by people of all ages. It’s a fun and easy craft project that can be done with just a few materials. In this step-by-step guide, we’ll show you how to make a paper airplane that can fly through the air.
Materials:
- The rectangular piece of paper (preferably A4 or letter size)
- Scissors
- Pencil
- Ruler
Step 1: Start with a rectangular piece of paper and fold it in half vertically, so that the short ends meet. Make sure to crease the paper firmly along the center fold.
Step 2: Unfold the paper and lay it flat with the crease facing up. Then, fold the top two corners down to meet the center crease, creating a triangle shape at the top.
Step 3: Fold the top edge of the paper down along the bottom of the triangle shape, so that the top edge lines up with the bottom of the triangle. Make sure to crease the paper firmly along the fold.
Step 4: Flip the paper over and repeat step 3 on the other side. This will create a diamond shape at the top of the paper.
Step 5: Take the right and left sides of the diamond and fold them inwards along the center crease, so that they meet at the bottom.
Step 6: Fold the resulting shape in half along the center crease, so that the pointy end meets the flat end. Make sure to crease the paper firmly along the fold.
Step 7: Take the top layer of the paper on the pointy end and fold it down along the center crease, so that the pointy end meets the bottom of the flat end. Make sure to crease the paper firmly along the fold.
Step 8: Flip the paper over and repeat step 7 on the other side. This will create a pointy nose on the front of the airplane.
Step 9: Take the top layer of the paper on each side and fold it down along the center crease, so that the edges meet in the center. Make sure to crease the paper firmly along the fold.
Step 10: Take the top layer of the paper on the bottom end of the airplane and fold it upwards along the center crease, so that the edge meets the bottom of the wings. Make sure to crease the paper firmly along the fold.
Step 11: Flip the paper over and repeat step 10 on the other side. This will create a tail on the back of the airplane.
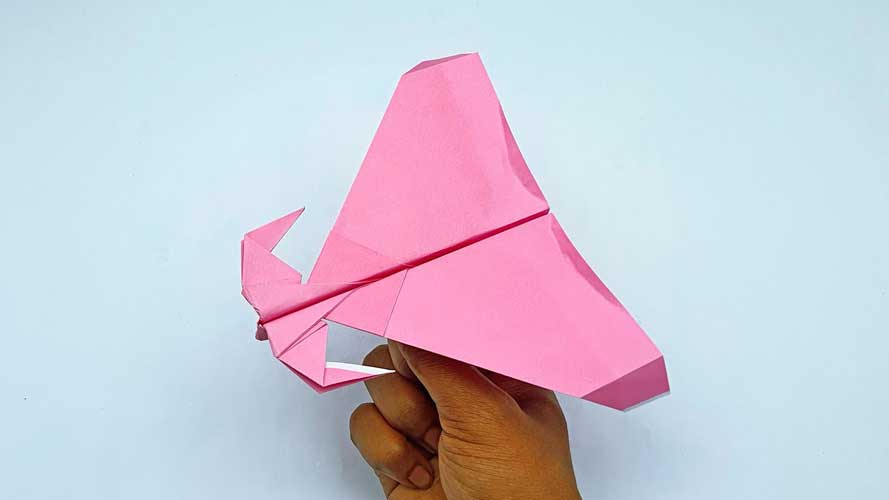
Step 12: Gently pull the wings down and away from the body of the airplane, so that they form a flat plane on either side. Make sure that the wings are parallel to each other and perpendicular to the body of the airplane.
Your paper airplane is now complete and ready to fly through the air! To test it out, find a large open space, hold the airplane by the nose, and throw it forward with a gentle flick of the wrist.


