


When it comes to the best Ornament making For Christmas decorations, there are a few key things that you need in order to have the perfect holiday. Of course, you need a Christmas tree. But what is a Christmas tree without decorations? That’s where the best ornaments come in.
There are a lot of different ways that you can make your own ornaments. You can buy them premade, but where’s the fun in that?
It’s that time of year again! Get into the holiday spirit with these five best ornaments for Christmas decoration. From traditional to modern, there’s something for everyone. So get your tree ready and start hanging these beautiful ornaments.
When it comes to Christmas, ornaments are a must. They are the perfect way to add a personal touch to your tree and show off your holiday spirit. But with so many options available, it can be tough to decide which ones to buy.
Here is a list of the Best Ornament making For Christmas Decoration look its best:
When it comes to making your Christmas tree look its best, there are a few key elements you need. First and foremost, you need great ornaments. Not only do they add color and life to your tree, but they also help give it that “finished” look.
1. Diy Christmas Ornaments Decorations Simple Ideas | Christmas Tree Decorations | Christmas Craft.
Get into the Christmas spirit with these DIY decorations
No matter what time of year it is, getting into the Christmas spirit is as easy as making your own decorations. With a little creativity and some common household items, you can make Christmas decorations that will bring holiday cheer to your home.
To get started, try making a paper snowflake. All you need is a piece of paper and a pair of scissors. Cut the paper into a square, then fold it in half diagonally. Next, fold the triangle in half again. Finally, cut along the folded edges to create your snowflake. Once you have the hang of it, you can make snowflakes of all different sizes and shapes.
Another easy decoration to make is a pom-pom garland. All you need are some pom-poms and string or yarn.
Easy ornaments: Make your own baubles with some paint and ribbon
Looking for some easy ornaments to spruce up your Christmas tree this year? Why not try making your own baubles with some paint and ribbon?
This project is perfect for those who want to add a personal touch to their tree, and it’s also a great activity to do with kids. All you need is some paint, ribbon, and some clear glass or plastic balls. Simply paint your design onto the ball, let it dry, and then add a ribbon loop for hanging.
Making your own Christmas ornaments is a fun way to get into the holiday spirit, and it’s also a great way to save money. So why not give it a try this year?
Snowy scene: A simple way to add some winter wonderland to your home
In the dead of winter, what could be cozier than coming home to a scene straight out of a snow globe? With just a few simple materials, you can easily create your own winter wonderland right at home.
First, gather some clear glass jars or bowls. You could even use mason jars if you want to get really rustic. Next, add some fake snow, small evergreen trees or branches, and perhaps some miniature houses or figurines. Arrange everything how you like it and then top it off with a lid.
Now you have your very own snow globe! These make for beautiful and unique Christmas decorations that are sure to impress your guests. So go ahead and add a little bit of winter magic to your home this holiday season!
Garlands: Get creative with some string, pinecones, and glitter
Looking for some creative and unique garland ideas for your Christmas tree this year? Look no further! With just a few simple supplies, you can create one-of-a-kind garlands that will take your tree to the next level.
Whether you want to go classic with some string and pinecones or get a little more festive with some glitter, there’s a garland idea here for everyone. So get creative and have fun!
Wreaths: A classic Christmas decoration that you can make yourself
Wreaths are a classic Christmas decoration that you can make yourself. They’re easy to make and can be customized to match any decorating style. Plus, they make your home smell great! Here’s how to make a wreath:
Start by gathering your supplies. You’ll need a wreath form, some wire cutters, and a hot glue gun. You’ll also need plenty of greenery, berries, and other decorations. Once you have everything you need, it’s time to start putting your wreath together.
Cut the greenery into small pieces and Hot glue them onto the wreath form, starting at the bottom and working your way up. Be sure to overlap the pieces so that the wreath looks full and lush. Once you’ve covered the entire wreath form, it’s time to add the finishing touches.
2. Diy Glitter Paper Angel For Christmas | How To Make A Angel For Christmas
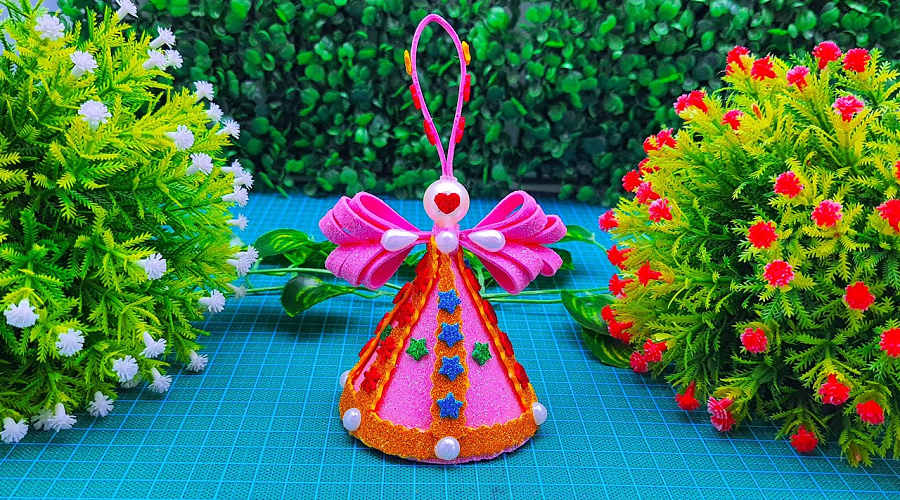
What are glitter paper angels and why make them for Christmas?
Glitter paper angels are a fun and easy craft project that you can do with your kid
s to decorate for Christmas. They are simple to make, and you can use any color of paper and glitter that you like. You can also add beads, sequins, or other decorations to personalize your angel.
Making glitter paper angels is a great way to spend time with your kids and get into the Christmas spirit. It’s also a fun way to recycle old newspapers or magazines that you were going to throw away. So gather up your supplies and give it a try!
What you’ll need: List the materials needed to make the angel.
Step 1: Cut out the angel’s body.
If you’re looking for a fun and festive way to spruce up your home for Christmas, why not try making your own glitter paper angel? It’s a simple DIY project that anyone can do, an
d it’s sure to add a touch of holiday cheer to any room. Here’s what you’ll need:
-1 sheet of glitter paper
-1 sheet of construction paper
-Scissors
-Glue or tape
-A pencil
First, cut out the angel’s body from the glitter paper. trace around a template or freehand the shape. Then, cut out two wings from the construction paper. Once you have all your pieces cut out, it’s time to assemble your angel.
glue or tape the wings to the back of the body. Step 2: Add glitter to the angel’s wings.
Step 3: Attach the wings to the body.
Attach the wings to the body of your paper angel. Make sure that the wings are positioned correctly before securing them in place. Once you have attached the wings, your paper angel is complete!
Step 4: Hang up your angel!
After you’ve completed your glittery paper angel, it’s time to hang it up! You can use a clear thread or fishing line to suspend it from the ceiling. Make sure the hook or nail you’re using is also secure. You don’t want your angel falling and breaking!
Once your angel is hung up, step back and admire your handiwork! These sparkling angels are a beautiful addition to any holiday decor, and they’re so easy to make. So gather up your supplies and give it a try!
3.3D Snowflakes Making With Eva Glitter Foam Sheets paper | DIY Snowflakes For Christmas Decorations
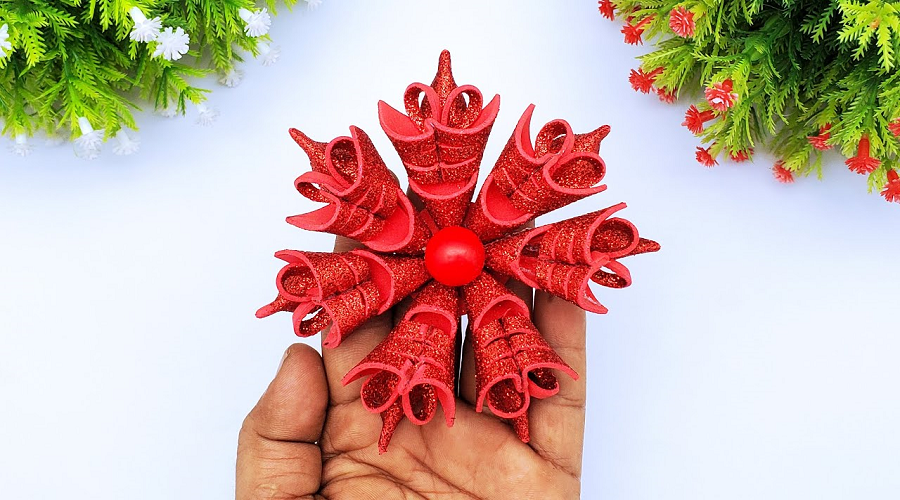
What are 3D snowflakes and why make them?
3D snowflakes are simply paper snowflakes that have been cut out using three-dimensional templates. They can be made from a variety of materials, but most commonly they are made from thin sheets of white paper.
The main reason people make 3D snowflakes is for decoration. They can be hung from the ceiling or placed on windows and mirrors. They add a touch of winter wonderland to any home.
Another reason people make 3D snowflakes is that they make great gifts. They can be given to friends and family members as a token of holiday cheer.
If you’re looking for a fun and festive activity to do with your kids this winter, why not try making some 3D snowflakes? It’s a great way to get them into the holiday spirit!
What you need: list the materials needed
If you want to add some extra sparkle to your home this holiday season, try making your own 3D snowflakes! All you need is a few materials that can easily be found around the house.
To make these snowflakes, you will need:
- – 6 Eva Glitter Foam Sheets
- – 1 sheet of A4 paper
- – Scissors
- – Stapler
- – Pencil
Making your own 3D snowflakes is a fun and easy activity that the whole family can enjoy. Follow the simple instructions below to get started!
Step 1: fold Eva glitter foam sheet
- 1. To make your own 3D snowflakes out of Eva glitter foam sheets, you’ll need to start by folding the sheet in half.
- 2. Once you’ve done that, fold it in half again and then cut along the folds to create four equal-sized pieces.
- 3. The next step is to take two of the pieces and glue them together at the edges. You can use a hot glue gun or some other type of adhesive.
- 4. Repeat this step with the remaining two pieces so that you have two sets of two glued-together pieces.
- 5. Now it’s time to start cutting out your snowflake shapes! You can either freehand it or use a template if you want to be precise.
Step 2: cut out snowflake shape
If you want to make 3D snowflakes out of Eva Glitter foam sheets, the first step is to cut out the snowflake shape. You can either use a template or freehand it. If you’re using a template, trace the template onto the foam sheet and then cut it out. If you’re freehanding it, start by folding the foam sheet in half and then in half again. Then, use a pencil to draw your snowflake design onto the folded sheet. Cut out your snowflake, being careful not to cut through all of the layers at once. Once you’ve cut out your snowflake, unfold it, and voila! You’ve got yourself a 3D snowflake.
Step 3: put snowflakes together
DIY snowflakes are a great way to add some extra sparkle to your Christmas decorations. If you’re looking for a fun and easy project to take on this holiday season, look no further than making your own 3D snowflakes out of Eva Glitter Foam Sheets paper!
Here’s what you’ll need to get started:
- -Eva Glitter Foam Sheets paper
- -Scissors
- -Tape
- -Ruler or measuring tape
Follow these simple steps and you’ll have your own beautiful 3D snowflakes in no time:
Step 1: Cut six pieces of Eva Glitter Foam Sheets paper into equal squares. You can make your snowflakes any size you want, but we recommend starting with squares that are about 10cm x 10cm.
4. Christmas Snowflake making Ideas | Simple & Easy Glitter Foam Sheet Snowflake
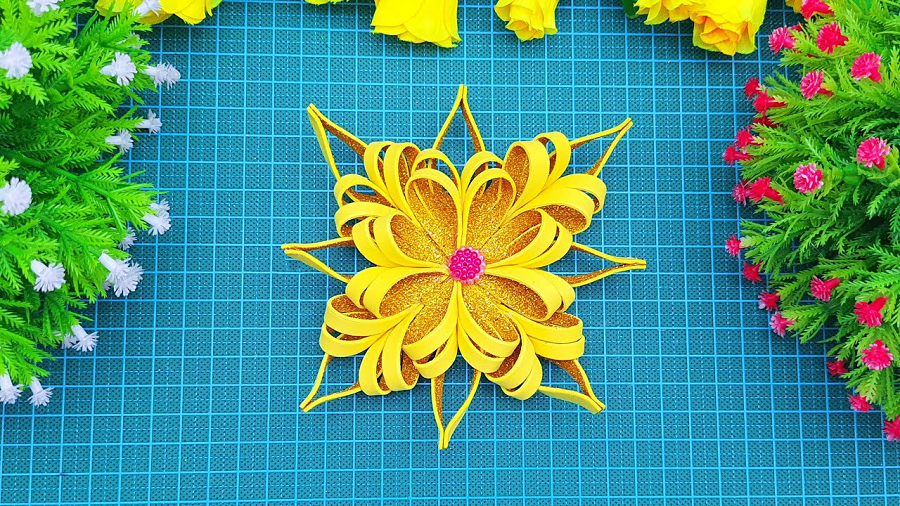
Christmas is a time for snowflakes!
Christmas is a time for snowflakes! What better way to celebrate the season than by making your own glittery foam sheet snowflakes? These simple and easy snowflakes are perfect for kids of all ages. Here’s what you’ll need:
- – Foam sheets
- – Glitter glue
- – Scissors
First, cut your foam sheets into strips. Then, fold the strips into thirds and glue them together. Once the glue is dry, cut out your snowflake shape. Finally, add some glitter glue to give your snowflake some extra sparkle!
What You Need: Glitter foam sheet, scissors, glue
If you’re looking for a simple and easy way to make your own glitter foam sheet snowflakes, then you’ve come to the right place. All you need is a glitter foam sheet, some scissors, and some glue. With just a few simple steps, you’ll be on your way to creating beautiful snowflakes that will add some sparkle and shine to your Christmas decorations.
Step One: Cut out a snowflake shape from the foam sheet
Looking for a fun and easy holiday craft? Try making snowflakes out of glitter foam sheets! It’s a great activity for kids and adults alike. Here’s how to get started:
- Step One: Cut out a snowflake shape from the foam sheet. You can use a template or freehand it. If you’re freehanding it, start with a small circle in the center and then cut out wedges around the edge.
- Step Two: Once you have your snowflake shape cut out, use a sharp knife or scissors to make small cuts along the edges. This will give your snowflake some texture and dimension.
- Step Three: Now it’s time to add some glitter! You can either sprinkle glitter on top of your snowflake or brush on glue and then sprinkle the glitter on.
Step Two: Decorate your snowflake with glitter
Making a glitter snowflake is a simple and easy way to add some sparkle to your Christmas decorations. All you need is a foam sheet and some glitter. Follow these steps and you’ll have a beautiful snowflake in no time!
Cut a foam sheet into a snowflake shape. You can use any kind of scissors, but it’s easier to get a nice clean cut if you use sharp scissors.
Once you have your snowflake cut out, it’s time to add the glitter. You can use any color you like, or mix and match for a more festive look. Simply sprinkle the glitter onto the foam sheet, then gently press it down so it sticks.
Now that your snowflake is all sparkly, it’s time to hang it up! You can tape it to a window or door, or string it up with some ribbon or yarn.
5. A Beautiful Glitter Paper Snowflake – How To Make A Glitter Foam Sheet Snowflake Flower
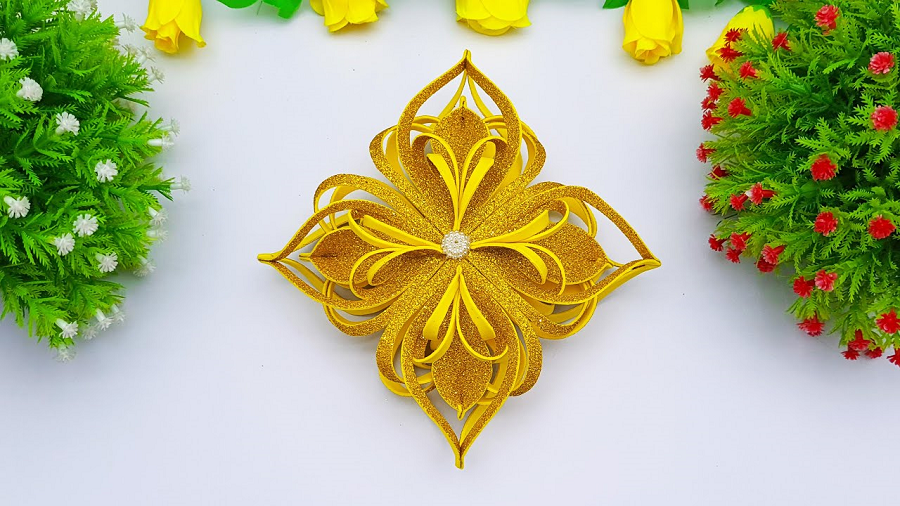
Paper snowflakes are beautiful and easy to make
Glitter paper snowflakes are a beautiful way to decorate for the holidays. You can make them any size and they sparkle in the light. They are so easy to make, you just need some glitter paper and a few supplies.
What You Need: Glitter Foam Sheet, Scissors, Pen or Pencil
Making your own glitter paper snowflakes is a fun and easy way to add some sparkle to your winter decor. All you need
is a glitter foam sheet, a pair of scissors, and a pen or pencil.
To start, fold your glitter foam sheet in half. Then fold it in half again. Now you will have a long, narrow strip of paper. Next, use your scissors to cut out shapes along the folded edge. Make sure not to cut all the way through so that the two sides are still attached at the bottom.
Once you have finished cutting out your shapes, unfolded the paper to reveal your beautiful glitter snowflakes!
Step 1: Fold the foam sheet in half
Making a glitter paper snowflake is easy and only requires a few materials. With just some foam sheet, glitter, and scissors you can make a beautiful snowflake to decorate your home.
To start, fold the foam sheet in half. Then, cut out a small circle from the center of the folded foam sheet. This will be the center of your snowflake. Next, cut out curved lines around the edge of the foam sheet. Make sure to not cut too close to the center circle. Finally, unfold your snowflake and add some glitter to give it some extra sparkle!
Step 2: cut out a snowflake shape
With winter comes the snow, and with the snow comes the opportunity to make some amazing crafts! One of the most classic winter crafts is the snowflake. Snowflakes are simple to make and can be customized to fit any decor.
To make a glitter paper snowflake, you will need:
-1 sheet of glitter foam sheet
-Scissors
-Ruler or measuring tape
-Pencil
Start by cutting out a snowflake shape from the glitter foam sheet. You can use a template or freehand this step. If you are freehanding, start by folding the foam sheet in half, then in half again. Then, use scissors to cut out a curved line from the folded edge to the center point. Unfold your paper and you should have a beautiful snowflake shape!
Use a sharp knife to cut out a snowflake shape from the glitter foam sheet. Be sure to cut slowly and carefully so you don’t accidentally rip the foam. If you want your snowflake to be symmetrical, fold the foam sheet in half before cutting out your shape. Once you have cut out your snowflake, gently peel it away from the rest of the sheet.
Step 3: Unfold the snowflake and add glitter.
Snowflakes are unique and beautiful, and adding glitter to them makes them even more special. Here’s how to do it:
1. Cut a sheet of glitter foam into a square.
2. Fold the square in half to make a triangle.
3. Cut off the bottom corner of the triangle to make a smaller triangle.
4. Fold the triangle in half again to make a smaller triangle.
5. Repeat steps 2-4 until you have a small triangle with 6 points.
6. Unfold the snowflake and add glitter to the points with glue or tape.
7. Hang your snowflake up to dry and enjoy your sparkling creation!
Step 4: unfold the snowflake and admire your work!
You’ve waited all year for this moment. The snow is falling and the air is crisp. It’s time to make a glitter paper snowflake! Follow these simple steps and you’ll be admiring your handiwork in no time.
First, fold your glitter foam sheet in half. Then, fold it in half again. You should now have a long, thin strip of glittery goodness. Next, take one end of the strip and make a small cut. Then, continue making cuts along the length of the strip, each one getting progressively bigger.
Now it’s time to start unfolding your snowflake! Begin by gently separating the layers at the small cut you made first. Continue separating the layers until you’ve reached the end of the strip. And there you have it! A beautiful glitter paper snowflake to admire and enjoy!
Final Thoughts
In conclusion, making your own ornaments for Christmas decoration is a great way to personalize your holiday decor and save money. With a little bit of creativity and some basic supplies, you can create unique and meaningful decorations that will be cherished for years to come.


