


Angels are a big part of easy DIY Christmas Angel Ornaments. They represent hope, love, and peace. What better way to spread those holiday cheer than by making your own angel ornaments? This DIY project is easy, cheap, and only requires a few materials that you probably already have around the house. So gather up the kids, some glue, and some glitter, and let’s get started!
Christmas is a wonderful time of year when family, friends, and loved ones come together to celebrate. One of the best parts of Christmas is decorating the tree with beautiful ornaments. This year, try making your own DIY Christmas angel ornaments. They are easy to make and will add a special touch to your tree.
Quick and Easy DIY Christmas Angel Ornaments:
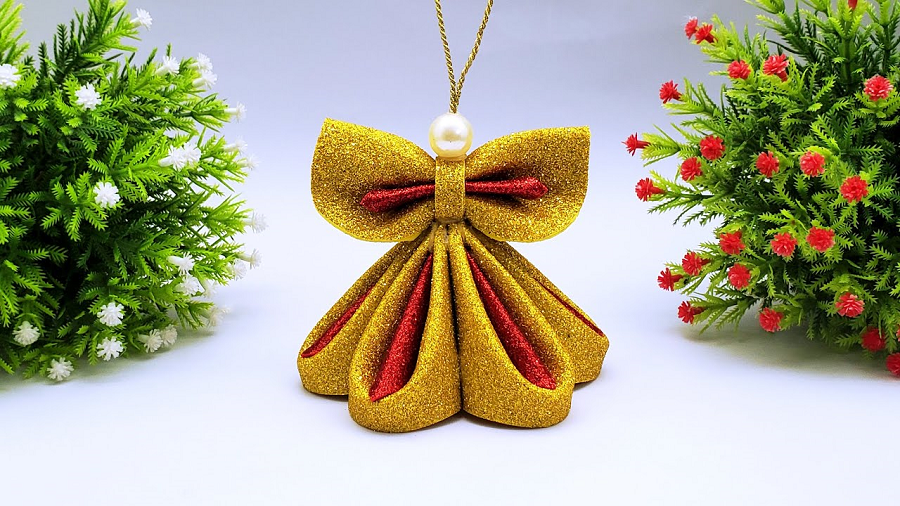
1. How To Make Angel For Christmas | Easy DIY Christmas Angel Ornaments With Glitter Foam Paper
Introduce the idea of making angel ornaments for Christmas.
Looking for a fun and easy Christmas craft project for the kids? Why not try making angel ornaments? This craft is perfect for kids of all ages and can be done using simple materials like glitter foam paper. Plus, these homemade angels make great gifts or tree decorations.
Supplies Needed: Gather the supplies needed to make the ornaments.
1. Gather the supplies needed to make the ornaments. You will need glitter foam paper, scissors, glue, and a black marker.
2. Cut out two angel wings from the glitter foam paper. Make sure they are the same size.
3. Cut a small circle out of the glitter foam paper for the head and glue it onto one of the wing pieces.
4. Draw a face on the head with the black marker.
5. Glue both wing pieces together, sandwiching the head in between them.
6. Let the glue dry completely before hanging your ornament on the Christmas tree.
7. Enjoy your beautiful homemade Christmas angel!
Step One: trace and cut out angel shapes from glitter foam paper.
Angels are a popular symbol of Christmas and these easy DIY ornaments are a great way to add a personal touch to your tree. All you need is some glitter foam paper and a few basic craft supplies.
To get started, trace and cut out angel shapes from the glitter foam paper. You can use a template or freehand the shapes. Once you have your angels cut out, it’s time to start decorating them.
Add some personality to your angels by embellishing them with sequins, beads, or other small decorations. You can also use paint or markers to add details like faces, hair, and wings. Be creative and have fun!
Once you’re finished decorating your angels, simply hang them on your tree with some clear fishing line or ribbon. They make lovely homemade additions to any holiday display.
Step Two: add details to the angels with a pen or marker.
Add some pizzazz to your angels by giving them some details. A simple way to do this is with a pen or marker. You can add things like eyelashes, eyebrows, and mouths. This will give your angels some personality and make them stand out. You can also use markers to add details to the wings. This will give your angels a more unique look.
Step Three: assemble the angels by gluing or taping the body parts together.
It’s time for step three in our guide on how to make an angel for Christmas – assembling the body parts! Whether you’re using glue or tape, this is a simple process that just requires a bit of patience. Just make sure all the pieces are lined up correctly before you start attaching them.
Once the body is assembled, it’s time to add some finishing touches. You can use glitter foam paper to create wings or get creative with other materials like ribbon or fabric. Just let your imagination take flight!
With these easy steps, you’ll have a beautiful Christmas angel in no time. So get crafting and enjoy spreading some holiday cheer!
Step Four: hang the finished angels on the Christmas tree.
To hang the finished angels on the Christmas tree, use a clear fishing line or thread. Make a small hole in the top of the angel’s head, and thread the line through. You can make a loop to hang it from or tie it directly to a branch. If your angel is light enough, you can also use a piece of tape to attach it to the branch.
Another option is to use hot glue to attach the angel to the tree. Put a small amount of glue on the back of the angel’s head, and press it firmly onto the branch. Hold it in place until the glue sets, and your angel will be securely attached.
2. Glitter Paper Snowflake | Diy Crafts | Beautiful Snowflake Ornament Making Ideas
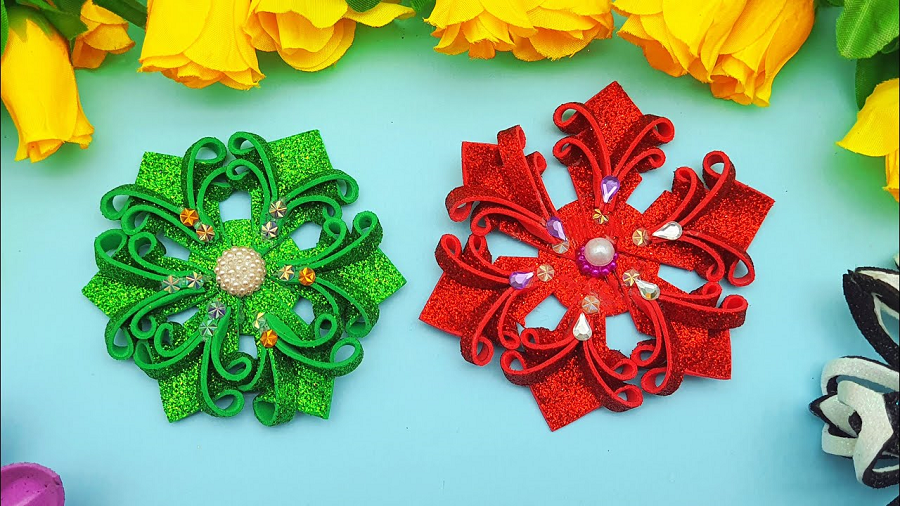
Glitter paper snowflakes are a beautiful and easy way to add some holiday cheer to your home.
Looking for a festive and easy way to add some holiday cheer to your home? Glitter paper snowflakes are the perfect solution! You can make them in any color or style you like, and they’re sure to add a touch of sparkle to your décor. Plus, they’re easy to make with just a few simple supplies. So why not give it a try?
Step 1: Cut out a snowflake template from paper.
To make your own glitter paper snowflakes, you’ll need to start with a template. You can find snowflake templates online or in craft stores. Once you have your template, trace it
S onto a piece of glitter paper. Then, cut out the snowflake carefully with scissors.
Now that you have your glittery snowflake template, it’s time to start decorating! You can add beads, sequins, or anything else you like to make your snowflake unique. Get creative and have fun!
Step 2: Trace the template onto glitter paper.
If you want to make your own glitter paper snowflakes, follow these simple instructions. First, find a snowflake template online or in a book. Then, trace the template onto glitter paper. Be sure to use a pencil so you don’t damage the glitter paper. Once you have traced the template onto the paper, cut it out with a sharp pair of scissors. Finally, hang your beautiful snowflake ornament on your Christmas tree!
Step 3: Cut out the glitter paper snowflake.
Glitter paper snowflakes are a beautiful and easy way to add some holiday sparkle to your home. They’re also perfect for kids to make since they only require a few simple supplies and steps. Here’s how to make your own glitter paper snowflakes in just a few minutes.
1. Start by cutting out a small circle from the glitter paper. This will be the center of your snowflake.
2. Using scissors, cut out eight equal-sized strips radiating outward from the center circle.
3. Once you have all eight strips cut, it’s time to start folding them up into thirds. Start by folding one strip in half, then fold it in half again so it’s only about an inch wide. Repeat this step with all eight strips.
Step 4: Attach a string or ribbon to the snowflake.
Now that your snowflake is complete, it’s time to hang it up! Cut a small hole in the top of the snowflake, and thread a string or ribbon through it. You can now hang your beautiful snowflake ornament on your Christmas tree or around your home!
Step 5: Hang the snowflake up!
It’s that time of year again! Time to break out the crafting supplies and get to work on some holiday decor. This year, try your hand at making glitter paper snowflakes. They’re simple to make and look beautiful hanging on the tree.
Here’s what you’ll need:
- – Glitter paper
- – Scissors
- – Tape
- -String or ribbon
Follow these easy steps and you’ll have glittering snowflakes in no time:
1. Cut a piece of glitter paper into a square. The size of the square will determine the size of your snowflake, so choose accordingly.
2. Fold the square in half diagonally to create a triangle.3. Fold the triangle in half again to create a smaller triangle.4.
3. DIY Christmas Tree | 3D Christmas Tree Making With Paper | How To Make A X-Mas Christmas Tree
Christmas is a time for giving, and what better way to give than by making your own 3D paper Christmas tree!
This easy-to-follow tutorial will show you how to make your own 3D paper Christmas tree. All you need is some paper, scissors, and glue!
With just a few simple steps, you can make your own beautiful 3D paper Christmas tree. This project is perfect for kids and adults alike. So get creative and have fun!
What You’ll Need: All you need is some paper, scissors, and glue.
If you’re looking for a unique and fun Christmas decoration this year, look no further than this DIY 3D paper Christmas tree! All you need is some paper, scissors, and glue, and you can make your own one-of-a-kind tree to display in your home.
This project is perfect for kids and adults alike – anyone can do it! Just follow the simple instructions below and you’ll have your own 3D paper Christmas tree in no time. So get creative and have fun with it!
Step One: Cut out a bunch of paper triangles. The more the better!
Cut out a bunch of paper triangles. The more the better! This is the first step in making a 3D Christmas tree.
It may seem like a tedious task, but the end result is worth it. Plus, you can make it a fun activity by enlisting the help of your friends or family members.
Once you have all your triangles cut out, it’s time to start assembling your tree. Start at the bottom and work your way up, attaching each triangle to the one below it.
Step Two: Glue the triangles onto a piece of cardstock, spacing them out evenly.
In this step, you will glue the triangles onto a piece of cardstock, spacing them out evenly. This will be the base of your 3D Christmas tree.
To begin, gather your supplies. You will need a piece of cardstock, scissors, a pencil, a ruler, glue, and triangles (cut out from construction paper or green felt). Once you have all of your materials, it’s time to start gluing!
Using a pencil and ruler, draw lines on the cardstock to mark where you will glue the triangles. You can make your tree as tall or short as you like – just make sure that the lines are even so that your tree will be symmetrical. Next, apply glue to the back of each triangle and attach it to the cardstock following your pencil lines. Press down firmly to make sure that the triangles are secure.
Step Three: Cut out a star or other decoration for the top of your tree.
It’s time for step three in our DIY 3D Christmas Tree-making tutorial – cutting out a star or other decoration for the top of your tree. This is a really simple step, but it’s an important one nonetheless. After all, what’s a Christmas tree without a star on top? To cut out your star (or whatever other decoration you’ve chosen), simply trace the outline onto some cardstock or construction paper and then cut it out.
Once you’ve got your star cut out, it’s time to move on to step four – attaching it to the top of your tree!
Step Four: Hang your tree up and enjoy!
It’s finally time to hang your beautiful 3D paper Christmas tree up and enjoy! You’ve put so much effort into making it, so take a step back and admire your work. Remember to take some pictures too – you’ll want to remember this moment for years to come.
Your tree will bring some extra holiday cheer to your home, and it’ll be a great conversation starter for any guests that come over. So sit back, relax, and enjoy the fruits of your labor. And from all of us here at DIY Christmas Tree, we wish you a very Merry Christmas!
Final Thoughts
In conclusion,making your own angel ornaments is a fun and easy way to get into the Christmas spirit. With just a few supplies and a little bit of time, you can create beautiful ornaments that will last for years to come. So get creative and have fun!


