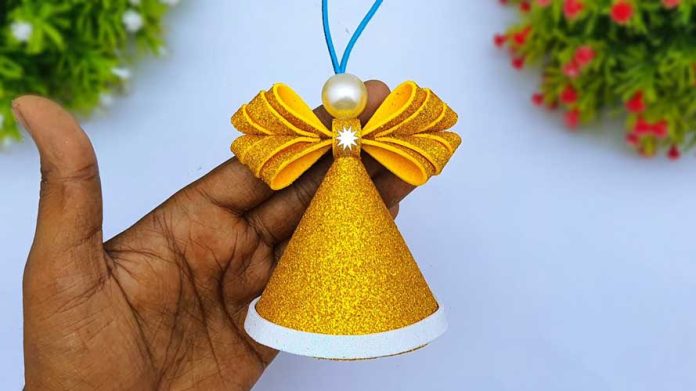
The holiday season is a time for spreading love, joy, and creativity. One enchanting way to infuse your home with a touch of celestial elegance is by crafting your very own Foamiran Christmas angels. These delicate and charming ornaments can grace your Christmas tree or be used as decorative accents around your home. In this step-by-step guide, we’ll explore how to create beautiful Foamiran Christmas angels that radiate the spirit of the season.
Materials You’ll Need:
Before we embark on our creative journey, let’s gather the essential materials required for making Foamiran Christmas angels:
- Foamiran sheets: Available in various colors; white or gold work beautifully for angel wings and robes.
- Wooden beads: For the angel’s head.
- Paint and brushes: To color the wooden beads for the angel’s face.
- Craft wire: For creating the angel’s halo.
- Scissors: Sharp, precision scissors for intricate cuts.
- Craft knife: Useful for delicate cuts (optional).
- Cutting mat: To protect your work surface (optional).
- Embossing tools: To add texture and detail (optional).
- Clear craft glue: To secure the angel’s parts.
- Ribbon: For creating a loop for hanging.
- Markers or pencils: For adding details like eyes and mouth.
- Faux flowers or decorative elements: Optional for embellishing the angel’s robe.
Now, let’s explore the step-by-step process of creating DIY Foamiran Christmas angels:
Step 1: Prepare the Angel’s Wings and Robe
- Begin by drawing and cutting out the angel’s wings and robe from the Foamiran sheets.
- You can use templates or create your own designs.
- Be sure to make symmetrical cuts for the wings.
Step 2: Craft the Angel’s Head
- Paint the wooden bead with the desired skin tone for the angel’s face.
- Allow it to dry completely.
- Once dry, use markers or pencils to add eyes, a mouth, and other facial features.
- Attach the wooden bead to the top of the robe using clear craft glue.
Step 3: Create the Angel’s Halo
- Cut a piece of craft wire and form it into a small circle to create the angel’s halo.
- Attach the halo to the top of the angel’s head using clear craft glue.
Step 4: Add Texture and Detail (Optional)
- To enhance the angel’s wings and robe, you can use embossing tools to add texture and detail.
- Gently press the tools onto the Foamiran to create patterns and dimensions.
Step 5: Embellish the Angel (Optional)
- If desired, decorate the angel’s robe with faux flowers or other decorative elements.
- Attach these embellishments using clear craft glue.
Step 6: Create a Hanging Loop
- Cut a piece of ribbon to your desired length.
- Form a loop and attach it to the top of the angel’s head using clear craft glue.
Step 7: Display Your Foamiran Christmas Angels
- Your DIY Foamiran Christmas angels are now ready to be displayed.
- Hang them on your Christmas tree, garlands, or in windows to catch the light.
- Consider creating a collection of angels with varying sizes and designs for a heavenly holiday display.
Conclusion:
Crafting Foamiran Christmas angels is a heartwarming and creative way to infuse your holiday decor with celestial charm. These handmade angels not only capture the essence of the season but also reflect your unique style and craftsmanship. So, gather your materials, select your favorite designs, and embark on a crafting journey that will fill your home with the spirit of the holiday season. Happy crafting!


