


Handmade paper toys have been around for centuries and are still popular today for their charm and simplicity. Whether it’s folding an origami crane or constructing a paper dollhouse, these toys offer a hands-on creative experience that engages both young and old alike. The best thing about handmade paper toys is that they require minimal resources and are eco-friendly, making them an excellent alternative to plastic toys. In this blog post, we will explore the 4 Best Handmade Paper Toys that will spark your imagination and ignite your passion for crafting.
Each toy is unique in its design and requires different skill levels, making it suitable for both beginners and experienced crafters. With their delightful and intricate designs, these paper toys are not just fun to create but also make great gifts that are sure to be treasured. So, whether you’re a seasoned crafter or a curious beginner, join us as we dive into the world of handmade paper toys!
1. DIY Paper Dragon Making | How To Train Your Dragon With Paper
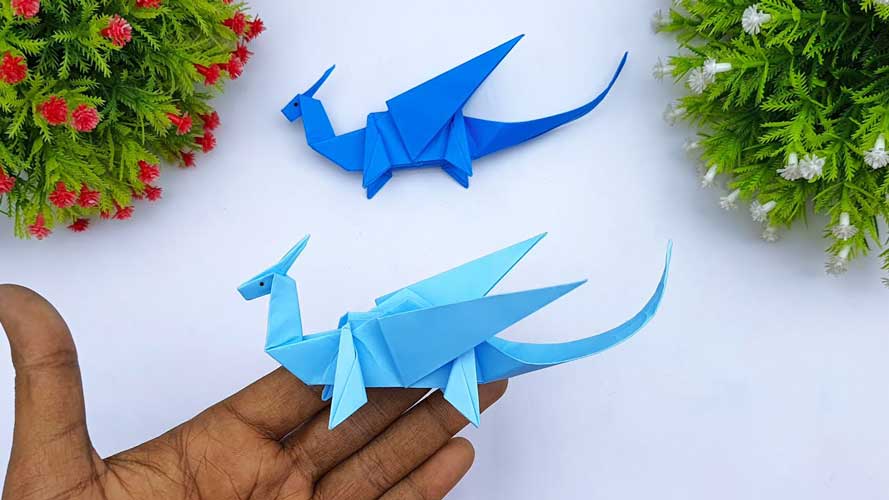
Do you or your kids love the How to Train Your Dragon franchise? Have you ever thought about creating your own dragon out of paper? If so, you’re in the right place! In this step-by-step guide, we’ll show you how to train your own dragon with paper.
Step 1: Choose Your Dragon The first step in creating your paper dragon is to choose which dragon you want to create. There are plenty of options to choose from, such as Toothless, Stormfly, Hookfang, and more. Once you’ve decided on your dragon, you can begin gathering the materials you need.
Step 2: Gather Your Materials To make your paper dragon, you’ll need a few things, including:
- Colored paper
- Scissors
- Glue
- Pencil
- Marker
- Ruler
Step 3: Draw and Cut Your Dragon Using your pencil and ruler, start drawing the shapes of your dragon on colored paper. You can use the internet as a reference or get creative and design your own dragon. Once you’ve drawn all the shapes, carefully cut them out using scissors.
Step 4: Assemble Your Dragon Now it’s time to assemble your dragon! Start by gluing the different parts together, making sure to follow the design you’ve created. This step requires patience and precision, so take your time and be careful not to glue the wrong parts together.
Step 5: Add Details Once you’ve assembled your dragon, it’s time to add the details that will make it unique. You can use a marker to draw the dragon’s scales, eyes, and other features. You can also use other materials, such as felt or pipe cleaners, to add texture and depth to your dragon.
Step 6: Train Your Dragon Now that your paper dragon is complete, it’s time to train it! Use your imagination to come up with fun games and activities that involve your dragon. You can create a dragon-themed obstacle course, have your dragon participate in a paper-flying contest, or even create your own dragon-themed story.
Creating your own paper dragon is a fun and creative activity that can provide hours of entertainment. By following these six steps, you can train your own dragon with paper and enjoy the many adventures that come with it. So, gather your materials and let your imagination take flight!
2. DIY Moving Paper Toy Fish | Origami Fish making Ideas | Handmade Paper Toy Ideas
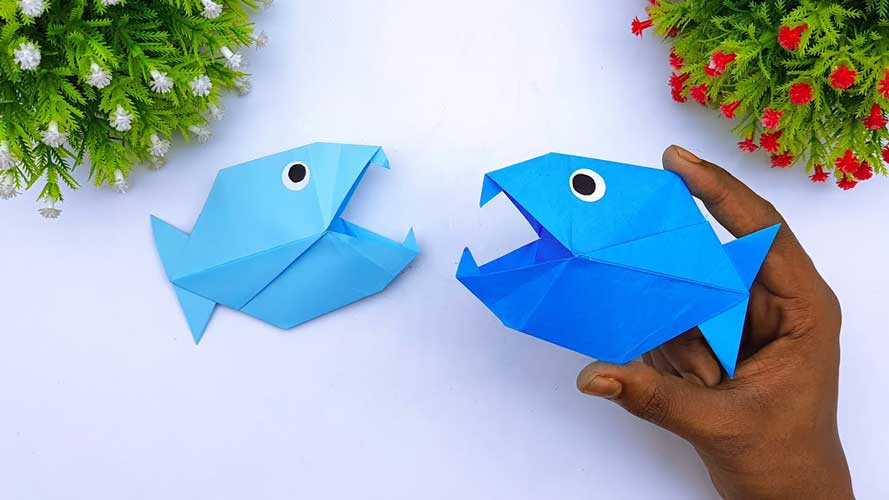
Are you looking for a fun and easy DIY project that you can do with your kids? If so, why not try making a moving paper toy fish? In this step-by-step guide, we’ll show you how to create your own fish toy that moves when you pull its tail.
Step 1: Gather Your Materials To make your moving paper toy fish, you’ll need a few supplies:
- Colored paper
- Scissors
- Glue
- Pencil
- Ruler
- String or yarn
- A paper clip
Step 2: Draw and Cut Your Fish Using your pencil and ruler, draw the shape of your fish on colored paper. You can make your fish any size you want, but a good size to start with is around 6-8 inches long. Once you’ve drawn the fish, cut it out using scissors.
Step 3: Create Your Tail Next, use a different color paper to create your fish’s tail. Draw and cut out a triangle shape that’s about 1-2 inches wide and 2-3 inches long. Fold the triangle in half lengthwise to create a crease down the center.
Step 4: Attach Your Tail Glue the folded edge of the tail to the back of your fish, positioning it near the end of the fish’s body. Make sure to leave some space between the tail and the body to allow room for movement.
Step 5: Add Your String Cut a piece of string or yarn that’s around 12-18 inches long. Tie one end of the string to the tail of the fish, and tie the other end to a paper clip.
Step 6: Test Your Toy To make your fish move, hold the paper clip and pull the string. As you pull the string, the tail will move up and down, making the fish look like it’s swimming.
Making a moving paper toy fish is a simple and fun DIY project that can provide hours of entertainment. By following these six steps, you can create your own fish toy that moves when you pull its tail. This project is great for kids of all ages and can be customized to create different types of fish or sea creatures. So, gather your supplies and get ready to create your own underwater adventure!
3. Moving Paper Toy Shark Making Ideas | Handmade Paper Shark Easy Tutorial
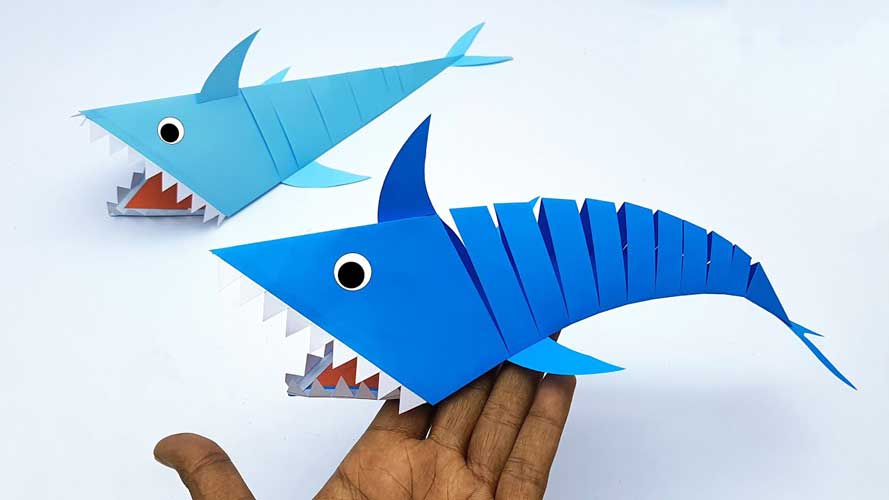
Are you fascinated by sharks and looking for a fun and creative project to do with your kids? Why not make a moving paper toy shark? In this step-by-step guide, we’ll show you how to create your own shark toy that moves when you pull its tail.
Step 1: Gather Your Materials To make your moving paper toy shark, you’ll need a few supplies:
- Colored paper
- Scissors
- Glue
- Pencil
- Ruler
- String or yarn
- A paper clip
Step 2: Draw and Cut Your Shark Using your pencil and ruler, draw the shape of your shark on the colored paper. You can make your shark any size you want, but a good size to start with is around 8-10 inches long. Once you’ve drawn the shark, cut it out using scissors.
Step 3: Create Your Tail Next, use a different color paper to create your shark’s tail. Draw and cut out a triangle shape that’s about 2-3 inches wide and 3-4 inches long. Fold the triangle in half lengthwise to create a crease down the center.
Step 4: Attach Your Tail Glue the folded edge of the tail to the back of your shark, positioning it near the end of the shark’s body. Make sure to leave some space between the tail and the body to allow room for movement.
Step 5: Add Your String Cut a piece of string or yarn that’s around 12-18 inches long. Tie one end of the string to the tail of the shark, and tie the other end to a paper clip.
Step 6: Test Your Toy To make your shark move, hold the paper clip and pull the string. As you pull the string, the tail will move up and down, making the shark look like it’s swimming.
Step 7: Add Details Now that your shark toy is complete, it’s time to add some details to make it look more realistic. You can use a marker or colored pencils to draw the shark’s teeth, eyes, and other features. You can also use other materials, such as felt or pipe cleaners, to add texture and depth to your shark.
Making a moving paper toy shark is a fun and easy DIY project that can provide hours of entertainment. By following these seven steps, you can create your own shark toy that moves when you pull its tail. This project is great for kids of all ages and can be customized to create different types of sharks or sea creatures. So, gather your supplies and get ready to create your own underwater adventure!
4. Moving Paper Toy Ideas | How To Make Paper Crow Step By Step
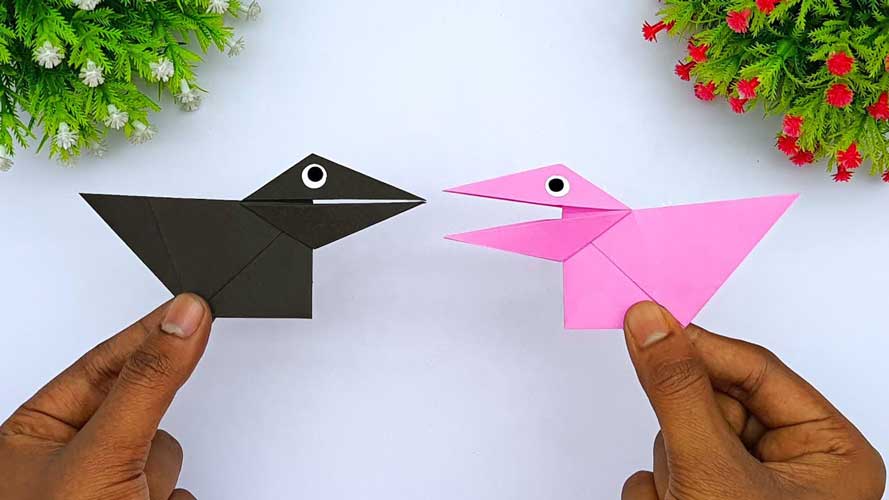
Are you looking for a fun and easy DIY project to do with your kids? Why not make a paper crow? In this step-by-step guide, we’ll show you how to create your own crow using just a few simple supplies.
Step 1: Gather Your Materials To make your paper crow, you’ll need a few supplies:
- Black construction paper
- Scissors
- Glue
- Pencil
- White chalk or crayon
- Googly eyes (optional)
Step 2: Draw and Cut Your Crow Using your pencil, draw the shape of your crow on the black construction paper. You can make your crow any size you want, but a good size to start with is around 6-8 inches long. Once you’ve drawn the crow, cut it out using scissors.
Step 3: Create Your Wings Next, use the remaining black construction paper to create your crow’s wings. Draw and cut out two wing shapes that are approximately the same size as your crow’s body.
Step 4: Attach Your Wings Using your glue, attach the wings to the sides of your crow’s body. Make sure to position the wings so that they look like they’re attached to the crow’s body and can move freely.
Step 5: Add Your Eyes If you want to give your crow googly eyes, now is the time to attach them using your glue. If you don’t have googly eyes, you can draw the eyes onto your crow using your white chalk or crayon.
Step 6: Add Details Using your white chalk or crayon, add details to your crow. Draw a beak and talons onto the crow’s body. You can also add feathers to the wings or tail if you’d like.
Step 7: Test Your Crow Once you’ve added all the details you want, hold your crow by the body and gently flap the wings to see if they move. If they don’t, you may need to adjust the position of the wings or add some extra glue to help them stick.
Making a paper crow is a simple and fun DIY project that can provide hours of entertainment. By following these seven steps, you can create your own crow using just a few simple supplies. This project is great for kids of all ages and can be customized to create different types of birds or animals. So, gather your supplies and get ready to create your own flying friend!


