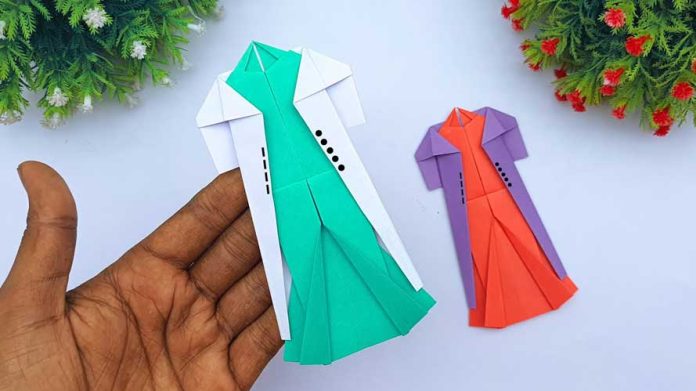
Welcome to the enchanting world of paper crafting! In this comprehensive guide, we will delve into the art of creating a charming paper dress with a coat. This creative project is not only a fun way to explore your artistic side but also makes for an impressive decor piece or a delightful gift. So gather your crafting supplies and let’s embark on this whimsical journey together!
Materials Needed:
Before we begin, make sure you have the following materials ready:
- Patterned paper or cardstock
- Scissors
- Glue or adhesive tape
- Pencil
- Ruler
- Decorative elements (optional)
- Markers or colored pencils (optional)
Step 1: Choosing the Right Paper: Select a patterned paper or cardstock that complements the theme or style you envision for your paper dress. Consider colors, patterns, and textures that resonate with your creative vision.
Step 2: Creating the Dress Pattern: Using a ruler and pencil, draw the outline of your dress on the selected paper. You can experiment with different styles, such as A-line, ball gown, or sundress. Allow your imagination to run wild! Once satisfied, carefully cut out the dress pattern.
Step 3: Adding Details: To give your paper dress a touch of elegance, consider embellishing it with additional details. You can create ruffles, and lace patterns, or even add small paper flowers. Remember to cut and attach these details to the dress before assembling it.
Step 4: Designing the Coat: Using another piece of patterned paper or cardstock, draw and cut out a coat pattern that matches the style of your dress. The coat can be short or long, with or without buttons—let your creativity guide you. Don’t forget to add any desired decorative elements to the coat as well.
Step 5: Assembling the Dress and Coat: Now it’s time to bring your paper dress and coat to life! Begin by carefully attaching the back of the dress to the front, ensuring a secure and neat join. Next, attach the coat over the dress, aligning the neckline and sleeve openings. Use glue or adhesive tape to hold everything together.
Step 6: Adding Final Touches: To enhance the overall look of your paper dress with a coat, you can employ various techniques. Consider using markers or colored pencils to add shading or highlights, giving depth and dimension to the dress. Furthermore, you can attach small decorative elements like ribbons, beads, or sequins to add that extra sparkle.
Step 7: Displaying or Gifting Your Creation: Once your paper dress with a coat is complete, it’s time to showcase your artistic accomplishment. You can place it on a miniature dress form, frame it, or use it as a centerpiece for a special occasion. Alternatively, consider gifting it to someone dear, spreading joy and admiration for your creative skills.
Conclusion:
Congratulations on completing your journey through the magical realm of crafting! By following this step-by-step guide, you have mastered the art of making a cute paper dress with a coat. Let your imagination soar as you explore endless possibilities in paper crafting. Remember, the true beauty lies in the passion and creativity you infuse into your creations. So keep crafting and spreading joy through your delightful works of art!


