


Christmas Decorations are a time to get creative and make decorations that can be used year after year. One of the best things about Christmas decorations is that they don’t have to be expensive or complicated to create. This article will provide an easy step-by-step guide for making your very own DIY glitter paper angel for Christmas. Not only is this a fun activity, but it also makes beautiful Christmas Decorations that you can proudly display every holiday season.
Christmas Decorations are just around the corner and that means it’s time to get creative with decorations! If you’re looking for a fun way to spruce up your holiday decor this season, why not make a DIY glitter paper angel? This easy-to-follow tutorial will show you how to make an angel out of paper, glue, and glitter in no time.
1. Diy Glitter Paper Angel For Christmas | How To Make A Angel For Christmas
DIY Christmas Angels
The holiday season has officially arrived, and what better way to get into the Christmas Decorations spirit than by making your own DIY Christmas Decorations angels? Making your own decorations can bring a unique style to your home and create lasting memories with family and friends.
Creating a glitter paper angel is a simple craft that requires minimal supplies, but yields big results. With just a few pieces of cardstock or construction paper, some sparkly glitter, glue, scissors, and ribbon you can quickly design an angel that will look beautiful on any tree. This creative endeavor will also provide hours of entertainment for children who can help make their very own angels for the holidays.
Take the time this year to make something special with your loved ones – try out this fun DIY project today! The results are sure to leave you feeling merry and bright!
Materials Needed
Making a glitter paper angel for Christmas Decorations time is an enjoyable and easy-to-do DIY project. To make sure the project runs smoothly, there are several materials that need to be gathered before beginning. Here’s a quick checklist of all the materials needed to create a beautiful glitter paper angel:
First, you’ll need some white cardstock or thick paper (at least 8.5″ x 11″). This will serve as your base angel shape. Additionally, you’ll need scissors, glue sticks, and double-stick tape, if desired. The additional decorations can include glitter in any color of your choice – silver looks especially festive around Christmas time! For cutting out the smaller details, such as wings and facial features, an X-acto knife is recommended. Finally, for attaching any sequins or beads, you may want to pick up some wire or thread from your local craft store.
Step 1: Cut & Glue Wings
This Christmas Decorations, make your own DIY glitter paper angel to adorn your home. You’ll be surprised by how easy it is to make and you can do the entire project using just a few materials that you may already have lying around. Step 1: Cut & Glue Wings is the first step towards making this beautiful Christmas Decorations ornament.
The wings of the angel are made out of two pieces of cardstock paper – one white and one silver glittery sheet. Use scissors to cut both sheets into four equal-sized triangular shapes and then glue them together in pairs, white on top of the silver. After gluing all four pairs together, use an X-acto knife or scissors to round off the edges for more realistic-looking wings. Finally, add some hot glue along the middle where each pair meets for extra strength and stability.
Step 2: Make Body and Dress
This article will explain the second step of making your own glitter paper angel for Christmas Decorations. First, you’ll need to create a body and dress for your angel. To do this, you’ll need some glitter paper in whatever color or design desired to make the clothing elements of your angel.
Start by cutting out two circles from the glitter paper: one larger than the other. The smaller circle will be used as the head and neck of your angel while the bigger circle will form its body and skirt. Next, cut out strips of glitter paper that are long enough to wrap around both these circles twice; glue them around each circle so they can hold their shape once dried.
Step 3: Decorate with Glitter Paper
It’s time to bring your glitter paper angel for Christmas Decorations to life with a few simple decorations! Step three of this DIY craft project involves decorating your angel with glitter paper. To start, you will need a variety of colors and textures of glitter paper. Cut the paper into strips and circles in different sizes and shapes. Then, glue them to the body of the angel using a hot glue gun. Make sure to cover all the parts of the angel that you want decorated including its wings, arms, legs, and headpiece.
Next, create small details such as facial features or clothing by cutting out tiny pieces from other colors of glitter paper. If desired, add extra sparkle by adding some iridescent sequins or beads on top for a finished look.
Step 4: Assemble & Hang Angel
The fourth step to making your very own DIY glitter paper angel for Christmas Decorations is assembly and hanging. This step may seem daunting, but with a few simple steps, you’ll be able to craft a beautiful paper angel in no time! First, begin by gathering all of the pieces that have been cut out in the previous steps. Make sure you have all of the pieces necessary and that they are cut correctly so they will fit together correctly.
Next, start attaching everything together using glue or double-sided tape depending on what type of material you are using. Be sure to use enough adhesive so everything stays together securely once it’s hung up. Finally, attach a string or ribbon to the back of your angel to hang it up wherever you would like! With these easy steps in mind, you’ll be ready to create your very own sparkling Christmas decoration in no time!
2. 3D Snowflakes Making With Eva Glitter Foam Sheets paper | DIY Snowflakes For Christmas Decorations
Materials Needed: Eva Glitter Foam Sheets
Making 3D snowflakes from Eva glitter foam sheets is a fun and easy activity for the whole family to enjoy. This festive project will make your home look beautiful during the holiday season, and all you need to get started are some simple supplies. To create these DIY snowflakes, you’ll need Eva glitter foam sheets in different colors. The variety of colors available will add extra sparkle, allowing you to personalize your decorations with unique designs. These sheets can be found at most craft stores, or online retailers like Amazon or Etsy. With just a few basic materials and simple steps, you’ll have beautiful decorations that will last from year to year!
Step 1: Cut Out the Shapes
Making your own DIY snowflakes for Christmas decorations is a fun and easy project that brings out the craftiness in all of us. Step 1 of this 3D Snowflakes Making With Eva Glitter Foam Sheets paper DIY Snowflakes For Christmas Decorations starts with cutting out the shapes. This first step can be done using scissors or an X-acto knife – whichever you prefer. The shape possibilities are endless, so get creative! Cut out circles, stars, squares, triangles, and whatever else comes to mind. If you want to make complex shapes, trace around existing objects like cookie cutters or stencils. Once your shapes are cut out, it’s time to move on to step 2!
Step 2: Assemble the Snowflakes
Step 2: Assembling the Snowflakes is the second step in making unique 3D snowflakes with Eva Glitter Foam Sheets. Crafting these intricate paper decorations can be a fun and creative activity to do during the holiday season. It’s also a great way to get into the Christmas Decorations spirit! To make these snowflakes, all you need are scissors, glue, and your desired colored sheets of EVA glitter foam paper. With this craft project, you can make different shapes of snowflakes that will add that extra sparkle to your home’s winter decorations.
To start assembling your 3D snowflake, first, fold one sheet of foamy paper diagonally and in half again to create equal triangles.
Step 3: Hang Up Your Creations
Once you have finished creating your 3D snowflakes from Eva Glitter Foam Sheets paper, it’s time to show them off! Hanging up these handmade decorations is a great way to add some extra holiday cheer to any space.
Take a look around your home or office and decide what kind of display you want for the snowflakes. You can hang them in clusters with thread or fishing lines for a unique and eye-catching effect. You can also drape ribbons through them to create an ethereal look. If you’d rather keep things simple, use tape or string to attach the snowflakes individually wherever you think they will be most visible.
No matter how you choose to hang up your creations, they will definitely make any room feel more festive this holiday season!
Tips & Tricks
One of the most popular decorations for Christmas Decorations is 3D snowflakes. Making them with Eva Glitter Foam Sheets paper can be a fun and creative way to spruce up your holiday decor. Here are some tips and tricks on how to create beautiful 3D snowflakes that will make all your friends envious.
To get started, you will need a pair of scissors, a ruler, a pencil, Eva Glitter Foam Sheets of paper in different colors, glue, and some strings or ribbons to hang them. The first thing you want to do is measure out six equal pieces of foam sheet paper in one color. Next, draw a line from the top down through the center point with your pencil then cut along these lines so that each piece has two identical halves.
3. Christmas Snowflake making Ideas | Simple & Easy Glitter Foam Sheet Snowflake
Christmas Snowflakes
Christmas snowflakes are a beloved part of the holiday season. Their beauty and intricate design symbolize the joy and warmth of this special time of year. If you’re looking to add some festive cheer to your home, why not try making Christmas snowflake decorations? With just some simple materials, like glitter foam sheets and scissors, you can create unique and beautiful pieces that will be cherished for years to come.
This article provides step-by-step instructions on creating glitter foam sheet snowflakes, so everyone in your family can join in the fun! Making these gorgeous decorations is easy: simply cut shapes from the foam sheets, layer them together to form intricate patterns, then dust them with glitter for an eye-catching sparkle. Have a great time crafting with your children or loved ones this holiday season – it’s sure to put smiles on everyone’s faces!
Supplies: Glitter Foam Sheets
Christmas is quickly approaching and everyone needs fun, festive projects to get in the holiday spirit! Crafting with glitter foam sheets is an easy way to add some sparkle and shine to any project. Glitter foam sheets are a great material for creating beautiful snowflake decorations for Christmas gifts, tree ornaments, wall hangings, and more. With just a few simple supplies you can make stunning snowflakes that will instantly light up any room during the holiday season.
Glitter Foam Sheets are perfect for crafting because they have adhesive on one side and glitter on the other, making it easy to stick pieces onto almost any surface. Plus, they come in a variety of colors so you can customize your snowflake design however you’d like. They are also lightweight yet durable and last longer than traditional paper crafts would.
Step 1: Cut & Bend Foam Sheets
Creating your own Christmas snowflakes using glitter foam sheets is a fun and easy way to decorate for the holidays. Step 1 in making these festive decorations is to cut and bend the foam sheets into the desired snowflake shape. Here are some helpful tips on how to properly cut and bend foam sheets for creating beautiful snowflakes:
Begin by tracing a design onto the foil sheet with either scissors or an X-Acto knife. Once you have your desired shape, use scissors to carefully cut around it. To create a 3D effect, lightly fold along the lines of your design before cutting it out completely. When finished, gently press down on each point of your snowflake so that they curve outward in order to make them look realistic. With patience and practice, you will soon be able to create amazing 3D snowflakes from glittery foam sheets!
Step 2: Join Shapes Together
Are you looking for a creative and fun Christmas activity to do with your family this holiday season? Why not try making some homemade glitter foam sheet snowflakes? They are easy, sparkly, and festive – perfect for adding some extra cheer to your home. Step two of the process is joining the shapes together.
To join shapes together, use hot glue or clear tape. Put a small amount of glue on the edges of two shapes and then press them together firmly to ensure they stick securely. Alternatively, use a piece of clear tape to hold the pieces in place while you work on other parts of your snowflake design. Both options will keep your shapes intact when complete. Additionally, if you have any excess pieces that need joining, now is a good time to do it as well! Make sure all edges are flush so there are no gaps between pieces.
Step 3: Hanging/Decorating Snowflake
The third step in making a beautiful glitter foam sheet snowflake is to hang it up and decorate it. To do this, start by measuring the space you have available for your decoration. Depending on the size of your snowflake, you may need to adjust the measurements accordingly or use multiple pieces of string to hang it up. You can also choose to add additional decorations around your snowflakes such as ribbons, bows, and other items.
Additionally, embellishments like sequins and buttons can be used for extra sparkle! Once everything is in place, tie off each end of the string so that your snowflake hangs securely from its spot. With a few simple steps and some creativity, you’ll have an eye-catching Christmas decoration that will bring holiday cheer into any home!
Variations for Design Ideas
The holiday season is here and it is time to get creative with your Christmas decorations. From snowflakes to garlands, many of us love to make our own decorations for the season. If you are looking for some unique snowflake-making ideas, then look no further than simple and easy glitter foam sheet snowflakes! With just a few basic supplies, you can create some beautiful festive pieces that will add a little sparkle to your Christmas decor. Plus they are super fun and easy to make!
Not only can you use glitter foam sheets to create traditional snowflakes, but there are also variations on the theme such as paper cut-outs or even 3D paper designs. You can also add extra elements like ribbons or beads to give your projects an extra layer of texture.
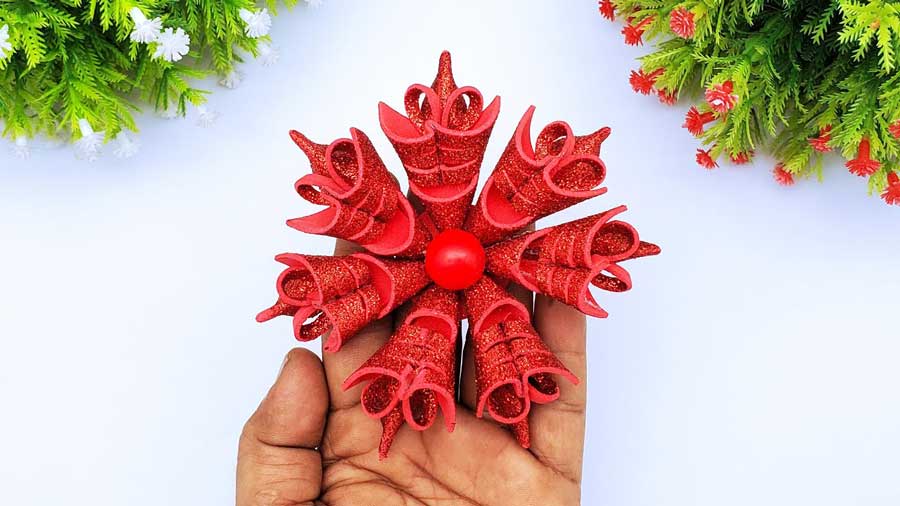
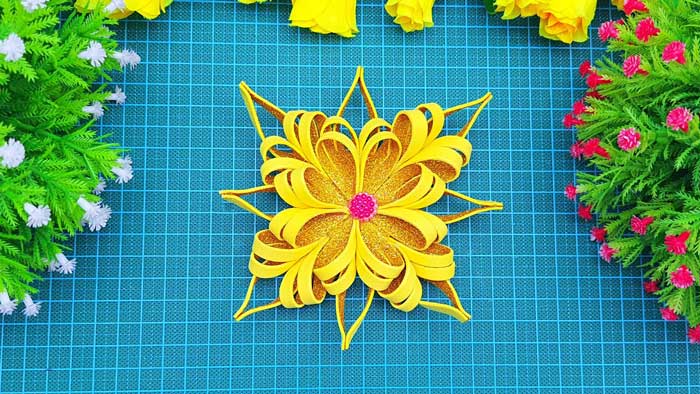
4. A Beautiful Glitter Paper Snowflake – How To Make A Glitter Foam Sheet Snowflake Flower
Making Glitter Foam Sheet Snowflakes
Making Glitter Foam Sheet Snowflakes is a fun and creative way to add some sparkle to your holiday decorations. This simple project can be done with the whole family – kids will love the sparkles! All you need for this project are foam sheets, glitter, scissors, and glue. With these supplies, you’ll be able to make a beautiful flower-like snowflake decoration that will bring joy to your home this winter season.
Starting with a single foam sheet, cut out several petal shapes and then fold each one in half along its length. You can make as many petals as you’d like or use different colors of foam sheets for different colors of petals.
Supplies Needed
A beautiful glitter paper snowflake is an easy and elegant craft project that anyone can make with a few simple supplies. All you need to create your own sparkly winter decoration is foam sheets, glitter, scissors, and glue. With these items, you can construct a shimmering snowflake flower that looks like it came from a winter wonderland.
You’ll begin by gathering all of the necessary materials for your project: foam sheets in assorted sizes and colors, glitter in coordinating colors, scissors, and glue or double-sided tape. To make sure that your snowflake stands out from the crowd, choose bright-colored foam sheets with plenty of sparkles! Once you have collected all of the items required to complete your creation, you’re ready to start crafting your unique design.
Step 1: Trace the Flower Template
This article will provide step-by-step instructions on how to trace a template for a beautiful glitter paper snowflake. This project is easy and fun, perfect for all ages! To begin, find a flower template you like online or create one yourself. Trace the template onto a sheet of glitter foam paper, making sure to leave enough room between each petal so that your snowflake doesn’t look overcrowded.
If you feel adventurous, try experimenting with different shapes and sizes of templates for unique results. Once the flower shape has been traced onto the glitter foam paper, it’s time to get creative and decorate! With an array of craft materials at your disposal such as sequins, ribbons, beads, and more – let your imagination take over!
Step 2: Cut Out the Shape
Creating a glitter foam sheet snowflake flower is an easy and fun way to add some sparkle to your holiday decorations. The second step of this craft project is cutting out the shape. To get started, trace the desired pattern onto one side of the foam sheet, either with a pencil or pen. Once you have traced the pattern, use scissors to carefully cut it out along the line.
Make sure that all of your lines are smooth and even so that they will fit together perfectly in later steps. If needed, you can also use a ruler or other straight edge as a guide when cutting out more intricate shapes like stars or snowflakes. With some patience and practice, you can easily create beautiful paper snowflakes that will be perfect for any holiday celebration!
Step 3: Add Glitter and Stick
Welcome to Step 3 of this creative craft-making tutorial. By now, you have created your own foam sheet snowflake flower, and it’s time to add the extra sparkle! In this step, you will learn how to coat your paper flower with glitter for an eye-catching decoration that can be hung up in any space. With a few simple supplies, such as glitter, glue sticks, and a paintbrush or sponge brush, you can achieve a beautiful wintery effect without much effort.
Before adding the glitter directly onto the snowflake flower design, spread out some newspaper or other appropriate material so that any excess glitter does not get all over your work surface.
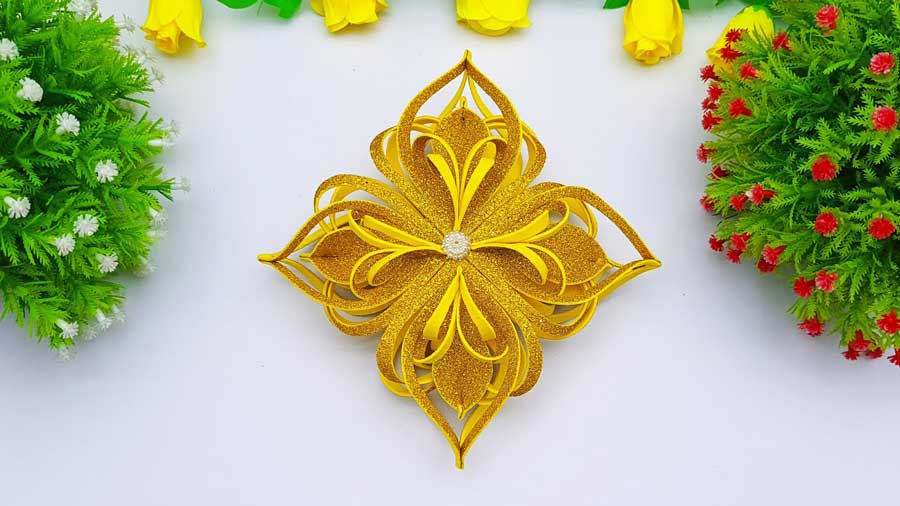
Step 4: Create Snowflake Petals
Are you ready for the final step in making a stunning glitter paper snowflake? Creating the petals of your glitter foam sheet snowflake flower requires minimal supplies, making it an achievable and fun project.
The petals are made by cutting small geometric shapes out of cardstock or other thick paper that can be easily cut with scissors. After cutting out the shapes, they should be decorated with glue and glitter before being attached to the center of your snowflake. Make sure to leave a small gap between each shape to ensure that when glued together, they form a nice circle around the center.
You may also want to add some extra adhesive at the points where the two pieces meet so that everything stays secure after assembly. Once all of your pieces have been glued together, you will have created beautiful petal-like shapes that make up your finished snowflake!
Step 5: Assemble and Glue Together
Creating a glitter foam sheet snowflake flower is an easy and fun project for both adults and kids. Step 5 involves assembling the pieces together and gluing them into place. First, use scissors to cut several pieces of foam sheet into different sizes of circles. Then, take one circle from each size and arrange them in a flower pattern on top of a flat surface.
Next, take glue dots or small dots of craft glue to attach the circles together in their arranged pattern. Be sure to be generous with the glue so that all parts stay firmly attached when finished. Finally, it’s time to add some sparkle! Spread polyester glitter or loose craft glitter over the front side of the snowflake flower until you are satisfied with its appearance. When finished, allow it time to dry before displaying proudly!
Final Thoughts
In conclusion, decorating for the Christmas holiday is an important part of the celebration. Not only do decorations add to the holiday spirit, but they are also a great way to express creativity and start meaningful conversations with family and friends. Whether you opt for traditional decorations or something more modern, Christmas decorations can turn any home into a festive and inviting space. If you’re looking to deck your halls this year, remember that there’s no one size fits all solution – let your imagination lead the way!


