


Glitter Paper Angel For Christmas Decoration is the time for decorations, fun, and joy. Add a special touch to your holiday decor with a handmade glitter paper angel! This easy craft project is sure to make your home sparkle with festive cheer. With just a few simple supplies like colorful paper and glue, you can create an eye-catching decoration that will bring the Christmas spirit into any space.
The holiday season is upon us and many of us are looking for ways to make our homes look festive. One beloved Glitter Paper Angel For Christmas Decoration that adds a touch of sparkle and joy to any home is the glitter paper angel. This traditional ornament is a great way to bring some extra cheer into your home in the form of a handmade craft project.
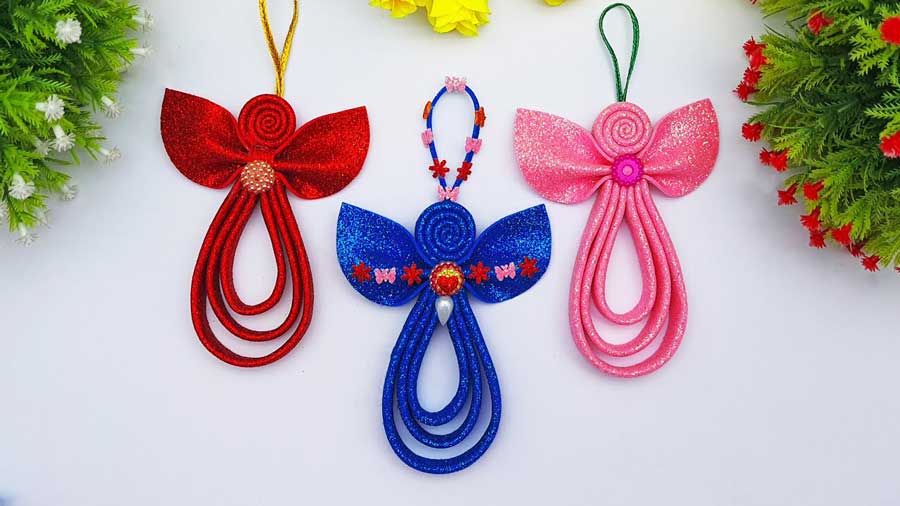
1. Glitter Paper Angel For Christmas Decoration | Easy To Make A Glitter Foam Sheet Angel
Making a Glitter Angel
Do you want to make a beautiful and festive glitter angel for your holiday Glitter Paper Angel For Christmas Decoration? With some simple materials, you can create a dazzling, sparkling angel perfect for your Christmas tree. This easy-to-follow guide will show you how to make a glitter paper angel from foam sheets in just a few simple steps.
First, gather the materials that are needed for this project: foam sheets of different colors, scissors, glue sticks, and glitter. Cut out two identical pieces of the foam sheet in an angel shape – one should be slightly larger than the other – then glue them together at the edges. Next, use scissors or a craft knife to cut out details such as wings and facial features on both sides of the angel’s body. Finally, add some sparkle with glitter! Apply it evenly all over the surface of your angel using a brush or sponge applicator.
Supplies: Glitter Foam Sheets
Glitter Paper Angel For Christmas Decoration is just around the corner and it’s time to break out your holiday decorations. If you’re looking for a fun and easy way to get into the spirit of Christmas, why not make a glitter paper angel? Glitter foam sheets are the perfect supplies for this craft project. Not only do they have the added sparkle of glitter, but they are also lightweight which makes them easy to manipulate when crafting with kids.
Glitter foam sheets come in a variety of colors and sizes so there’s something for everyone’s taste. You can use smaller pieces to create delicate details or larger pieces as wingspan for a beautiful angel. They also come in different shades so you can mix and match colors or go with one consistent hue throughout your design.
Step 1: Cutting the Shape
Making a glitter paper angel for Glitter Paper Angel For Christmas Decoration is an easy, fun, and creative activity. One of the first steps to making this Christmas angel is to cut the shape. To do so, you will need a piece of glitter foam sheet, two inches wider than the size of your desired finished angel; a pencil; scissors; and an optional craft knife or rotary cutter.
First, draw the desired shape on the glitter foam sheet using a pencil. When drawing it onto the sheet, make sure that your design includes two symmetrical sides which are mirror images of each other. Next, cut out this shape from the glitter foam sheet with either scissors or a craft knife/rotary cutter. Once done cutting out this basic shape for your angel body, you can move on to adding details in Step 2: Adding Details!
Step 2: Adding the Details
When it comes to making the perfect Glitter Paper Angel For Christmas Decoration, nothing adds a bit of sparkle and shine like glitter paper angels. This simple craft project is sure to bring a cheerful holiday spirit into your home. Step two in creating this delightful Christmas decoration involves adding some details to make your angel unique.
First, you’ll want to select the right materials for your angel. Choose a colored foam sheet or cardstock paper with lots of shimmery glitters embedded in it for the best effect. Be sure to pick out some colorful feathers and buttons too! Then, lay out all of your materials on a flat surface and start cutting out shapes that resemble wings, hearts, stars, or any other design you’d like for your angel’s body and dress. Glue these shapes onto the foam sheet or cardstock paper so they stay in place while you work on other details.
Step 3: Assembling the Angel
Creating a sparkly angel from glitter paper is an easy and fun way to make a festive Glitter Paper Angel For Christmas Decoration for the Christmas season. Step 3 of this craft project is all about assembling the pieces to create a stunning Angel.
Begin by gathering the supplies required for this step: scissors, glue, a foam sheet, and the two printed wings which were created in Step 2. Cut out the body of your angel from the foam sheet using your scissors – remember to leave enough room at the bottom of your shape so that it can be glued onto something sturdy when complete. Then, use craft glue to attach each wing onto either side of the foam sheet body – make sure they are firmly attached so they don’t come off during handling. Finally, place some felt or cotton balls on either side of your angel’s head as makeshift “halo” wings!
Step 4: Finishing Touches
A glitter paper angel is a beautiful and easy-to-make Glitter Paper Angel For Christmas Decoration that will add sparkle and joy to any home this holiday season. Step 4 of the process is all about finishing touches, and using a few simple tools can really bring your creation to life.
Start by taking your scissors and carefully cutting two thin strips for the wings. Make sure they are long enough so that when you attach them, they reach all the way around the body of your angel in an X shape. Then take some glue or double-sided tape, whichever you prefer, and attach the wings securely in place at the back of your angel’s body. Finally, add a loop of ribbon at the top for hanging if desired. With these extra details, you’ll have a stunning finished product sure to be admired by everyone who sees it!
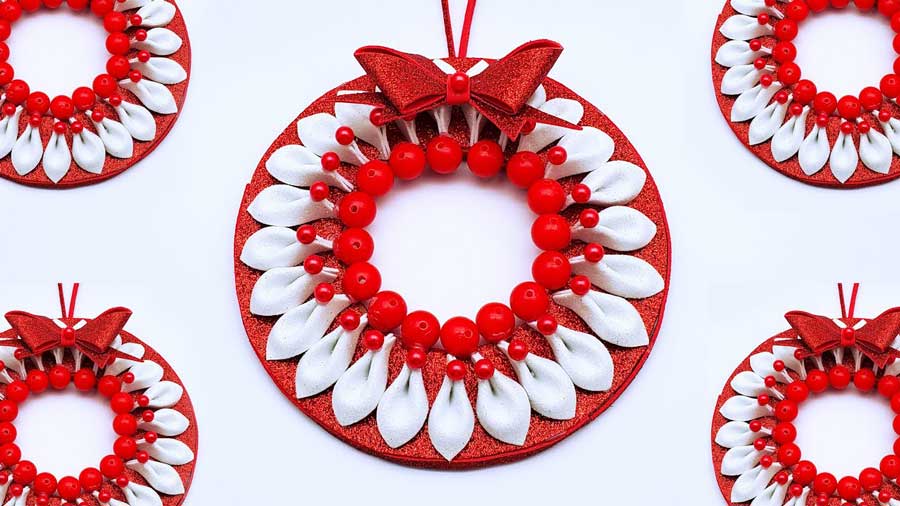
2. Christmas Wreath Making Using Paper Glitter Foam Paper | Wall Hanging Wreath Making For Christmas
Making a Christmas Wreath
Christmas is the most festive time of year and making a Glitter Paper Angel For Christmas Decoration wreath is one of the easiest crafts to get into. Crafting your own Christmas wreath can be a fun and creative way to celebrate the holiday season, plus you can tailor it to fit your home’s unique style! This article will guide you through how to make a beautiful paper glitter foam wall hanging wreath for your home this Christmas.
This project is great for families looking for an easy craft activity, or those wanting something new to decorate their walls with over the holidays. With only some paper glitter foam, scissors and string, you’ll have everything you need to make a colorful and eye-catching wall hanging that will add a pop of holiday cheer in any home. So grab your materials and let’s get started creating this festive decoration!
Materials: Paper, Glitter, Foam
This Christmas season, you can make a festive wreath from the comfort of your own home. All you need is paper, glitter, and foam to create a beautiful wall hanging for the holiday! With this simple guide, you can craft something special that will bring joy and cheer to your family’s celebrations. Plus, crafting a unique piece of art with these materials is an excellent way to get creative and have fun!
From traditional wreaths to more modern designs, there’s something here for every style. The possibilities are endless – all you need is some imagination and a few basic supplies. With the help of paper, glitter, foam, and other easy-to-find materials, creating an eye-catching Christmas wreath will be easier than ever before! So gather up the supplies listed above and start making your very own festive decoration today!
Step 1: Preparing the Base
Making a beautiful and eye-catching Christmas wreath out of paper glitter foam paper is an inexpensive and easy way to spruce up your home for the holiday season. The first step to creating this festive wall hanging is preparing the base; this will form the foundation for your unique creation. There are a few different materials you can use as the base, including a wire wreath frame or thick cardboard cut into a circular shape. The wireframe is easily accessible at craft stores, while cardboard can be acquired from almost any household item such as cereal boxes and pizza boxes. Whichever material you choose, make sure it has enough stability to support your decorations without warping or becoming misshapen. Once you have selected and prepared your base, it’s time to start making your DIY Christmas wreath!
Step 2: Crafting the Wreath
Christmas is a time of joy and celebration, and one way to show your festive spirit is by making a beautiful wall-hanging wreath. With the right materials, crafting your own Glitter Paper Angel For Christmas Decoration wreath can be simple and fun! Step two in this paper glitter foam paper wall hanging wreath-making process is crafting the wreath itself. To begin, start with an 8-inch circle as your base shape. Trace it onto cardboard or heavy cardstock and cut it out – this will be your foundation for the entire project. Next, use colorful foam sheets to create petals around the edge of your base circle. Cut out strips of different colors from the foam sheets then use glue to attach them around the circumference of the base shape – make sure that each petal slightly overlaps with its neighbor to give texture and depth to your design. Finally, add glitter for sparkle!
Step 3: Adding Embellishments
Adding embellishments to a Christmas wreath is a great way to make it look festive and glamorous. There’s no better time of the year than Christmas when it comes to making your home look beautiful. Embellishing your paper glitter foam paper wall hanging wreath with some extra sparkle will bring it to life for the holiday season. With these fun and easy steps, you can create a stunning decoration perfect for any home!
The possibilities are endless when it comes to adding embellishments such as pom-poms, ribbons, bells, feathers, garlands, and bows – all of which can be found at most craft stores. You can even use recycled materials like buttons or old tinsel from previous Christmases.
Step 4: Attaching Hanging Ribbon
Making a Glitter Paper Angel For Christmas Decoration wreath out of glitter foam paper is a great way to add festive cheer to your home during the holiday season. It’s also an easy and affordable project that you can complete in four simple stages. The fourth stage – attaching hanging ribbon – will give your wreath the perfect finishing touch.
In this step, it’s important to choose the right type of ribbon for the job. Use wide, sturdy ribbons made from thick materials such as velvet or satin in festive colors like red, green, or gold. You’ll need two pieces of ribbon that are long enough to fit around your entire wreath and hang easily on your wall when draped over a hook or nail. After cutting them to size, attach one piece of ribbon at 12 o’clock and another at 6 o’clock using glue dots or double-sided tape.
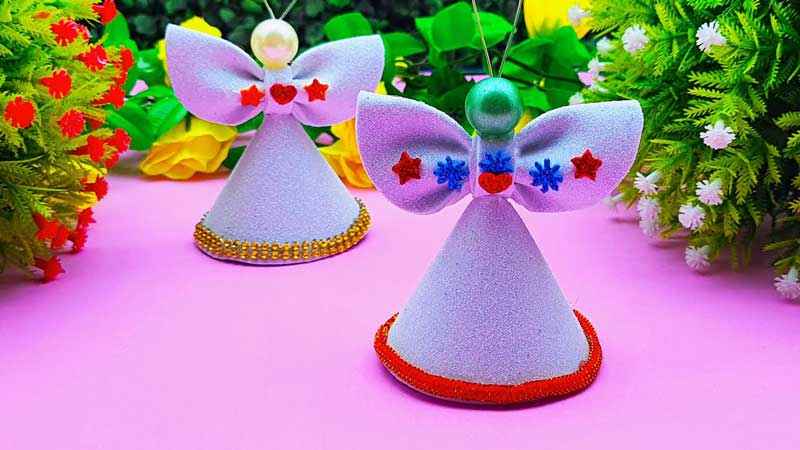
3. Diy Christmas Angel With Glitter Foam | How To Make A Angel For Christmas Tree Decoration
Make a Christmas Angel
This Glitter Paper Angel For Christmas Decoration, create a one-of-a-kind angel to decorate your tree! All you need is glitter foam and a few simple supplies to make this festive holiday decoration. The end result will be an angel that is beautiful, unique, and sure to add some sparkle to your Glitter Paper Angel For Christmas Decoration tree.
Making a Christmas angel out of glitter foam is easy and fun. With just a few basic tools and materials, you can create an adorable angel for your Christmas tree in no time. This project is perfect for beginners as well as more experienced crafters looking for a festive way to add some sparkle this season. Follow the instructions below to get started on creating your own special holiday decoration!
Supplies Needed: Glitter Foam and other Materials
The Glitter Paper Angel For Christmas Decoration season is here, and it’s time to start creating fun decorations for your home! If you’re feeling creative and want to craft something special for your tree, consider making a glitter foam angel. This easy-to-make DIY project will give your tree a beautiful and unique look that everyone in the family can enjoy.
You’ll need some basic supplies to get started, including glitter foam sheets in different sizes and colors, scissors, a glue gun, ribbon or twine, pipe cleaners, or wire for the arms and legs of the angel. You also may want to have some colorful felt pieces on hand as well as fabric scraps for clothing or wings if desired. With these materials, you can create an eye-catching decoration that is sure to be admired by all who see it!
Cut Out the Pieces: Trace, Cut, and Assemble
Are you looking to add a special touch to your Glitter Paper Angel For Christmas Decoration this year? Why not make your own decoration? This DIY Christmas angel tutorial is an easy way to get creative and have fun! With just a few simple supplies, you can create an adorable sparkly angel for your tree. Start by tracing the shape of the angel onto glitter foam, then cut it out using scissors or a craft knife. Once you’ve cut out all of the pieces, assemble them according to the instructions and use hot glue or fabric glue to attach them together. You’ll be amazed at how quickly this cute little angel will come together – so grab those supplies and let’s get started!
Decorate the Angel: Colour and Glitter
Are you looking for a festive addition to your Christmas tree this year? Look no further – DIY Christmas angels made with glitter foam are the perfect way to add a touch of sparkle and color. Whether you’re making it as a family project or simply want something unique, these easy-to-make angels can be decorated however you choose.
Create your own beautiful angel using glitter foam sheets and some craft supplies. You can make them any size, shape, and color that you like – all it takes is some imagination! Add ribbons, feathers, and beads for an extra special touch. Finish off your creation with glitter so that it reflects the light from the Christmas tree lights – now you have a one-of-a-kind angel decoration! There’s nothing quite like decorating the angel yourself for an extra personal touch.
Add Wings and Halo: To Complete the Look
The Glitter Paper Angel For Christmas Decoration season is upon us, and it’s time to start adorning the tree with holiday decorations! DIY projects are a fun way to add personal touches to your home decor. A great project for all ages is a homemade angel decoration that can hang on the tree. With a few materials and some imagination, you can create an adorable glitter foam angel in no time at all. The end result will be sure to bring cheer and joy this holiday season with its festive sparkle!
Adding wings and a halo will complete the look of your homemade Glitter Paper Angel For Christmas Decoration angel. Making these pieces are simple if you have access to craft foam or cardboard. You just need scissors, glue, a hot glue gun (for adults), and of course glitter, paint, or anything else you would like to use for decorations.
Create Accessories: For Extra Sparkle
This holiday season, why not add some extra sparkle to your Christmas decorations with a DIY Christmas angel? With just basic supplies like glitter foam and other craft materials, you can create an angel that will turn heads on any Christmas tree.
Making your own Christmas angel at home is easy and affordable. You can customize it however you want to fit your personal style or the color palette of the room! The best part is that once you have all the necessary supplies, it takes no time at all to make the perfect accessory for your festivities.
So grab a few basic craft materials and transform them into something special for this holiday season. Your guests are sure to be impressed by this festive accessory made with love from you!
4. Eva Foam Sheet Christmas Angel | How To Make A Glitter Paper Angel | Diy Glitter Paper Craft
DIY Glitter Paper Craft
Are you looking for a fun and easy DIY project to do this Glitter Paper Angel For Christmas Decoration? Then look no further than the glitter paper craft. This craft is an excellent way to make your own Christmas angel decorations out of Eva foam sheets and glitter paper! With just a few simple steps, you can create beautiful angel decorations that will bring holiday cheer to any room.
Making your own angel decorations is not only a great way to get creative, but it’s also an inexpensive alternative to buying ready-made decorations from stores. All you need are some Eva foam sheets, basic crafting supplies like glue and scissors, as well as glitter paper in colors of your choice. Once you have all the materials ready, follow the tutorial below for step-by-step instructions on how to make these sparkling angels!
Materials Needed: Eva Foam Sheet, Glitter Paper
This article will discuss how to make a DIY glitter paper craft featuring an Eva foam sheet Christmas angel. In order to complete this project, you will need two essential materials: an Eva foam sheet and glitter paper. Working with Eva foam is a great way to get creative and add dimension to your projects. It is easy to cut, shape, and glue together for a variety of projects. Glitter paper adds color and sparkle that can make any project come alive!
Once you have all the necessary materials gathered, it’s time to start crafting! This Christmas angel project requires some basic craft skills like cutting, folding, and gluing. You will also need some items like scissors or small blades for cutting the foam sheets as well as glue for sticking them together. With these simple steps in mind, you’ll be able to create your own beautiful sparkling angel in no time!
Step 1: Cutting Out Angel Shape
This step-by-step guide to making a glitter paper angel out of Eva foam sheets will help you create a perfect Christmas decoration for your home. With just a few simple supplies, you’ll be able to craft an eye-catching seasonal accent that’s sure to draw compliments from family and friends. To get started, begin by cutting out the angel shape from the Eva foam sheet.
To do so, use scissors or an X-Acto knife and cut along the edges of the template provided in this tutorial. Make sure all lines are even and straight to ensure that your finished product looks its best. Once you’ve finished cutting out the angel shape, discard any excess materials, and proceed to Step 2: Gluing & Assembly. With these easy instructions in hand, crafting your own glitter paper angel is sure to be a breeze!
Step 2: Add Wings and Face Details
This article will discuss step two in the process of making a glitter paper angel with Eva foam sheet. This unique Christmas craft is simple and fun to make, perfect for holiday decorating or gift-giving. The second step in this project involves adding wings and facial details to your finished body shape.
To start, you’ll need to cut out two identical wing shapes from your glitter paper; use scissors or an X-acto knife for precision cuts. You can either freehand the design or trace out a template onto the paper beforehand. Once both wings are cut out, apply glue along the edges of each side before attaching them to the back of the angel’s body. For further stability, add a few small pins along the center edge of each wing.
Next up is adding those important facial features!
Step 3: Assemble Eva Foam Sheet Parts
Making a glitter paper angel is an easy and fun way to add some sparkle to your holiday decorations this season. Step 3 in the craft is assembling Eva Foam Sheet parts. Eva Foam Sheet is an inexpensive, lightweight foam material that comes in various colors and thicknesses, perfect for a variety of crafts like this one. To begin, gather all the required supplies: 1 sheet of 12 x 18” Eva Foam Sheet, scissors, glue gun, and glitter paper. Cut out the following pieces from the foam sheet – 2 wings (2 x 4”), 1 body (6 x 8”), 2 arms (2 x 3”), and 1 head (3 x 4”).
Step 4: Apply the Glitter Paper
This article will provide a step-by-step guide for making a glitter paper angel out of Eva Foam sheets. Step 4 of this craft project is to apply the glitter paper. For this, you’ll need to cut the glitter paper into thin strips and adhere them to the foam using glue or double-sided tape. Make sure that each strip is laid in one direction, starting from the head down to the wings and body of your angel. The purpose of this is twofold: First, it adds texture and sparkle to the form; second, it helps make your angel more realistic looking by giving it an extra dimension. To increase durability, use multiple layers of glitter paper on each side while creating your design. Once all your strips are in place and glued down, give your angel one last layer of glue or tape across its surface for added security.
Final Touches
In conclusion, the glitter paper angel is the perfect addition to a Christmas decoration. It’s an easy and inexpensive way to bring an extra sparkle of joy to any home this holiday season. The shimmery angel can be hung on any wall, or placed on a mantle as a centerpiece. Best of all, it’s fun and fast to make with the help of materials that are easy to find.


