


The holiday season is a time to celebrate and gather with family and friends, and one of the most popular decorations found in homes during this time of year is the Christmas tree. Adorning these trees are a myriad of festive ornaments that come in all shapes, sizes, materials, and colors. From traditional glass balls to handmade sculptures and everything in between, these ornaments can be used to create unique displays that reflect owners’ personal styles.
Christmas is a time of year when many families come together to celebrate the joy and cheer of the holiday season. One activity that everyone loves is decorating the Christmas tree with colorful ornaments. Whether it’s a single ornament that’s been passed down for generations or a collection of new and unique pieces, each one tells a story.
1. Nice & Pretty Glitter Foam Paper Christmas Tree Ornaments | Christmas Tree Topper Making Ideas
Glitter Foam Paper Trees
If you’re looking for an inexpensive and easy way to create a unique Christmas tree this holiday season, then look no further than these glitter foam paper trees. Not only are they fun and easy to make, but they add a touch of sparkle to any festive decorations. Plus, the kids will love helping you craft them!
These cute little trees can be used as ornaments or even as tree toppers. All you need is some colorful foam paper, scissors, glue, and lots of glitters! Cut out the desired shape of your tree from the paper then get creative by adding details such as snowflakes or stars with your scissors. Finally, finish off with loads of glitter in various colors and shades – anything goes when it comes to crafting these beautiful trees!
Supplies: Needed Materials
Creating a festive, eye-catching Christmas tree topper is the perfect way to put the finishing touches on your holiday decorations. Adding glitter foam paper ornaments can take your tree to the next level. But before you get started, you’ll need to make sure you have all of the supplies needed for this creative project.
For this crafty project, you will need a variety of materials including scissors, glue sticks, and markers. You will also need assorted glitter foam paper in different sizes and colors so that you can create unique shapes and decorations for your ornaments. A cutting mat might also be helpful when it comes time to cut out each piece of glitter foam paper for maximum accuracy and precision. Finally, a few pieces of thin string are recommended if you plan on adding hanging accents like streamers or tassels from your Christmas tree topper.
Step 1: Cutting the Foam Paper
If you’re looking for a creative and exciting way to decorate your Christmas tree this year, why not make some glitter foam paper Christmas tree ornaments? This easy DIY project is perfect for anyone who wants to add a sparkle to their holiday decorations. In this tutorial, we will guide you through the first step of the process: cutting the foam paper into shapes.
Using scissors or a craft knife, cut out fun shapes from your foam paper. Popular choices include stars, snowflakes, bells, and other festive symbols. If you’d like to create an intricate design with small details, it’s best to use a craft knife rather than scissors as this will help ensure precision cuts are made in the paper. Regardless of which tool you choose though, take care when handling your materials; blades can be sharp and dangerous if used incorrectly!
Step 2: Gluing the Pieces Together
Creating Christmas decorations can be a fun and creative activity. Making your very own glitter foam paper Christmas tree ornaments and topper is no exception. Step 2 of this project involves gluing the pieces together to make a festive ornament that’s sure to bring holiday cheer.
Start by laying out all the foam paper pieces you have cut in step one. Next, take your hot glue gun and carefully glue each piece together until the ornament shape is complete. When gluing the edges, use extra care as too much heat could melt the foam paper instead of securing it in place. Once all of the pieces are glued together, wait for them to cool before moving on to step three – decorating! With patience and creativity, you’ll soon have a lovely decoration ready for display!
Step 3: Adding Glitter & Decorations
Now that you have a sturdy base and the shapes of your Christmas decorations, it’s time to add the sparkle! Step three in making your own ornaments and tree toppers is adding glitter and decorations. There are many ways to make these ornaments shine. One way is to use foam paper with glitter-colored paint brushed on them.
This will give the ornament a shimmery look that reflects off of the light in your room. Another way is to glue little pieces of colored tassels, pom poms, sequins, ribbons, and other decorative materials on the ornament for extra texture. You can also use pipe cleaners for hanging loops or arms if you want your Christmas tree decoration to take on a 3D shape. Finally, spray paint can be used as well for that extra special touch!
Step 4: Making a Christmas Tree Topper
Christmas tree decorating is a beloved holiday tradition, and tree toppers are the crowning glory of this treasured decoration. To make a Christmas tree topper that stands out from the crowd, try making your own with glitter foam paper! This crafty project combines colorful materials with creative design to create an eye-catching piece that will turn any Christmas tree into a showstopper.
Getting started on your custom glitter foam paper Christmas tree topper is easy! First gather your supplies: craft foam sheets in festive colors, glitter glue, scissors, hot glue gun and sticks, ruler or measuring tape, and sequins or other decorations. Then use the ruler or measuring tape to measure out the size of the star you’d like for your topper – remember it should be slightly larger than half the height of your tree.
2. Christmas Mini wreath Making With Glitter Eva Foam Paper | DIY Christmas Wreath | Christmas Decor
Christmas Mini Wreath Making
The holiday season is a great time to make festive decorations. Get in the Christmas spirit and create your own mini wreath with glitter Eva foam paper! DIY Christmas wreaths are an easy and fun way to spruce up your home décor this year.
Making these mini wreaths couldn’t be simpler – all you need is a few supplies such as glitter Eva foam paper, scissors, and glue. With just a little bit of craftiness, you can design beautiful decorations that will bring warmth and cheer into your home. It’s a great activity for kids too – they’ll love creating their own unique piece of decor!
No matter what style or look you have in mind, you can easily customize these mini wreaths to suit any taste. So why not give it a try?
Materials Needed: Glitter Eva Foam Paper
Are you looking for a fun and easy way to add some festive cheer to your holiday decorations? If so, this Christmas mini wreath made with glitter Eva foam paper DIY Christmas wreath is the perfect project for you! Not only does it add a unique touch of sparkle to your home during the holidays, but it’s also very simple and inexpensive to make. All you need is glitter Eva foam paper, which can be found in most craft stores or online retailers. With just a few supplies and some creativity, you’ll have a beautiful wreath that’s sure to impress all of your guests this winter season!
Step 1: Cut Out Shapes
Creating a Christmas mini-wreath is an easy and fun way to add festive cheer to your home this holiday season. To make a truly unique DIY Christmas wreath, you need to start by cutting out shapes from glitter Eva foam paper. This material is perfect for making intricate decorations and its sparkly texture adds a bit of extra magic!
Start by drawing out the shape that you want to cut on the glitter Eva foam paper. You can use scissors or a craft knife for this step – just be sure not to press down too hard with either tool as it could damage the sheet of paper below. Once all of your shapes are cut out, it’s time to assemble them into your beautiful handmade Christmas mini-wreath!
Step 2: Glue Pieces Together
When it comes to crafting the perfect holiday wreath, Step 2: Glue Pieces Together is key. With just a few simple supplies, like glittery Eva foam paper and hot glue, you can create an eye-catching mini Christmas wreath that will brighten up any room in your home this holiday season. Start by measuring the size of your foam sheet and cutting it into 2-inch wide strips.
Once all of your pieces are cut, it’s time to start gluing them together. Take one strip and bend it into a circle shape before applying hot glue along the edges and adding another piece on top – continue doing this until you have created a full mini wreath shape with all of your strips of foam glued together. This will be the base for your crafty project!
Step 3: Add Decorations
This article will guide you through step three of making a mini Christmas wreath using glitter Eva foam paper. Decorating your DIY Christmas wreath is one of the most exciting parts of this craft! After completing steps one and two (cutting the shapes out of the glitter Eva foam paper and forming them into a loopy design), it’s time to get creative with decorations.
You can add as much or as little decoration to your wreath as you want. Some popular choices for festive touches are tinsel, ribbons, sequins, holiday-themed stickers, felt poinsettias, and even small presents. You can opt for either a more traditional look or go wild and make something truly unique that expresses your creativity. Be sure to have plenty of extra materials on hand so you’re not limited in what you create!
Step 4: Hang and Enjoy!
Now that you have created the perfect glittery Eva foam paper Christmas wreath, it is time to hang and enjoy! With a few simple steps, you will be able to display your homemade creation in no time.
First, use a hammer and nail to attach the wreath to your desired wall or door. Be sure that the nail is secure in order for the wreath to stay up properly. Then, place the top of the ribbon on top of the nail and tie it around so that it is held securely. After tying it tightly, fluff out any ribbons or decorations as needed to achieve an aesthetically pleasing visual look.
You can now step back and admire your beautiful work of art! Place other holiday decorations near your wreath for added effect or use strands of colored lights around its circumference for extra sparkle during nighttime gatherings.
3. Christmas Snowflakes Making Easy Tutorial Step By Step | Simple Paper Snowflakes Wall Hanging
Crafting Snowflakes
Creating the perfect holiday decoration doesn’t have to be difficult. Crafting snowflakes is a simple and fun way to get into the Christmas spirit. With just a few materials, you can easily make beautiful paper snowflakes for hanging on your walls or windows. This step-by-step tutorial will show you how to craft your own adorable snowflakes in no time!
The basic materials needed are scissors, white paper, and glue or tape. First, start with a square piece of paper, then fold it in half diagonally to make a triangle shape. Next, cut various shapes out of the edges so that when the paper is unfolded it looks like a lacy snowflake design. For extra pizzazz, add glitter or other decorations before gluing two pieces together to form one dimensional ornament!
Supplies Needed
Making your own Christmas snowflakes is a fun and creative way to get into the holiday spirit. Whether you’re looking to make decorations for your home or gifts for friends, this easy tutorial will show you how to craft beautiful paper snowflakes with just a few simple supplies. To get started on your festive project, all you need are scissors, construction paper, a ruler, and some glue.
Start by choosing the colors of paper that will be used for your project. Cut strips of the chosen colors in varying sizes; any width between one-quarter and one inch is fine. When cutting out each strip, ensure that it has both straight edges and pointed ends for creating perfect snowflake shapes. With these materials prepared, it’s time to begin making Christmas snowflakes in earnest!
Drawing the Snowflake
Snowflakes are one of the most iconic symbols of winter and Christmas, representing the beauty and uniqueness of each snowflake that falls from the sky. With this tutorial, Christmas snowflake making is easier than ever! Follow along step by step to learn how to make simple paper snowflakes with a few materials you may already have at home. By the end of this tutorial, you will be able to make beautiful paper snowflakes for wall hangings or decorations.
Gather your supplies: scissors, 6-inch pieces of white paper, a ruler, and a pencil. You’re ready to start drawing the perfect Christmas snowflake! The process is simple: first, use your ruler and pencil to draw lines on each piece of paper so it looks like a six-pointed star. Cut out all eight points with scissors and then fold each point in half twice.
Cutting the Snowflake
Are you looking for an easy, fun activity to do with the family to get into the Christmas spirit? Look no further! Cutting paper snowflakes is a great way to spend time with your loved ones while making beautiful decorations for your home. This Christmas snowflakes-making tutorial will give you step-by-step instructions on how to create simple and stunning paper snowflakes wall hangings that are sure to bring a smile or two over the holiday season.
Even if you’ve never made a paper snowflake before, this tutorial will make it easy for anyone of any age or skill level to create beautiful decorations in no time at all. So grab some scissors and craft supplies, gather your family around, and let’s cut some snowflakes!
Decorating Ideas
Decorating for Christmas is a fun and exciting way to get into the holiday spirit. One of the most popular decorations is paper snowflakes, which can be made easily with just some scissors and paper. This article will provide an easy tutorial step-by-step guide on how to make beautiful snowflakes that can be used to hang in windows or even around your Christmas tree.
With this simple guide, you’ll be able to create unique snowflakes of any shape or size with just a few snips of the scissors. You can start with traditional six-pointed snowflakes or play around with other shapes – it’s up to you! Not only is it easy and inexpensive, but you’ll have something truly unique that nobody else has.
Hanging the Snowflakes
Hanging the Snowflakes is every Christmas enthusiast’s favorite winter activity. This tutorial provides an easy and simple step-by-step guide to creating beautiful paper snowflakes for wall decorations. It doesn’t take a lot of effort, just some simple supplies and a little bit of time. With this guide, you can easily make the perfect Christmas snowflake decorations to add warmth and charm to your home this holiday season.
This DIY project starts with gathering all the necessary materials required such as white or colored paper, scissors, tape, or glue-sticks or stapler. Once everything is ready, begin folding the paper into a triangle shape in order to create the intricate shapes of your desired snowflakes. Then cut out any patterns you like on each side before unfolding it carefully and voila!
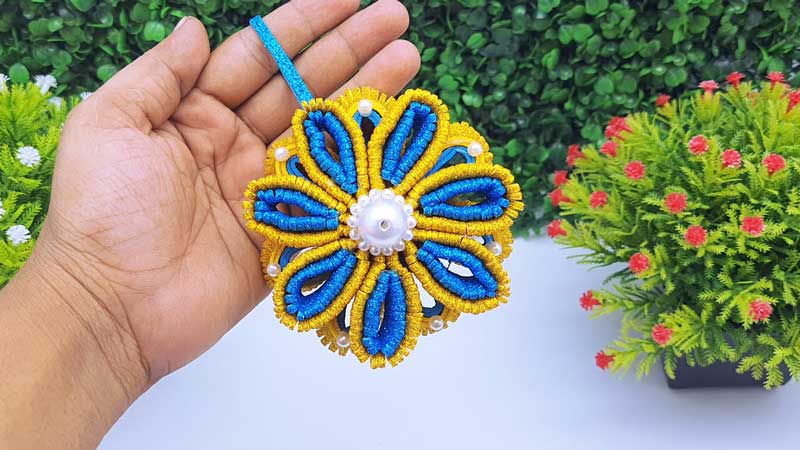
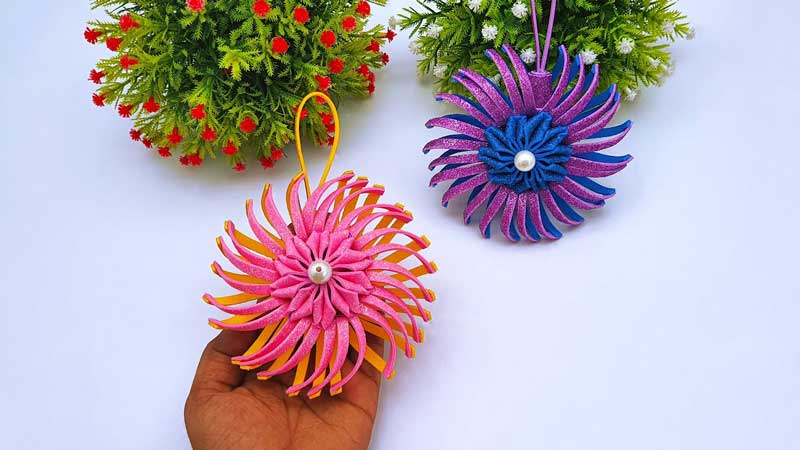
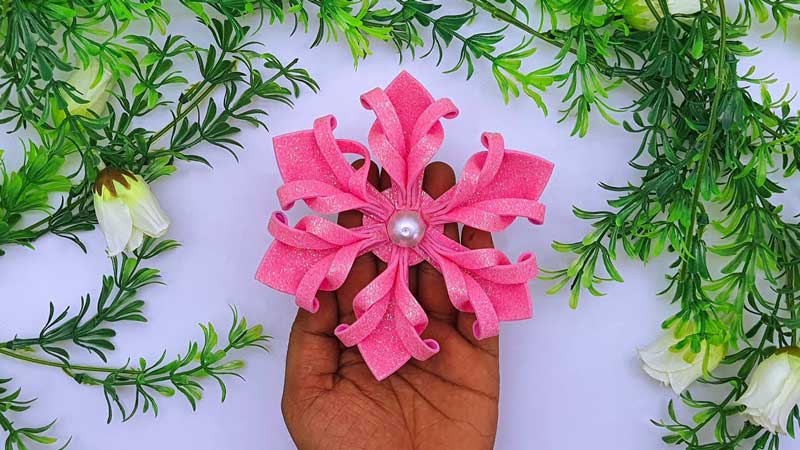
4. Glitter Foam Paper Ball Christmas Decorations | Christmas Ornaments With Glitter Ball | Christmas
Glitter Foam Paper Balls
Glitter foam paper ball decorations are the perfect way to add an extra sparkle to any Christmas tree this year. Not only are they a fun and creative way to decorate your home for the holidays, but they also make great gifts for family and friends. These festive ornaments come in a variety of shapes and sizes, from small balls that can be hung on trees and wreaths to larger ones that can be placed on mantles or tables. Each one is covered in sparkling glitter that will reflect light around the room for a magical effect.
The best part about these decorations is how easy it is to put them together. All you need is some basic craft supplies such as foam paper, scissors, glue, glitter, and ribbons. With just those few items, you can create beautiful balls of all different colors and patterns with plenty of sparkles.
Crafting Supplies Needed
Are you looking for a unique and fun way to craft your own Christmas decorations? Look no further than Glitter Foam Paper Ball Christmas Decorations! This DIY project can be done by anyone, regardless of age or crafting experience. All you need is some basic supplies and a creative spirit to make these beautiful ornaments that will surely add a sparkle to your holiday decor.
To get started, you’ll need some materials such as foam paper balls, glitter in various colors, scissors, a glue gun, and glue sticks. You’ll also want to have some tape handy as well as an array of embellishments such as sequins, beads, and ribbon. Once you’ve gathered all the items needed for this project it’s time to begin creating your festive decorations! Cut out shapes from the foam paper balls then glue on glitter to give them texture and sparkle.
Step-by-Step Instructions
Creating beautiful Christmas decorations can be a fun and easy project for the whole family. If you’re looking for something new to make this year, glitter foam paper ball Christmas ornaments are a perfect choice. This article will provide step-by-step instructions on how to create these unique decorations.
To start, gather your supplies: adhesive glitter foam paper sheets in various colors, scissors, ribbon pieces, and a hot glue gun. Cut out circles of various sizes from the adhesive foam paper sheets; these will serve as the bases for your ornaments. You can also cut out other shapes like stars and snowflakes if desired. Arrange all of the circles onto a flat surface in a design that you like and then use small pieces of ribbon to tie them together into bunches.
Personalizing Ornaments
Personalizing ornaments is a great way to add a special touch to your holiday decorations. Whether you are looking for something simple and inexpensive or something that requires more effort, there are many ways to make personalized Christmas ornaments. Glitter foam paper ball Christmas ornaments are one of the most popular options for sprucing up holiday decor. These festive decorations bring an extra bit of sparkle and shine to any tree, wreath, or garland. Not only do they look beautiful when hung from branches, but they also make wonderful gifts for family and friends!
Glitter foam paper ball Christmas ornaments come in many shapes and sizes so you can choose the one that best suits your style and budget.
Adding Glitter for Sparkle
Adding glitter to any holiday decorations is an ideal way to add some sparkle and shine to the season. Glitter foam paper ball Christmas decorations will bring a little bit of magic into your home this holiday season. These crafts are easy and fun for all ages, at any skill level, making them perfect for adding that extra special touch of glamour to your Christmas tree or mantle display.
Glitter foam paper balls can be used as both ornaments and as standalone decorations, providing plenty of ways for you to add a touch of sparkle throughout your home this Christmas. They come in a variety of colors and sizes so you can find the perfect match for any decorating theme or color scheme. And with just a few simple supplies like glue, glitter, and ribbon, you’ll be able to make beautiful creations with ease.
Different Ideas for Decorating
Decorating for the holidays can be a fun and creative activity. There are many different ideas for decorations that you can use to make your home festive. For example, glitter foam paper ball Christmas decorations can add a sparkle of color and texture to any holiday decor. Glitterball Christmas ornaments also add an eye-catching element that will light up any room in the house. With these two ideas, you can create a magical holiday atmosphere with just a few simple steps.
Glitter foam paper ball decorations involve cutting out circles from colored foam sheets and then gluing glittery objects, such as sequins, beads, and buttons onto them. These circles can then be hung on walls or placed around the house to bring a festive spirit into your home.
Final Thoughts
In conclusion, Christmas tree ornaments are a great way to show off your holiday spirit and style. They can be traditional, whimsical, classic, or even personalized. Whether you prefer the rustic look of vintage glass balls or the latest in modern technology-inspired designs, there is an ornament for every taste. Ornaments can be purchased online, from big box stores, and from local craft vendors.


