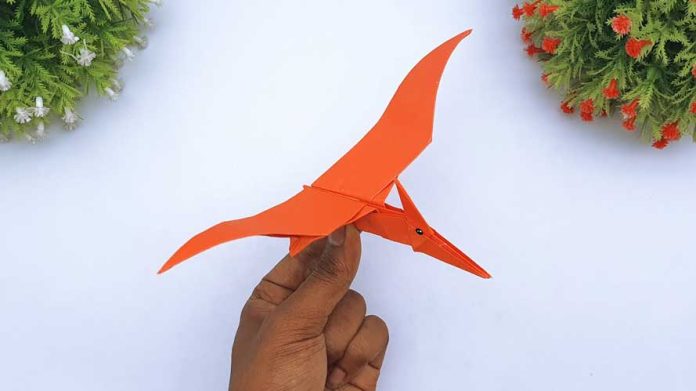
Origami, the art of paper folding, allows us to create beautiful and intricate shapes with just a single sheet of paper. In this step-by-step guide, we will explore how to make an easy origami pterodactyl—a legendary creature from the prehistoric era. This simple origami project is perfect for both beginners and enthusiasts looking to create a unique and eye-catching piece. So, grab a square sheet of paper, and let’s dive into the world of paper folding to bring the mighty pterodactyl to life!
Materials Needed:
- Square sheet of origami paper (15×15 cm or 6×6 inches)
- Clear workspace or table
Step 1: Starting Position Begin with the square sheet of origami paper. If one side of the paper is colored or patterned, make sure it is facing down to start with a clean surface.
Step 2: Folding the Paper Diagonally Fold the paper in half diagonally, bringing one corner to meet the opposite corner. Make sure the edges are aligned perfectly, and then crease the fold firmly.
Step 3: Creating a Triangle Unfold the paper to reveal the diagonal crease. Fold the paper again diagonally, this time bringing the other corner to meet the opposite corner. You will now have a smaller triangle shape.
Step 4: Forming a Diamond Shape Unfold the paper once more, and this time folds it in half horizontally, bringing the top edge to meet the bottom edge. Crease the fold well, and then unfold the paper again. You should have a crease running horizontally through the center of the triangle.
Step 5: Preparing for the Pterodactyl’s Body Flip the paper over, so the colored or patterned side is facing up. Fold the right and left edges of the triangle towards the center, aligning them with the central crease. This will create a narrower diamond shape.
Step 6: Shaping the Pterodactyl’s Body Take the top point of the diamond and fold it downwards towards the bottom point, folding along the center crease. This fold will form the body of the pterodactyl.
Step 7: Creating the Head and Beak Fold down a small portion of the top point to create the head of the pterodactyl. Then, fold the top of the head slightly inward to form the beak. Adjust the folds as needed to achieve the desired shape.
Step 8: Folding the Wings To create the wings, fold the right and left edges of the diamond shape upwards, aligning them with the central crease. The wings should be folded at an angle, starting from the base of the body and extending outwards. Adjust the wings to achieve the desired wing span and shape.
Step 9: Finishing Touches Gently shape the wings and body of the origami pterodactyl to give it a more three-dimensional appearance. You can curve the wings upwards or downwards to create a sense of movement. Also, gently shape the head and beak to add personality to your pterodactyl.
Step 10: Displaying Your Origami Pterodactyl Congratulations! You have successfully folded an easy origami pterodactyl. Now, find a special place to display your creation. You can perch it on a shelf, hang it from a thread, or incorporate it into a prehistoric-themed display.
Conclusion:
Congratulations on successfully creating your own easy origami pterodactyl! This simple yet captivating paper folding project has allowed you to bring the prehistoric creature to life through the art of origami. With just a square sheet of paper and a few folds, you’ve created a unique and eye-catching piece that showcases your creativity and skill.
Origami is not only a fun and engaging activity, but it also offers numerous benefits. It improves hand-eye coordination, enhances concentration and focus, and promotes a sense of relaxation and mindfulness. Folding an origami pterodactyl is a great way to explore your artistic side and develop your paper folding techniques.


