


DIY paper toy making is a fantastic way to explore your creativity while having fun. Not only is it an enjoyable activity, but it also encourages hands-on learning and helps to develop problem-solving skills. There are endless possibilities when it comes to paper toy making, and the best part is that all you need is paper and a few other basic materials.
One popular paper toy-making idea is creating origami animals. Origami is the Japanese art of folding paper, and it allows you to create three-dimensional animals and shapes with just a few simple folds. Another idea is making paper dolls with different outfits and accessories. This is a great way to express your fashion sense and style while creating something unique and personalized.
Paper airplanes are another classic paper toy that is easy to make and fun to play with. With a few folds, you can create various styles of airplanes that can fly long distances or do acrobatic tricks. You can even experiment with different types of paper to see how it affects the flight of the airplane.
1. How to Make a Paper Boat that Floats on Water | Origami Speed Boat Making Ideas
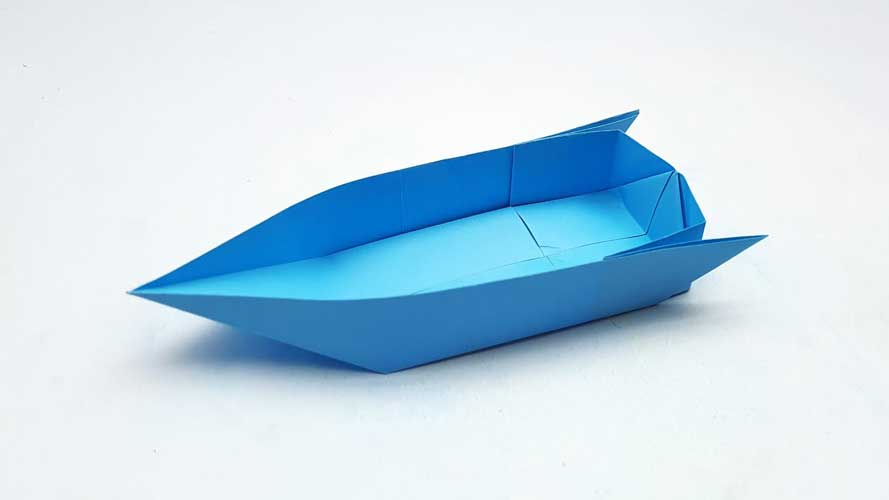
Making paper boats is a classic childhood activity that has been enjoyed for generations. Not only is it a fun and creative way to pass the time, but it’s also a great opportunity to teach children about science and engineering. With just a few simple folds, you can create a paper boat that can float on water. Here is a step-by-step guide on how to make a paper boat that floats on water.
Materials Needed:
- A sheet of paper (8.5 x 11 inches or A4 size)
- A pair of scissors
- A flat surface to work on
- A bowl or sink filled with water (to test the boat)
Step 1: Start with a rectangular sheet of paper and fold it in half vertically. Then, unfold it so that you have a crease down the center of the paper. This crease will be your guide for the next few folds.
Step 2: Fold the top left corner of the paper down to the center crease. Make sure that the top edge of the paper aligns with the center crease. Repeat with the top right corner, so that the paper looks like a kite shape.
Step 3: Fold the bottom edge of the paper up to meet the center crease. Then, fold it up again to create a double layer of paper at the bottom of the kite shape. These folds will help to create a more stable and buoyant base for your paper boat.
Step 4: Turn the paper over and repeat step 3 on the other side. This will ensure that both sides of the paper have the same folds.
Step 5: Fold the paper in half along the center crease, so that the two folded flaps are on the outside and the double layer of paper is on the inside. This will create a triangular shape.
Step 6: Fold down the top of the paper to create a small triangle, then fold it back up to create a crease. Repeat with the other side of the paper. These folds will become the sails of the boat.
Step 7: Open up the folds from step 6 to create two triangular flaps on either side of the boat. These will be the sails of the boat. The folds will create a small pocket that will help to hold the boat upright and provide stability.
Step 8: Fold the bottom edges of the boat up to create a flat bottom. This will help the boat float on water. The folds will create a small triangle at the bottom of the boat, which will act as a keel to help keep the boat upright.
Step 9: Open up the boat slightly and gently blow into the sails to puff them up. This will help to create a more realistic and fun-looking boat.
To test your paper boat, place it in a bowl or sink filled with water. If it sinks, adjust the folds to create a more water-resistant boat. If it floats, you’re done! You’ve successfully created a paper boat that floats on water.
Making a paper boat is a fun and easy craft that can be enjoyed by all ages. By following these simple steps, you can create a paper boat that floats on water and provides hours of entertainment. This activity is also a great way to teach children about science and engineering concepts, such as buoyancy and stability. So, next time you’re looking for a fun and creative way to spend an afternoon, try making a paper boat and setting sail on your own imaginative adventures.
2. How To Make Paper Flying Airplane | Handmade Paper Plane Making Tutorial
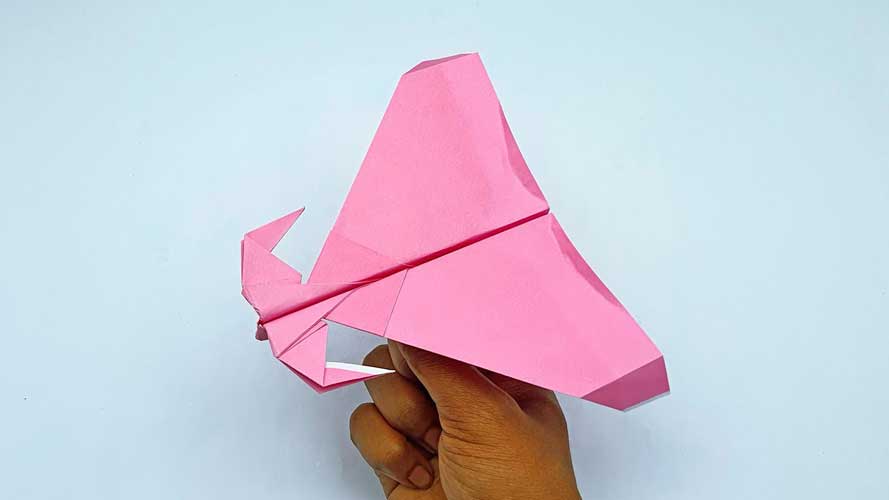
Making paper airplanes is a fun and entertaining activity that has been enjoyed by people of all ages for many years. It’s a great way to get creative and test out your engineering skills. If you’re looking for a new paper airplane design to try out, we’ve got you covered. In this blog post, we will guide you through the step-by-step process of making a paper-flying airplane that can soar through the air.
Materials Needed:
- A sheet of paper (8.5 x 11 inches or A4 size)
- A pair of scissors
Step 1: Start by folding the paper in half lengthwise. Make sure the edges are aligned before you crease the paper. This will create a center fold down the middle of the paper.
Step 2: Open the paper back up and fold the top corners down to meet the center crease. The tip of the folded corner should be a few inches away from the bottom edge of the paper.
Step 3: Fold the top edge of the paper down to the bottom edge. Make sure the crease is sharp and neat.
Step 4: Fold the paper in half along the center crease. This will create a V shape with folded corners on the top.
Step 5: Fold the top layer of the V shape down so that the folded corners are on the outside. The folded edge should be a few inches away from the bottom edge of the paper.
Step 6: Fold the top corners down again to meet the center crease. The tips of the folded corners should be slightly higher than the previous folds.
Step 7: Fold the top edge of the paper down to the bottom edge again. This will create a sharp and crisp fold.
Step 8: Fold the paper in half along the center crease. This time, the folded corners will be on the inside of the paper.
Step 9: Fold the top corners down once again to meet the center crease. The tips of the folded corners should be a little higher than the previous folds.
Step 10: Fold the top edge of the paper down to the bottom edge one last time. Make sure the crease is sharp and neat.
Step 11: Now, fold the wings of the airplane. Hold the airplane by the middle and fold the wings down on both sides. Make sure they are aligned and symmetrical.
Step 12: Fold the wings up slightly at the tips. This will help to keep the airplane level in flight.
Step 13: Finally, add a small fold at the back of the airplane to create a tail wing. This will help to stabilize the airplane in flight.
Your paper-flying airplane is now complete and ready for takeoff. Hold it by the middle and give it a gentle toss into the air. Experiment with different throwing techniques and see how far you can make it fly.
3. How To Make Paper Windmill Easy | Handmade Paper Crafts Pinwheel | Paper Toy Making
Paper windmills, also known as pinwheels, are classic toy that has been enjoyed by children for generations. They are simple to make and can be customized in a variety of ways, making them a perfect craft project for all ages. In this blog post, we will guide you through the step-by-step process of making a paper windmill that spins in the wind.
Materials Needed:
- A square sheet of paper (6 x 6 inches or larger)
- A pencil
- A ruler
- A pair of scissors
- A pushpin or tack
- A stick (optional)
Step 1: Start by marking the center of the paper with a pencil. To do this, fold the paper in half diagonally and then unfold it. Repeat this process for the other diagonal. The point where the two folds intersect is the center of the paper.
Step 2: Using a ruler and a pencil, draw four diagonal lines from the corners of the paper to the center point. These lines should be evenly spaced and create an “X” shape on the paper.
Step 3: Cut along the diagonal lines to the center point of the paper. Be sure to stop about 1 inch from the center point to leave a small square in the center.
Step 4: Fold every other corner of the paper towards the center of the square. Use the pencil to mark the center point of the square and then push a pushpin or tack through the center point.
Step 5: If you want to add a stick to your windmill, take a small stick and push it through the hole in the center of the windmill. This will give you a handle to hold onto when you spin the windmill.
Step 6: Hold the stick or the center of the windmill and give it a gentle blow or spin. The wind will catch the blades of the windmill and cause it to spin.
You can customize your paper windmill by using different colors or patterns of paper. You can also add decorations, such as stickers or glitter, to make your windmill stand out. Try making different sizes of windmills and experiment with different blowing techniques to see how fast you can make them spin.
4. Origami Gift Card Heart Making Easy Tutorial | Valentine’s Day Crafts Making
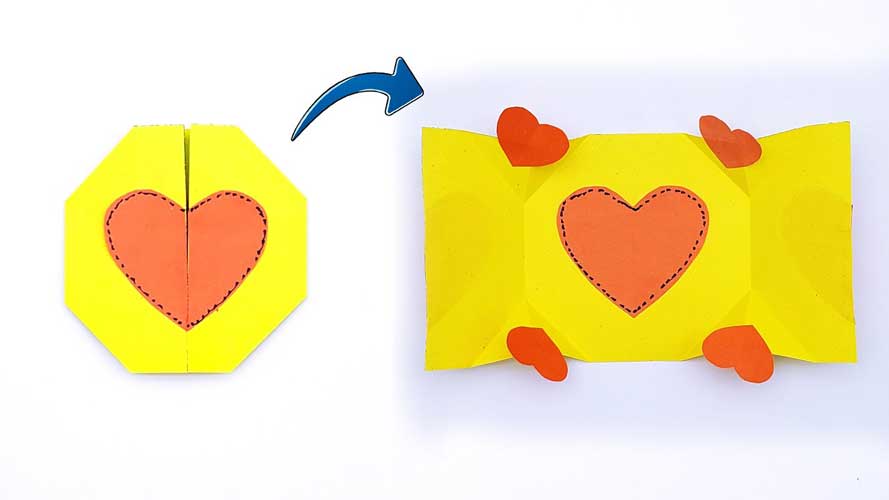
Giving someone a gift card is a great way to show your appreciation, but it can often feel impersonal. By adding a personal touch with an origami heart, you can turn a simple gift card into a heartfelt and thoughtful present. In this blog post, we will guide you through the step-by-step process of making an origami heart that can hold a gift card.
Materials Needed:
- A square sheet of paper (6 x 6 inches or larger)
- A gift card
- A pair of scissors (optional)
Step 1: Start by folding the paper in half diagonally to create a triangle. Make a crease along the fold and then unfold the paper.
Step 2: Fold the paper in half diagonally in the opposite direction to create a second triangle. Again, make a crease along the fold and then unfold the paper.
Step 3: Fold the paper in half horizontally, creasing it in the middle. Then, fold the paper in half vertically, creasing it in the middle.
Step 4: Open up the paper to reveal the creases you’ve made. Then, fold the paper in half diagonally so that the creases form a triangle on the top half of the paper.
Step 5: Open up the top layer of the paper and tuck the corners into the center crease. Then, fold the bottom edge of the paper up to the bottom edge of the triangle.
Step 6: Fold the bottom half of the paper up towards the top of the paper, creating a pocket. This pocket is where the gift card will be held.
Step 7: Slip the gift card into the pocket you just created, making sure it fits snugly. Then, fold the top half of the paper down and tuck the corners into the center crease to form the heart shape.
Step 8: Finally, you can use scissors to cut a small slit in the top of the heart shape to create a notch for the gift card to be easily removed.
And there you have it – an origami heart that can hold a gift card and make you’re present even more special. You can use different colored paper or decorate the heart with stickers or markers to make it even more personalized. It’s a simple and easy craft project that can be done in just a few minutes and is sure to be appreciated by anyone who receives it.


