


When it comes to decorating for Christmas, there are endless possibilities. But one of the most popular and timeless choices is the angel. Whether they’re hanging from the ceiling, perched atop the tree, or guarding the nativity scene, angels are a key part of many people’s holiday decorations. And while you can find plenty of Angels for sale, there’s something special about making your own.
This holiday season, try your hand at making one of these beautiful DIY angels. They make great decorations for any home and are sure to impress your friends and family. With a little bit of creativity and some simple supplies, you can make these amazing angels in no time.
Here are Five Best Most Amazing DIY Christmas Angels You’ve Ever Seen:
Here are five of the best, most amazing DIY Christmas Angels you’ve ever seen. These angels are sure to make your holiday season bright and beautiful. So what are you waiting for? Get crafting!
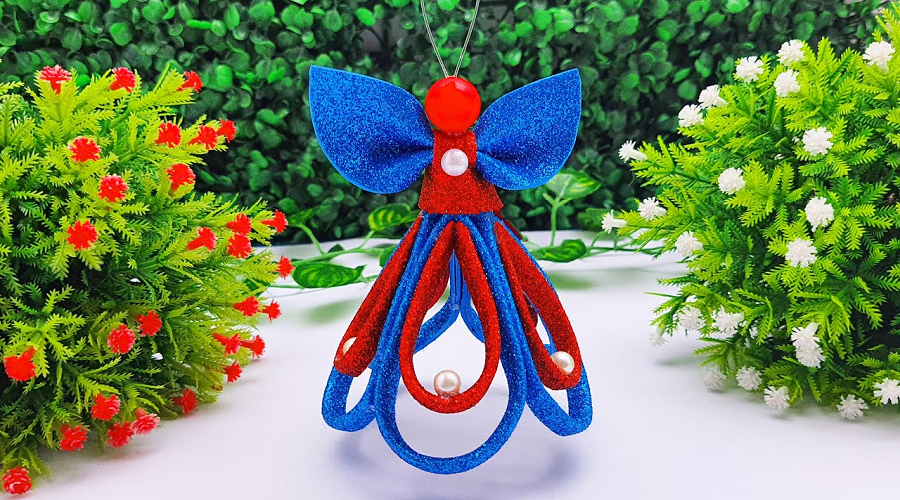
1. Diy Christmas Angel With Glitter Foam | How To Make A Angel For Christmas Tree Decoration
Glitter foam angel craft
This glitter foam angel craft is a fun and easy holiday project for kids of all ages. With just a few simple supplies, you can create a beautiful angel to hang on your tree or give as a gift.
To make your own glitter foam angel, you will need:
- -One sheet of glitter foam
- -One pipe cleaner
- -Scissors
- -Glue
- -Ribbon or string
First, cut out two wings from the glitter foam. Next, twist the pipe cleaner around the center of the wings to create the body of the angel. Then, glue on a ribbon or string for hanging. Finally, add any other details you like, such as beads for the eyes or sequins for the dress. Your glitter foam angel is now complete! Hang it on your tree or give it to someone special this holiday season.
Materials:
- glitter foam,
- pipe cleaner,
- googly eyes
This holiday season, try your hand at making this fun and festive DIY Christmas angel with glitter foam, pipe cleaners, and googly eyes. This project is perfect for kids or adults and is sure to add some sparkle to your home décor. To make your angel, start by cutting a glitter foam sheet into two equal pieces. Next, use a hot glue gun to attach the pipe cleaner to the top of one piece of foam. Then, glue on the googly eyes. Once everything is in place, carefully sandwich the two pieces of glitter foam together and press down firmly.
Your DIY Christmas angel is now complete! Display her on your mantle or shelf as part of your holiday decorations.
Step 1: Cut out an angel shape from glitter foam
To make your own glittery Christmas angel, start by cutting out an angel shape from glitter foam. You can use a template or freehand the design. Once you have your angel shape cut out, add some details like wings, a halo, and a face. Then, glue or tape the angel to a piece of string or ribbon and hang it up!
Step 2: Attach pipe cleaner to wings
It’s time to give your angel some wings! Cut two 12-inch pieces of pipe cleaner and twist them together in the center. Then, take each end and insert it into the body just below the arms. Next, bend the pipe cleaners outwards to create wings. Finally, add a little bit of glue to secure everything in place.
Step 3: Glue on googly eyes
Skip the expensive store-bought decorations this year and make your own with this easy tutorial. In just a few steps, you can create a cute and festive angel decoration for your home. All you need is some glitter foam, hot glue, and googly eyes.
To make your angel, start by cutting out a wing shape from the glitter foam. Make two wings so that your angel can fly high! Next, hot glue the wings to the back of the googly eyes. You can also add some extra details like a halo or a mouth with glitter paint.
Now your angel is ready to take flight! Hang her up on the Christmas tree or use her as a fun table decoration. With a little bit of creativity, you can make all sorts of different angles using different colors and materials. So get crafty and spread some holiday cheer!
Step 4: Add details with markers
After you have cut out your angel shape, it is time to add some details. You can do this with markers, paint, or even sequins. Get creative and have fun!
To start, you will want to add a face to your angel. You can use markers or paint for this. If you are using a marker, make sure to go over the lines a few times so that they are nice and bold.
Next, you can add some wings. Again, you can use a marker or paint for this. Once you have added the wings, you can move on to adding some other details like a halo or a star.
Get creative and have fun! This is your angel so make it unique.
2. Eva Foam Sheet Christmas Angel | How To Make A Glitter Paper Angel | Diy Glitter Paper Craft
What are Eva foam sheets?
ls used for making crafts. They are easy to work with and very versatile. You can use them to make a variety of different projects, including Christmas angels. Eva foam sheets are made from a type of plastic called ethylene-vinyl acetate, or EVA. This material is soft and flexible, yet durable. It is also waterproof, making it ideal for crafting projects that will be exposed to moisture.
To make a Christmas angel out of Eva foam sheets, start by cutting two wing shapes out of the material. Then, use a hot glue gun to attach the wings to the back of a small body shape. Finally, decorate the angel with paint, glitter, or any other embellishments you like.
How to make a simple Angel shape out of an Eva foam sheet
To make a simple Angel shape out of an Eva foam sheet, follow these steps:
1. Draw a wing shape onto the foam sheet. Make sure the wings are symmetrical.
2. Cut out the wing shape with a sharp knife or scissors.
3. Fold the top of the foam sheet down to create a head and neck for the Angel.
4. Cut a small oval shape out of the bottom of the foam sheet for Angel’s body.
5. Glue or tape the wings onto the back of the body.
6. Decorate the Angel as desired with paint, glitter, etc.
7. Hang your finished Angel on your Christmas tree or elsewhere in your home!
What you will need: list of materials
- 1. Eva Foam Sheet
- 2. Craft Knife
- 3. Cutting Mat
- 4. Pencil
- 5. glitter glue
- 6. paintbrush
- 7. small paintbrush
- 8. black Sharpie marker
- 9. gold Sharpie marker
- 10. clear packing tape
- 11. gold cord or string
In this project, you will need the following materials: an Eva foam sheet, a craft knife, a cutting mat, a pencil, glitter glue, a paintbrush, a small paintbrush, a black Sharpie marker, a gold Sharpie marker, a clear packing tape, and a gold cord or string.
Step-by-step guide: outline each step
- 1. Do you want to make a unique and beautiful Christmas angel out of Eva foam sheet? Here is a step-by-step guide that will show you how, from start to finish.
- 2. First, you will need to gather your materials. For this project, you will need an Eva foam sheet, scissors, and a hot glue gun.
- 3. Once you have your materials, the first step is to cut out the basic shape of the angel from the Eva foam sheet. You can use a template or freehand it.
- 4. Next, use the hot glue gun to attach two smaller pieces of foam together at the top to form the angel’s head. Then, glue on two wings made from smaller pieces of foam.
- 5. Finally, decorate your angel however you like!
3. Mini Wreath Making With Glitter Foam Paper For Christmas | Christmas tree Decorations ideas | Wreath
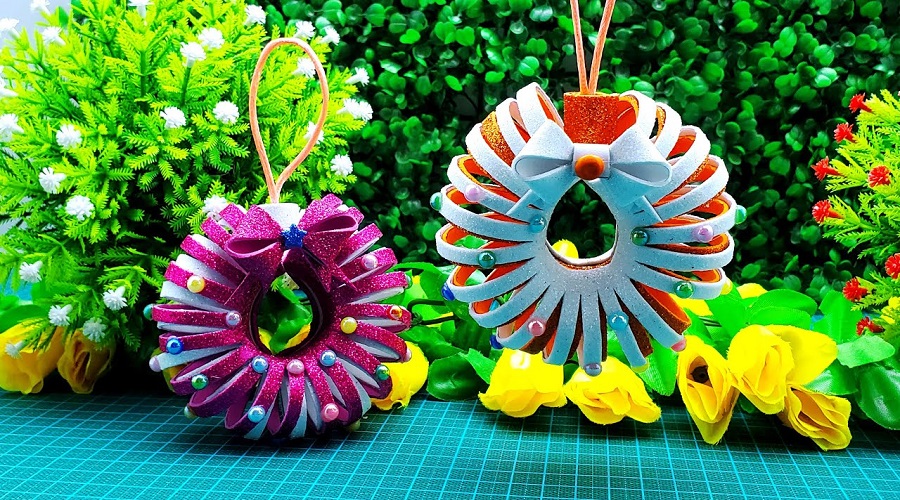
Why make your own mini wreath?
If you love crafting and DIY projects, then making your own mini wreath is the perfect activity for you this holiday season. Not only is it a fun way to get into the Christmas spirit, but it’s also a great way to add a personal touch to your home décor.
There are endless possibilities when it comes to designing your own mini wreath. You can choose whatever colors and materials you like to create a one-of-a-kind decoration that perfectly reflects your style. And best of all, it’s a relatively easy project that doesn’t take too much time or money.
So if you’re looking for a fun and festive DIY project this Christmas, why not try making your own mini-wreath? You’ll be glad you did!
Materials needed:
1. All you need is some glitter foam paper, scissors, and a hot glue gun to make this mini wreath.
2. This project is perfect for those who want to add a little something extra to their Christmas decor.
3. With just a few supplies, you can create a beautiful and festive wreath that will add some holiday cheer to your home.
Step 1: Cut out a circular base from the glitter foam paper
- Step 1: Cut out a circular base from the glitter foam paper.
- Using a sharp knife or scissors, cut out a small circle from the center of the glitter foam sheet. This will be the base of your wreath. Make sure the circle is large enough to fit around your head comfortably.
- Step 2: Cut strips of glitter foam paper to create the wreath shape.
- Cut strips of glitter foam paper into thin strips, about 1-2 inches wide. You will need enough strips to go around the entire circumference of your circular base.
- Step 3: Assemble your wreath by gluing the strips of glitter foam paper to the base.
- Start by applying a line of glue around the edge of the circular base. Then, begin attaching the strips of glitter foam paper to the base, overlapping them slightly as you go around.
Step 2: Hot glue the end of a strip of glitter foam paper and start wrapping it around the base in a spiral
Start your mini wreath by hot gluing the end of a strip of glitter foam paper to the base. Then, begin wrapping the strip around the base in a spiral. As you wrap, add more strips of glitter foam paper until the entire base is covered. Finally, top off your wreath with a bow or other decoration of your choice.
Step 3: Keep adding strips of glitter foam paper until the wreath is as full as you’d like
Start by applying a line of glue around the edge of the circular base. Then, begin attaching the strips of glitter foam paper to the base, overlapping them slightly as you go around.
Step 4: Hot glue on any additional embellishments like mini pinecones or holly berries
To make your mini wreath more festive, add some hot glue embellishments like mini pinecones or holly berries. This step is optional, but it will give your wreath a little extra flair. Just be careful not to overdo it with the glue – a little goes a long way! Conclusion: Hang your completed mini wreath on your tree or give it as a festive gift!
4. Diy Home Decorations Christmas For Snowflakes Ideas | Beautiful Paper Christmas Making
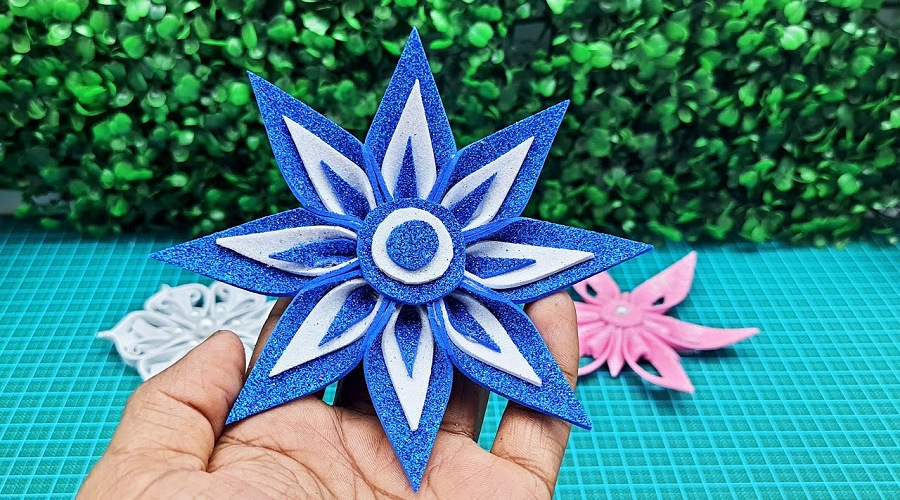
State the purpose of the blog DIY home decorations for Christmas
DIY home decorations for Christmas are a great way to add personal touches to your holiday decor. By using simple materials and following easy instructions, you can create unique snowflakes, wreaths, and other festive decorations. With a little creativity, you can turn your home into a winter wonderland this holiday season.
Paper Christmas ornaments: star, bell, candy cane
Making a gingerbread house: tips and tricks
Making a gingerbread house is a fun and festive activity to do during the holidays. Here are some tips and tricks to help you make the perfect gingerbread house.
When making your gingerbread dough, be sure to add plenty of spices like ginger, cinnamon, and nutmeg. This will give your gingerbread a strong flavor that will really stand out.
If you want your gingerbread house to be extra sturdy, try using royal icing to attach the pieces together. Just pipe the icing onto the edges of the Gingerbread and press them firmly together.
Finally, don’t forget to have fun with your decoration! Use candies and other sweets to create a festive and colorful display that will impress all your holiday guests.
Section 1: Christmas decorations for the home section
Although not everyone celebrates Christmas, many people enjoy decorating their homes for the holidays. There are many different ways to decorate, from simple to complex. This section will provide ideas and instructions for simple Christmas decorations that can be made at home.
One of the most popular ways to decorate for Christmas is with a wreath. Wreaths can be made from almost anything, including paper, fabric, or even pinecones. They can be hung on doors or walls, or placed on mantles or tables. Another popular decoration is the Christmas tree. Trees can be real or artificial, and come in all shapes and sizes. They can be decorated with lights, garlands, ornaments, and more.
No matter how you choose to decorate your home for Christmas, there are endless possibilities. Get creative and have fun! section
Section 2: Paper Christmas decorations
- 1. If you love spending time crafting during the holidays, then you’ll love these easy and beautiful paper Christmas decorations.
- 2. With just a few simple supplies, you can create stunning snowflakes and other festive holiday decorations.
- 3. So grab your scissors and glue, and get started on your own DIY home decorating project today!
Section 3: Making Christmas beautiful
Making Christmas decorations doesn’t have to be difficult. With a little creativity, you can make beautiful snowflakes to hang in your home.
Cutting paper snowflakes is a fun activity for kids and adults alike. They’re also a great way to add a personal touch to your Christmas decor.
To make paper snowflakes, you’ll need a few supplies: scissors, paper, and tape. Once you have your supplies, follow these simple steps:
1. Cut a piece of paper into a square shape.
2. Fold the square in half to create a triangle.
3. Fold the triangle in half again to create a smaller triangle.
4. Cut shapes out of the sides of the triangle (be careful not to cut the point off).
5. Unfold the triangle and admire your beautiful snowflake!
5. DIY Christmas Foamiran Ball Ornaments | Glitter Foam Paper Tree ornaments | Christmas Ball Ornaments
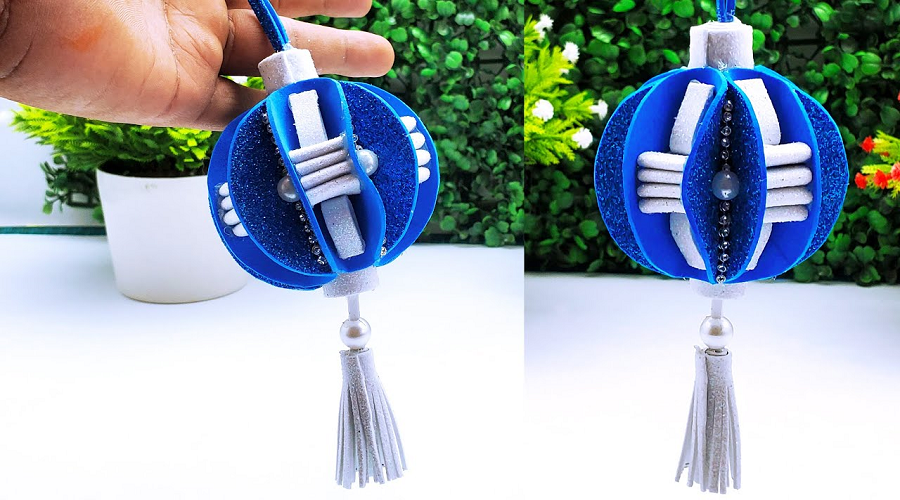
DIY Christmas ornaments
When it comes to Christmas decorations, there are plenty of ways to save money and still have a beautifully festive home. One way to do this is by making your own decorations. DIY Christmas ornaments are a great way to add a personal touch to your tree and home. Plus, they’re usually pretty easy and inexpensive to make. One popular type of DIY ornament is the Foamiran ball ornament. These ornaments are made with foa Miran, a glittery foam paper. They’re simple to make and can be customized to any color or style you want.
To make these ornaments, you’ll need Foamiran, scissors, a hot glue gun, ribbon, and glitter (optional). Start by cutting out small circles from the foam Miran.
What You Need:
- Foamiran
- Glitter foam paper
- Christmas ball Ornaments
- Scissors
- Pencil
- Knife
- Hot glue gun
- Glue sticks
With Christmas just around the corner, now is the perfect time to start thinking about DIY decorations! These glitter foam paper ball Ornaments are simple and fun to make, and they’ll add a touch of glamour to your tree. All you need is some Foamiran, glitter foam paper, and a few other basic supplies.
Final Thoughts
In conclusion, these are the five best most amazing DIY Christmas angels you’ve ever seen. With a little bit of creativity and some elbow grease, you can create any one of these beautiful angels to top off your holiday decor. So, what are you waiting for? Start crafting!


