


Foamiran is a type of foamed EVA that is used to create 3D objects. It is a popular material for Christmas ornaments because it is lightweight and easy to work with. Foamiran ornaments can be made in a variety of shapes and sizes, and they can be decorated with paint, glitter, and other embellishments. Foamiran is a type of foam that is used to create different crafts. It is a popular material to use because it is lightweight and easy to work with.
Eva is a type of Foamiran that is often Christmas is a time for decorations and one of the most popular materials to use is foamiran eva. It is a lightweight, durable, and easy to work with material that can be used to create a variety of different ornaments. Foamiran eva is available in a wide range of colors and can be easily cut and shaped into whatever design you desire. used to create Christmas ornaments. There are many different ways to make Foamiran ornaments, and they can be customized to fit any style.
What is Foamiran Eva?
Foamiran Eva is a type of foamed plastic that is used to make various Christmas ornaments. It is made from polyethylene terephthalate (PET) and polyurethane (PU), and is available in many different colors. Foamiran Eva is lightweight, durable, and easy to work with, making it a popular choice for many crafters. What are the benefits of Foamiran Eva?
Foamiran Eva offers many benefits to crafters. It is lightweight and durable, making it a great choice for projects that require strength and durability but that you also want to be lightweight. It is also easy to work with, and can be shaped into many different shapes. It can be made into ornaments, bows, and other Christmas decorations, as well as general crafts. What are the different color options for Foamiran Eva? Foamiran Eva comes in several different colors, and you can also add color to it. The most common colors are red, green, white, black and blue. You can also choose other colors for the foam if you’re looking for a specific color.
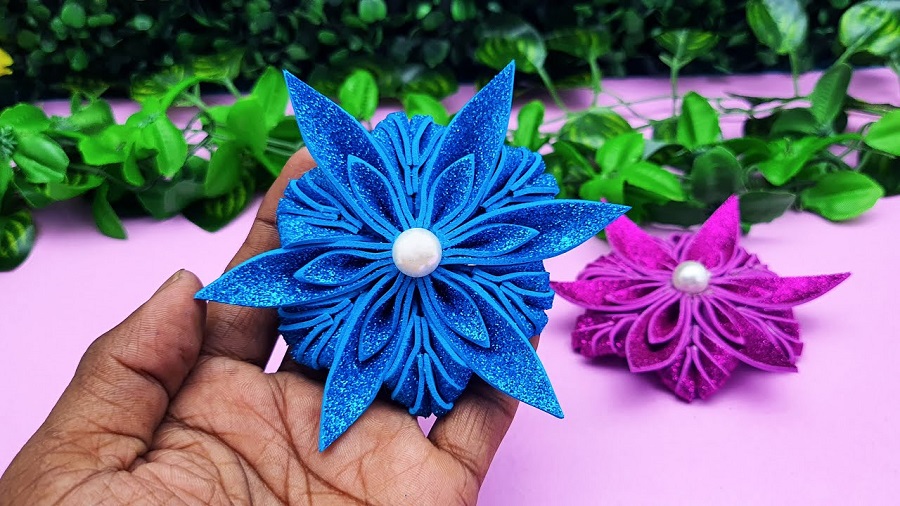
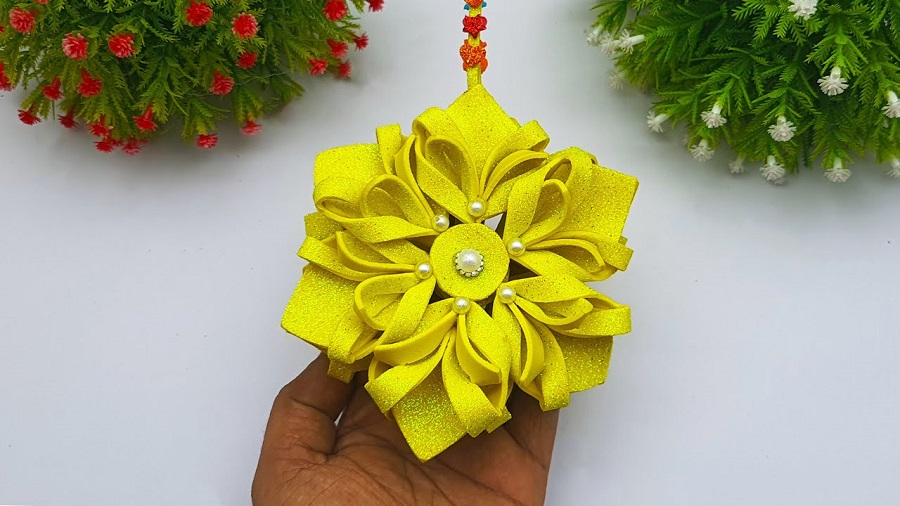
Best Christmas Ornaments From Foamiran Eva
1.Christmas Ornaments From Foamiran Eva | Amazing Mini Diy Christmas Craft Ideas
The benefits of using Foamiran Eva for Christmas ornaments
Foamiran Eva is a great material to use for Christmas ornaments. It is lightweight and easy to work with, so you can create intricate designs. Foamiran Eva is also inexpensive, so you can make a lot of decorations without breaking the bank. Another benefit of using Foamiran Eva for Christmas ornaments is that it is non-toxic. This means that it is safe for both children and pets.
Foamiran Eva is also biodegradable, so it won’t harm the environment when you are done with it. Foamiran Eva is a great material to use for Christmas ornaments. It is a lightweight, durable foam that can be easily cut and shaped. Foamiran Eva is also non-toxic and safe for children to use.
Another great benefit of using Foamiran Eva for Christmas ornaments is that it is very affordable. You can find this material at most craft stores and online retailers. Foamiran Eva is also easy to work with and can be glued, sewn, or painted. If you are looking for a unique and inexpensive way to create Christmas ornaments, then consider using Foamiran Eva. This versatile material can be used to create a variety of different decorations.
How to make a Foamiran Eva Christmas ornament?
Foamiran eva is a special kind of foam that is used to make all kinds of Christmas ornaments. It is very easy to work with and you can find it in any craft store. In this article we will show you how to make a simple Foamiran Eva Christmas ornament.
First, you will need to gather your materials. For this project you will need: Foamiran eva, a sharp knife, a cutting mat, and some ribbon. Once you have all of your materials, you can begin cutting out your foamiran eva shapes.
To start, cut out a large circle from the foamiran eva. This will be the base of your ornament. Next, cut out two smaller circles for the top and bottom of the ornament. Finally, cut out a small strip for the hanger.
Tips for making the perfect Foamiran Eva Christmas ornament
It’s that time of year again! Time to break out the Christmas decorations and get into the holiday spirit. If you’re looking for a unique and fun way to decorate your tree this year, why not try making your own Foamiran Eva Christmas ornaments?
Here are some tips to help you create the perfect Foamiran Eva Christmas ornament:
1. Choose the right foamiran eva sheet. There are many different types of foamiran eva available on the market, so make sure to select one that is easy to work with and won’t tear easily.
2. Cut out your desired shape. Once you have your foamiran eva sheet, use a sharp knife or scissors to cut out the shape of your ornament. Be as creative as you like!
3. Decorate your ornament. The possibilities are endless when it comes to decorating your ornament. You can use paints, glitter and even glue!
4. Add a string or ribbon. Tie a string or ribbon around the top of your ornament and you’re finished!
2. Snowflakes For Christmas Decoration | Glitter Paper Snowflake | Diy Glitter Paper Craft
As Christmas approaches, people all over start to decorate their homes with festive lights and cheerful decorations. One of the most popular ways to spread holiday cheer is by hanging snowflakes in windows and on trees. Snowflakes are unique and beautiful, and each one is different from the last. They bring the winter spirit into homes and help people get into the Christmas spirit.
Snowflakes are easy to make, and there are many different ways to decorate with them. They can be hung in windows, on trees, or even used as table decorations. No matter how they’re used, snowflakes are a great way to add some winter magic to your home this Christmas season.
Step One: Cut out a snowflake shape
To make a snowflake, you will need a piece of paper and a pair of scissors. Follow these steps to cut out a snowflake shape.
1. Fold the piece of paper in half lengthwise. Then fold it in half again.
2. Cut along the folds to create four equal-sized strips of paper.
3. Take two strips and make cuts along the edges to create a fringed effect. Repeat with the remaining strips.
4. Unfold the strips and then accordion-fold them in half, making sure to keep all the fringed edges aligned.
5. Once all four strips are folded, take two of them and twist them around each other in the middle to form a figure eight shape. Repeat with the remaining two strips.
Step Two: Make cuts into the paper
When it comes to making snowflakes, the most important step is to make cuts into the paper. This is what will give your snowflake its unique shape. To make cuts into the paper, you’ll need a sharp knife or scissors. Start by cutting small slits into the paper, then make larger cuts. Remember to be careful not to cut yourself!
Once you’ve made your cuts, you can start folding the paper to create your snowflake. Be creative and have fun! When it comes to making snowflakes, the most important step is to make cuts into the paper. This is what will give your snowflake its unique shape.
To make a cut, you will need a sharp knife or scissors. First, fold your paper in half. Then, fold it in half again. Keep folding until your paper is about 1 inch wide. Now, start making cuts into the folded paper. Be careful not to cut all the way through! Make sure each cut is different from the others – this is what will give your snowflake its unique shape. Once you’ve made all your cuts, unfold your paper and voila – you’ve created a beautiful snowflake!
Step Three: Fold the paper
As the temperatures outside begin to drop and the snowflakes start to fall, it’s time to start thinking about Christmas decorations. One of the most popular and timeless decorations are snowflakes. They can be used to decorate windows, doors, walls, fireplaces, or even used as gift tags.
Making your own snowflakes is a fun activity for the whole family. All you need is a piece of paper and some scissors. Follow these simple steps to make your own beautiful snowflakes.
- Fold the paper in half lengthwise.
- Fold the paper in half again lengthwise.
- Begin cutting different shapes out of the paper, being careful not to cut through all of the layers.
- Once you’re finished cutting, unfold the paper to reveal your one-of-a-kind snowflake design!
Step Five: Hang up your snowflake
Hang up your snowflake. It’s time to take down the Christmas decorations and put away the holiday cheer. But before you do, there’s one last thing to do: hang up your snowflake.
Snowflakes are a symbol of winter, and they’re also a reminder that Christmas is over. They’re beautiful, but they’re also a reminder that the coldest days of the year are still ahead. So take them down, and enjoy the rest of winter.
3. Diy Christmas Decorations With Glitter Foam Paper Angels | How To Make A Angel Christmas Ornaments
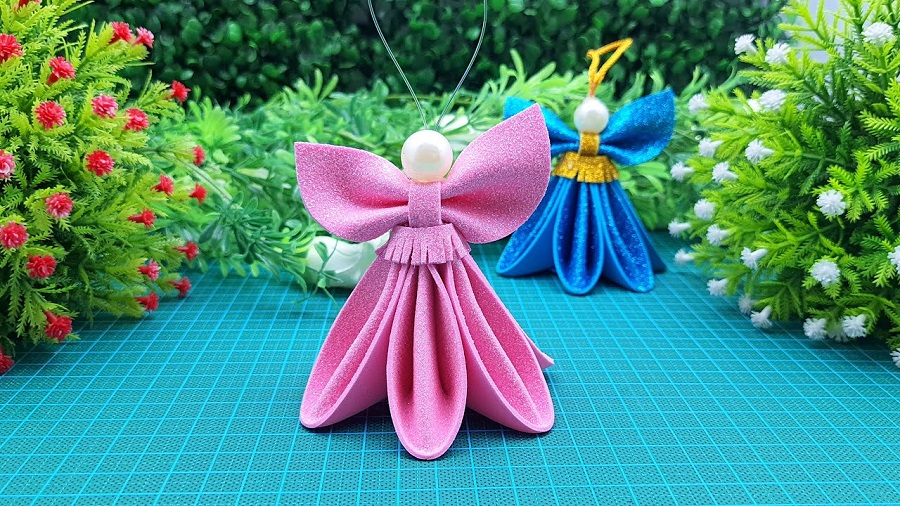
Looking to add some extra holiday cheer to your home this year? Check out these DIY decorations that are sure to get you into the holiday spirit! These glitter foam paper angels are a fun and easy way to decorate for Christmas. Simply cut out angel shapes from glitter foam paper and assemble them using glue or double-sided tape. You can hang them from the ceiling, put them on the tree, or use them to decorate wreaths and garlands.
Another great DIY decoration is a homemade Advent calendar. Fill small boxes or bags with festive treats and trinkets, then number them 1-24. Hang the calendar on a wall or door, and let your family enjoy a little surprise each day leading up to Christmas. So get creative and start spreading some holiday cheer with these DIY decorations!
What You’ll Need:
- 1 sheet of glitter foam paper
- Scissors
- Tape
- Pen or pencil
- Ruler or straight edge
Step One: Creating the Angel’s Body Step.
Cut a 6”x9” rectangle out of the glitter foam paper. This will be the body of your angel.
Next, cut two 2”x6” strips out of the remaining glitter foam paper. These will be used for the arms.
Step One: Creating the Angel’s Body
1. Begin by cutting a sheet of glitter foam paper into a long, thin strip. This will be the angel’s body.
2. Make two cuts along the length of the strip, about halfway through. These will be the arms.
3. Next, fold the top half of the strip over to form the angel’s head and neck. Tape or glue it in place.
4. Finally, twist the bottom half of the strip into a spiral to create the angel’s skirt. Tape or glue it in place as well.
Step Two: Adding Wings and Finishing Touches
Once you have cut out all of your foam paper angel shapes, it is time to add wings and final details. First, take two small pieces of wire and insert them into the top of the angel’s body. Next, bend the wires so that they form the shape of wings. Finally, use glitter or sequins to decorate the angels however you like. These lightweight decorations are perfect for adding a touch of holiday cheer to any room!
Step Three: Hang Up Your Angels and Enjoy!
This Christmas, take your décor to the next level with these easy-to-make glitter foam paper angels. With just a few supplies and a little bit of time, you can create beautiful angels that will add a touch of elegance to your home.
To make your angels, start by tracing an angel template onto glitter foam paper. Cut out the angel shape and then use a hot glue gun to assemble the body. Once the body is complete, add wings made from glitter foam paper or feathers. Finally, hang your angels from the ceiling or on a tree for all to enjoy!
4. Diy Christmas Angel With Glitter Foam | How To Make A Angel For Christmas Tree Decoration
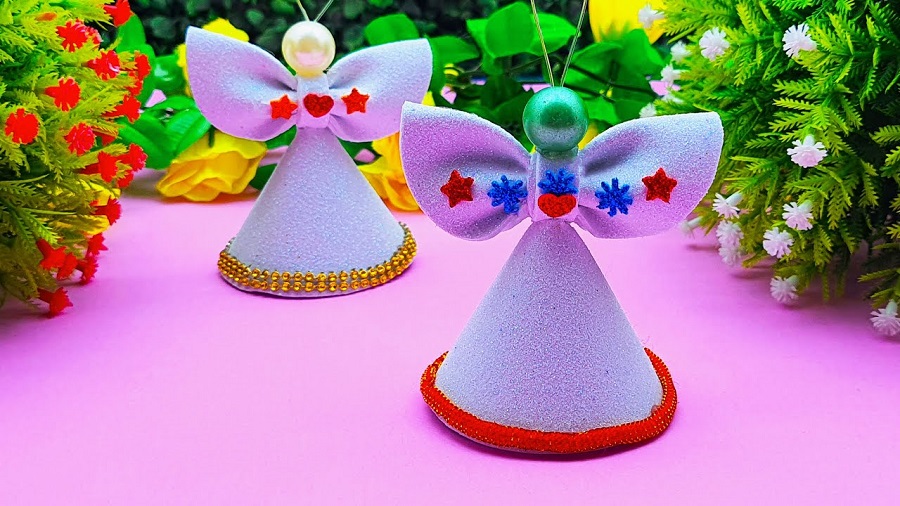
why make an angel for the Christmas tree?
When it comes to Christmas decorations, there are few things as iconic as the angel. Angels are often seen as messengers of hope and goodwill, making them the perfect addition to any holiday display. But why stop at just buying an angel for your Christmas tree when you can make your own?
Making your own angel is a great way to add a personal touch to your holiday decorating. It’s also a fun project for the whole family to enjoy. Here’s what you’ll need to get started:
-A piece of white felt
-A hot glue gun
-Scissors
-Gold or silver ribbon
-Sequins or beads (optional)
Cut a circular piece out of the white felt. This will be the angel’s head. Next, cut two strips of felt for the wings. Hot glue the head and wings together.
What you will need: list materials
If you want to make a beautiful angel for your Christmas tree, here is a list of materials you will need:
1. 1/2 yard of white felt
2. 1/4 yard of light pink felt
3. 1/4 yard of medium pink felt
4. 1/4 yard of dark pink felt
5. Scissors
6. White thread
7. Needle
Step One: making the body
One of the most important steps in making a Christmas angel is creating the body. This can be done by molding clay into the desired shape or by using a pre-made doll body. Once the body is made, it is important to add details such as wings, a face, and clothing.
Angels are one of the most popular Christmas decorations because they represent hope and peace. By taking the time to make your own angel, you can create a unique decoration that will be cherished for years to come.
Step two: making the wings
To make the wings for your Christmas tree angel, you will need two pieces of cardboard or poster board, scissors, duct tape, and feathers. First, trace the outline of one wing onto both pieces of cardboard. Then, cut out the wings. Next, take the two wings and tape them together at the top. Finally, attach the feathers to the wings with duct tape. Your angel’s wings are now complete!
Step three: attaching the wings
To complete your angel, you will need to attach the wings. To do this, first, find the center of the back of your angel and make a small mark. Next, take one of your wings and align the center point of the wing with the mark on the back of the angel. Once it is in place, use a hot glue gun to attach it to the body. Be sure to hold it in place for a few seconds until the glue sets. Repeat this process with the other wing.
Now that your wings are attached, your angel is almost complete! The final step is to add any final details such as a halo or ribbon. Once you have done this, your angel is ready to be placed on your Christmas tree!
Step four: adding the finishing touches
After you have cut out your angel’s body, it is time to add the finishing touches. You will need felt for the wings, a gold pipe cleaner for the halo, and white yarn for the hair. To make the wings, cut two pieces of felt in the shape of an angel’s wing. Make sure they are mirror images of each other. Sew the two pieces together along the edges, leaving a small opening at the top. Turn the wing right side out and stuff with cotton batting. Sew the opening shut.
To make the halo, twist a gold pipe cleaner into a circle and then twist the ends together to secure. Thread it through the top of your angel’s head. For the hair, cut six strands of white yarn, each about 12 inches long.
5. DIY Christmas Foamiran Ball Ornaments | Glitter Foam Paper Tree ornaments | Christmas Ball Ornaments

What You’ll Need: A list of supplies needed for the project.
1. Foamiran balls – You can find these at your local craft store or online. Make sure to get a variety of sizes so you can create different sized ornaments.
2. Wire – This will be used to create the hanger for your ornament. You can find wire at any hardware store.
3. Paint – This is optional, but it can be fun to paint your ornaments before adding any embellishments. You can use acrylic paint or any other type of paint that will work on foam.
4. Embellishments – This is where you can get creative! You can use sequins, beads, glitter, ribbon, buttons, etc. to decorate your ornaments. Just about anything goes!
Step One: Instructions for how to make the foam balls.
Making your own Christmas decorations is a great way to get into the holiday spirit, and these DIY foam ball ornaments are the perfect place to start. They’re easy to make and can be customized to fit your own unique style. Here’s what you’ll need:
- A package of foam balls (you can find these at most craft stores)
- Paint or markers
- Glitter
- Glue
To get started, simply paint or decorate your foam balls however you like. Get creative and have fun with it! Once you’re done, add a touch of glitter for some extra sparkle. Finally, use glue to attach a loop of string or ribbon so that your ornament is ready to hang.
Step Two: Instructions for how to decorate the balls.
Now that you have your foamiran balls, it’s time to get creative and start decorating! Here are some ideas to get you started:
- 1Paint the balls with acrylic paint. You can create any design you like – stripes, polka dots, flowers, etc. Let your imagination run wild!
- Use glitter glue to add some sparkle to your balls. You can write words or draw designs with the glue, then sprinkle on some glitter.
- Wrap the balls in yarn or ribbon. This is a simple way to add color and texture to your ornament. You can also try wrapping them in twine or jute for a rustic look.
- Stick on sequins, beads, or buttons with craft glue.
Step Three: Hang the ornaments on the tree!
After you have painted your ornaments, it is time to hang them on the tree! You will need:
- Foamiran balls
- Painted ornaments
- Twine or fishing line
- Scissors
Cut a piece of twine or fishing line and tie it around the top of the ornament. Make sure it is tight so that the ornament will not fall off. Hang the ornament on the tree and enjoy your handiwork!
Conclusions
In conclusion,these Christmas ornaments made from Foamiran Eva are a great way to add a personal touch to your holiday decor. They are easy to make and can be customized to match any decorating theme. So get creative and start making your own Foamiran Eva Christmas Ornaments today!


