


It’s that time of year again where we start to think about Christmas and all of the wonderful decorations that go along with it. One of the most important pieces of décor is the Christmas tree. There are so many different ways that you can decorate your tree, but sometimes the simplest ideas are the best. Here are 5 simple ideas for Christmas tree decorations that will bring some holiday cheer to your home.
String some popcorn or cranberries on a piece of string or ribbon and drape it around your tree for a rustic look. You can also make homemade paper snowflakes and hang them from the branches. Another easy decoration is to create a DIY garland using strips of fabric or ribbons in different colors and patterns. This is a great way to add some personal style to your tree.
When it comes to Christmas tree decorations, simpler is often better. A few well-chosen ornaments can make a big impact, and you don’t have to spend a lot of money to get them. Here are some simple ideas for decorating your Christmas tree.
Get into the Christmas spirit with this easy DIY project
Looking for a fun and easy way to get into the Christmas spirit? This DIY project is perfect for anyone who wants to add a personal touch to their holiday décor. All you need is some felt, ribbon, and a hot glue gun and you can create your own unique Christmas tree decorations. This project is so simple that even kids can help out. Just cut out some felt shapes – circles, stars, or whatever you like – and then use the hot glue gun to attach them to the ribbon. Loop the ribbon through the top of the tree and you’re done! These decorations are not only easy to make, but they’re also inexpensive. So if you’re looking for a way to add some personal flair to your Christmas tree this year, give this DIY project a try. Our Best Pick Christmas Tree Decorations Simple Ideas
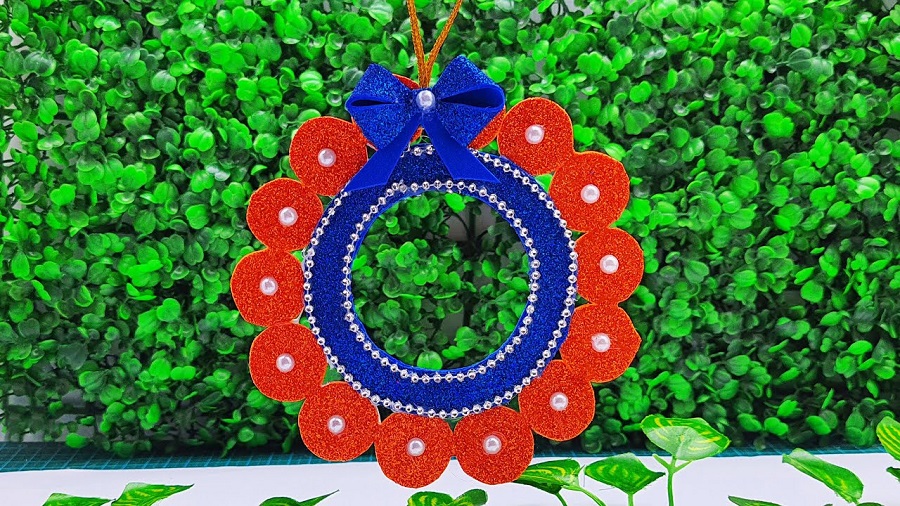
1. Christmas Wreath Using Glitter Foam Sheet – Diy Wall Hanging Glitter Paper Craft
Get into the Christmas spirit with this easy DIY project
Looking for a fun and easy way to get into the Christmas spirit? This DIY project is perfect for anyone who wants to add a personal touch to their holiday décor. All you need is some felt, ribbon, and a hot glue gun and you can create your own unique Christmas tree decorations. This project is so simple that even kids can help out. Just cut out some felt shapes – circles, stars, or whatever you like – and then use the hot glue gun to attach them to the ribbon.
Loop the ribbon through the top of the tree and you’re done! These decorations are not only easy to make, but they’re also inexpensive. So if you’re looking for a way to add some personal flair to your Christmas tree this year, give this DIY project a try.
Step 1: Cut out a circle from the glitter foam sheet
This wall hanging is perfect for kids of all ages and can be customized to match any holiday decor. Best of all, it takes less than an hour to make! To get started, you’ll need a glitter foam sheet, a pencil, scissors, and a hot glue gun. First, use the pencil to trace a circle onto the foam sheet. Then, cut out the circle with the scissors.
Next, cut out small triangles around the edge of the circle. Finally, hot glue the triangles to the back of the circle. Your glitter foam sheet wreath is now ready to hang! You can customize it by adding a bow or other embellishments. Or, keep it simple and let the sparkling glitter do all the talking.
Step 2: Cut out strips of glitter paper
Cut out strips of glitter paper to make a beautiful and unique Christmas wreath. This craft is perfect for kids and adults alike. All you need is some glitter paper, scissors, and a hot glue gun. First, cut out strips of glitter paper in whatever colors you like. Next, use hot glue to attach the strips to a foam wreath form. Start at the bottom and work your way up, overlapping the strips as you go. Once all of the strips are in place, let the wreath dry completely. Then hang it on your door or wall and enjoy your sparkling new decoration!
Step 3: Glue the strips of paper to the foam sheet
- 1. It’s that time of year again! Time to get out the craft supplies and get creative. This year, we’re making a festive wreath using a glitter foam sheet and some strips of paper.
- 2. This project is easy and fun, perfect for getting into the holiday spirit. And the best part is that it can be customized to your liking. So let’s get started!
- 3. First, you’ll need to gather your supplies. For this project, you’ll need a foam sheet, some strips of paper, glue, and scissors. Once you have everything, you’re ready to begin!
Step 4: Hang your wreath on the wall or door
A Christmas wreath is a beautiful addition to your holiday decor, and it’s easy to make one using glitter foam sheets. You can hang your wreath on the wall or door, and it will add a touch of holiday cheer to your home.
To make a glitter foam sheet wreath, you’ll need:
- -1 sheet of glitter foam (available at craft stores)
- -Scissors
- -Ribbon or string
- -Tape
Start by cutting the foam sheet into strips. Then, fold the strips in half and tie them together to form a circle. Once all the strips are tied together, fan out the ends to create a full, fluffy wreath. Finally, use ribbon or string to hang your wreath on the wall or door.
2. How To Make A Glitter Paper Butterfly | Glitter Foam Sheet Butterfly | Glitter Paper Craft Ideas
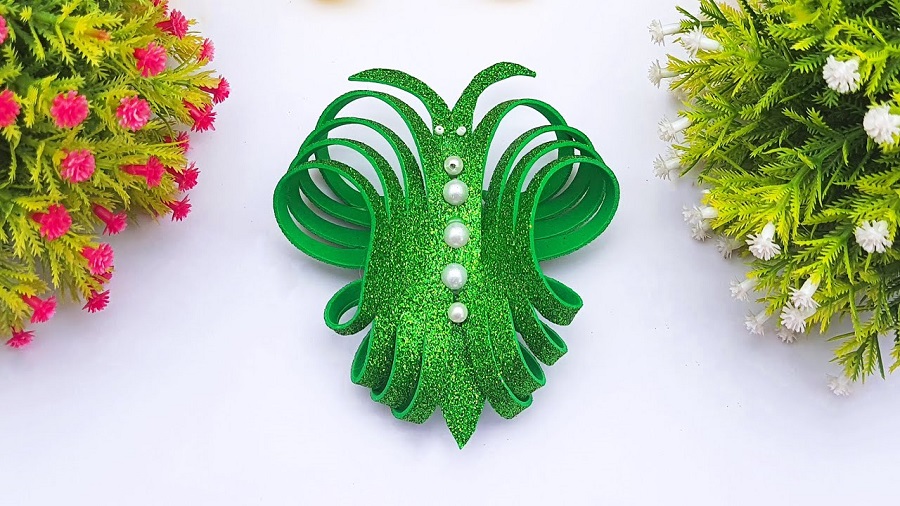
What are glitter paper butterflies and why make them?
Glitter paper butterflies are a fun and easy craft that anyone can do. They are perfect for kids and adults alike, and make a great decoration for any room. Glitter paper butterflies are made by cutting out butterfly shapes from glitter paper and then attaching them to foam sheets.
Materials needed: list all supplies
To make a glitter paper butterfly, you will need:
- -Glitter paper
- -Foam sheet
- -Scissors
- -Pen or pencil
- -Ruler
- -Glue
First, use the scissors to cut out a butterfly shape from the glitter paper. Then, use the pen or pencil to trace the outline of the butterfly onto the foam sheet. Cut out the foam sheet butterfly shape. Finally, glue the two pieces together.
Step-by-step instructions: easy to follow guide
A step-by-step guide to creating a glitter paper butterfly. This easy to follow guide will help you create a beautiful butterfly using glitter paper and foam sheets. With a little patience and practice, you’ll be able to make your own glittering masterpiece in no time!
Tips and tricks: insider secrets
- 1. Looking for something fun and creative to do with your glitter paper? Try making a glitter paper butterfly! This craft is simple and easy, and the results are beautiful and unique.
- 2. Here are some tips and tricks to help you get the best results:
- 3. First, cut out a butterfly shape from your glitter paper. Then, using a hot glue gun, glue the two halves of the butterfly together. Be sure to leave a small opening at the bottom so that you can insert the wire later.
- 4. Next, take your wire and insert it through the bottom of the butterfly. Once it’s in place, twist the wire to secure it. Then, using scissors or a knife, carefully make slits along both sides of the butterfly’s body.
3. DIY Glitter Foam Paper Christmas Wreath | Hanging Christmas Wreath Making With Eva Foam Paper
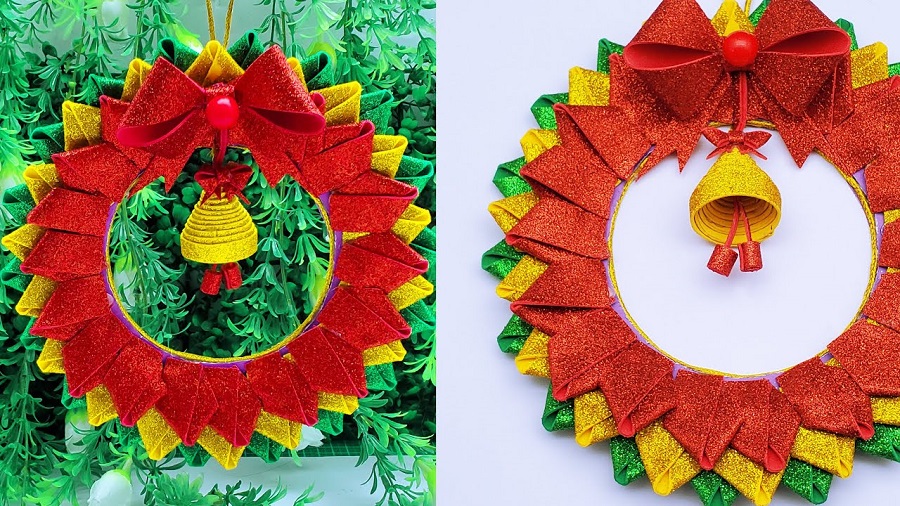
Christmas decorations bring holiday cheer to any home, and making them yourself can be a fun activity for the whole family. Eva foam paper is a great material to use for crafting, as it’s both durable and easy to work with. With a little bit of creativity, you can make a beautiful Christmas wreath that will last for years to come.
What you need:
- -1 styrofoam wreath
- -1 package of eva foam paper
- -1 hot glue gun and glue sticks
- -1 pair of scissors
- -1 ribbon (optional)
Making your own Christmas wreath is a great way to save money and have a unique decoration for your home. You can make a beautiful wreath with just a few supplies. All you need is a Styrofoam wreath, some Eva foam paper, hot glue, and scissors. You can find all of these supplies at your local craft store. Optional: If you want to add a ribbon to your wreath, you will need one. To make the wreath, start by cutting the Eva foam paper into small strips. Once you have enough strips, start hot gluing them onto the Styrofoam wreath.
Step by step guide:
Looking for a fun and unique way to decorate your home for the holidays? Why not try making your own hanging Christmas wreath! This step by step guide will show you how to make a beautiful wreath using Eva foam paper. First, you will need to gather your supplies. For this project you will need: Eva foam paper, scissors, a hot glue gun and glue sticks, ribbon, and any embellishments you would like to add (optional). Once you have all of your supplies, it’s time to get started! Begin by cutting the Eva foam paper into 2 inch strips. Next, take one strip and fold it in half. Continue folding the strip until it is about 1 inch wide. Then, take the end of the strip and glue it to the back side of the folded strip.
Tips and tricks:
- 1. Hanging a Christmas wreath is a tradition that dates back centuries.
- 2. While the materials and methods have changed over time, the basic idea remains the same: to create a beautiful, festive decoration for your home.
- 3. Here are some tips and tricks to help you make your own Christmas wreath this year:
- 4. Start with a sturdy base. A wire wreath frame is ideal, but you can also use a foam wreath or even a simple cardboard ring.
- 5. Choose your materials carefully. Fresh greenery will last longer than artificial plants, but both can look great if used properly.
- 6. Take your time when assembling the wreath. Be sure to evenly distribute the greenery and decorations so that it looks balanced and full.
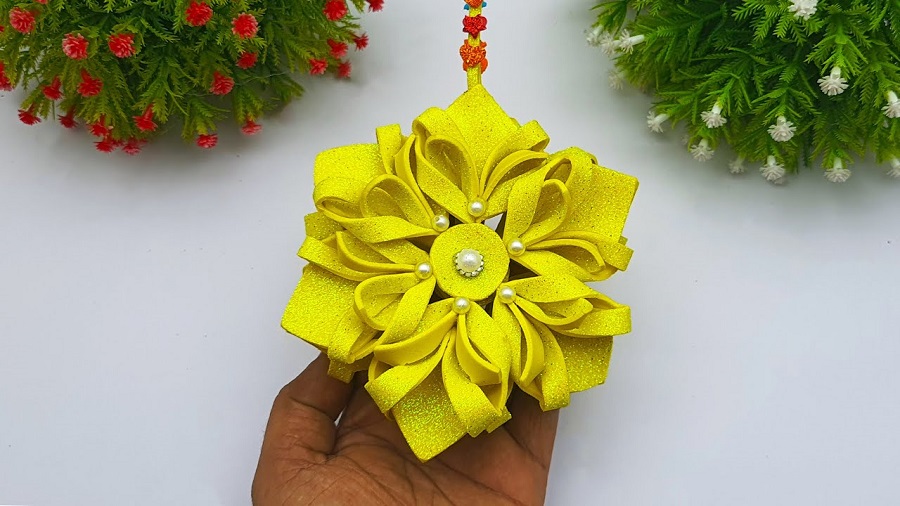
4. Christmas Ornaments From Foamiran Eva | Amazing Mini Diy Christmas Craft Ideas.
What is Foamiran Eva and what are its benefits?
Foamiran is a type of synthetic polymer that is becoming increasingly popular among crafters. It is similar to felt in terms of its ability to be shaped and sewn, but it is much lighter and stronger. Foamiran is also non-toxic and heat-resistant, making it ideal for a variety of crafting projects.
One of the most popular uses for foamiran is to create Christmas ornaments. The material can be easily molded into any shape, allowing for a wide range of designs. Foamiran is also very lightweight, so your finished ornament will not weigh down your tree branches. And because it is heat-resistant, you can even use a hot glue gun to attach embellishments without fear of melting the foamiran.
Step 1: Cutting out the shapes
Christmas is a time for family, friends and, of course, crafting. One of the most popular holiday crafts is making Christmas ornaments. And one of the most popular materials for making Christmas ornaments is foamiran eva. If you’ve never worked with foamiran eva before, don’t worry. It’s actually quite easy to use. In this tutorial, we’ll show you how to cut out shapes from foamiran eva and turn them into beautiful Christmas ornaments. So let’s get started! The first step is to cut out the shapes from the foamiran eva. You can use a die cutter, a punch or even just a pair of scissors. Once you have your shapes cut out, it’s time to start decorating them!
Step 2: Decorating the ornaments
After the ornaments are dry, it’s time to start decorating! This is the fun part where you can get creative and let your imagination run wild. Here are a few ideas to get you started:
- -Paint the ornaments with acrylic paint. You can use a brush or a sponge to apply the paint. Remember to use light colors first and then add darker colors on top.
- -Use glitter glue or sequins to add some sparkle to the ornaments.
- -Wrap the ornaments in colorful ribbon or yarn.
Get creative and have fun with this step! There are no wrong answers when it comes to decorating these beautiful Christmas Ornaments from Foamiran Eva.
Step 3: adding a hanger
It’s time to add a hanger to your Foamiran Eva Christmas Ornament! This is a quick and easy step that will make sure your ornament hangs nicely on the tree. First, take a small piece of wire and bend it into a loop. Next, poke a hole in the top of your ornament with a needle or toothpick. Thread the wire through the hole and twist it around to secure. Finally, bend the wire into a hook shape so that it can be hung on the tree. Your Foamiran Eva Christmas Ornament is now ready to hang! Enjoy showing it off on your tree or give it as a gift to someone special.
5. Snowflakes For Christmas Decoration – Glitter Paper Snowflake – Diy Glitter Paper Craft
Christmas is the most wonderful time of year. The snowflakes falling gently from the sky, the Christmas lights shining brightly in the dark night, and the smell of freshly baked cookies fill the air. What better way to decorate your home for Christmas than with these beautiful snowflakes?
There are so many different ways to make snowflakes. You can use paper, fabric, or even real snow! If you want to make a really special snowflake, try using Swarovski crystals. They add a touch of sparkle and elegance to any Christmas decoration.
Making your own snowflakes is a great way to add a personal touch to your Christmas decorations. It’s also a fun activity for the whole family! So grab some paper and some scissors and start creating your own winter wonderland.
How to make paper snowflakes
Making paper snowflakes is a fun and easy activity that can be enjoyed by people of all ages. Here are some tips on how to make your own paper snowflakes:
1. Start by folding a piece of paper in half. Then, fold the paper in half again.
2. Use scissors to cut along the folded edge of the paper, creating fringe.
3. Once you have cut the fringe, unfold the paper and then fold it in half again, this time with the fringe on the inside.
4. Again, use scissors to cut along the folded edge of the paper, creating more fringe.
5. Once you have finished cutting the fringe, unfold the paper and you will see your snowflake begin to take shape!
6. Keep repeating the process until your snowflake is the desired size.
7. You can add more “flakes” by cutting small triangles from the remaining sections of paper and attaching them to the large snowflake.
8. Once you have finished, you can hang your snowflake in a window, fan it out on your desk, or string it on some yarn to make a mobile.
Conclusion:
There are many simple ideas for decorating your Christmas tree that don’t take a lot of time or money. With a little creativity, you can have a beautiful tree that will be the envy of your neighborhood. So get out there and start decorating!


