


The holidays are a time for family, friends, and most importantly, crafting. Get into the Christmas spirit by making your own tree ornaments. Not only are homemade decorations more thoughtful, but they’re also usually cheaper than store-bought ones. Here are five of the best cute tree ornaments you can make for Christmas.
If you’re looking for some cute and festive tree ornaments to make this Christmas, we’ve got you covered.
- For a cute and simple ornament, try making a paper snowflake. Just cut out a snowflake shape from white paper and decorate it however you like.
- Another easy craft is to make salt dough ornaments. These are great for kids to make and can be customized however you want. Simply mix together some salt, flour, and water to form the dough, then shape it into whatever designs you like before baking it in the oven.
- If you’re feeling more ambitious, try your hand at making a felt gingerbread house ornament.
Check out our list of the 5 best Christmas decorations and crafts that are sure to get your tree looking its best:
From adorable felt ornaments to pretty paper garlands, we’ve got everything you need to make your tree shine. And the best part is, these decorations are all easy to make yourself! So grab some supplies and get crafting!
1. Cute Tree Ornaments Making For Christmas Decorations Crafts | Diy Christmas Ornaments| Christmas

What are some cute and easy ornaments you can make for your Christmas tree?
1. Cute and easy ornaments you can make for your Christmas tree include
2. popcorn and cranberry garland. This is a simple and elegant garland that can be made
in minutes. All you need is some popcorn, cranberries, and string.
3. Another cute ornament is a candy cane topiary. This is made by gluing mini candy canes to a Styrofoam cone and then decorating it with ribbon, beads, or other trimmings.
4. A third easy and festive idea is to make paper snowflakes out of construction paper or tissue paper. These can be hung from the tree with string or fishing line.
5. These are just a few of the many cute and easy ornaments you can make for your Christmas tree. DIY Melted Snowman Ornaments: how to make these adorable ornaments with just a few household items
DIY Candy Cane Ornaments: another easy and festive way to decorate your tree
Looking for a festive and easy way to decorate your Christmas tree? Try making your own candy cane ornaments! This simple DIY project only requires a few supplies and can be done in no time. Plus, it’s a great activity to do with kids.
To make your own candy cane ornaments, start by gathering some red and white felt, some scissors, and some hot glue. Cut the felt into strips of various sizes – you’ll need about twice as many red strips as white strips. Then, begin hot gluing the strips together at one end to form a candy cane shape. Once all of your strips are glued together, trim off any excess felt, and voila! You’ve made your own DIY candy cane ornament.
These handmade ornaments are sure to add some extra holiday cheer to your tree.
DIY Salt Dough Ornaments: a classic Christmas craft that kids and adults alike will enjoy
DIY salt dough ornaments are a classic Christmas craft that both kids and adults can enjoy. This simple project requires just a few inexpensive ingredients and can be easily customized to create unique ornaments for your tree. Best of all, making these ornaments is a fun activity that the whole family can enjoy together.
To make salt dough ornaments, you will need 1 cup flour, 1/2 cup salt, 1/2 cup water, food coloring (optional), and cookie cutters (optional). Simply mix the flour and salt together in a bowl, then slowly add water until the dough is moist but not too wet. If desired, add a few drops of food coloring to the dough to create colorful ornaments. Then use cookie cutters (or a sharp knife) to cut out desired shapes.
DIY Christmas Ornaments: Different Ideas For Ornaments
With Christmas right around the corner, it’s time to start thinking about decorations. One of the best parts of Christmas is decorating the tree. But why settle for store-bought ornaments when you can make your own? DIY Christmas ornaments are a great way to add a personal touch to your tree. Plus, they’re usually cheaper and more unique than anything you’ll find at the store.
Not sure where to start? Don’t worry, we’ve got you covered. Check out these different ideas for DIY Christmas ornaments:
- 1. Glitter Ornaments – Glitter ornaments are simple to make and add a touch of sparkle to your tree. All you need is some clear glue, glitter, and a few other supplies.
2. Easy Way To Make Handmade Paper Flower | Unique Paper Craft For Home Decoration | Paper Craft Flower
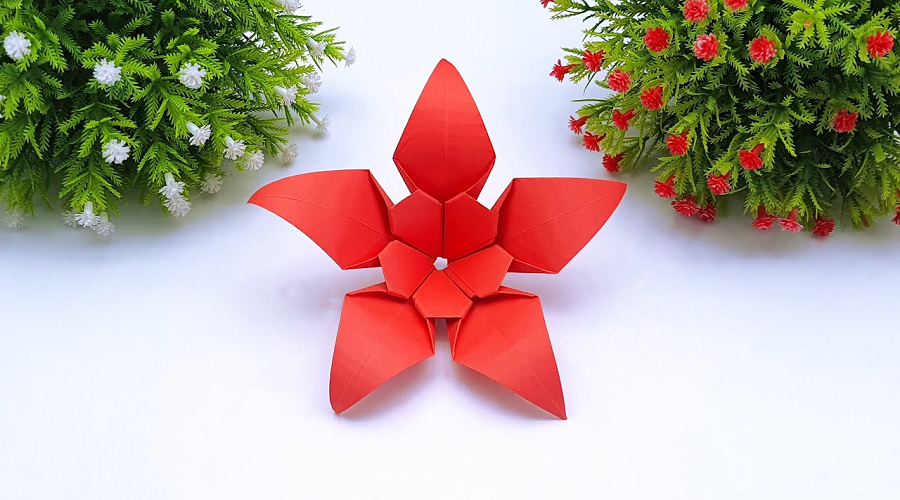
Paper flowers are a unique and easy way to add a personal touch to your home décor.
Paper flowers are a unique and easy way to add a personal touch to your home decor. You can make them out of any type of paper, from construction paper to wrapping paper. The best part about making paper flowers is that you can customize them however you want.
To make a paper flower, start by cutting a strip of paper into a spiral. Then, roll the spiral up from the outside in, making sure to keep it tight. Once you have rolled up the entire strip of paper, glue the end down and shape the flower however you like.
You can use paper flowers to decorate vases, picture frames, or even as part of a bouquet. They make great gifts for friends and family, and they are also a fun way to decorate your own home. So get creative and start making some unique paper flowers today!
What You’ll Need: All you need is some paper, scissors, and a little bit of time.
With just a few simple supplies, you can make your own handmade paper flowers! This papercraft is a great way to add a personal touch to your home decor.
To get started, you’ll need some colorful construction paper or scrapbooking paper. You can use whatever colors you like to create your flowers. Once you have your materials gathered, cut out several flower shapes from the paper. Make sure to leave a long stem on each one so that you can attach them to the base later.
Now it’s time to assemble your flowers! Begin by gluing or taping the layers of the flower together. Once all of the petals are in place, attach the stem to the base.
Step One: Choose Your Paper: You can use any type of paper you like for this project.
When it comes to handmade paper flowers, the options for what type of paper to use are endless. From tissue paper to construction paper to even recycled paper, the sky is the limit when it comes to what you can create. So, how do you choose the right paper for your project? Here are a few things to keep in mind:
The first thing you need to consider is the look you want to achieve. Are you going for something bright and colorful? Or are you looking for something more subdued and elegant? The type of paper you choose will play a big role in determining the overall look of your finished project.
Another important consideration is the thickness of the paper. If you want your flowers to be sturdy and stand up on their own, then you’ll need to choose a thicker paper.
Step Two: Cut Out Your Flowers: Freehand or use a template to cut out your flowers.
Cutting out your flowers is the second step in making these unique paper craft decorations. You can either freehand your cuts or use a template to make things easier. If you’re using a template, be sure to trace it onto the paper before cutting.
Once your flowers are cut out, you can start decorating them however you like. Add some color with paint or markers, or keep things simple with a white or cream-colored flower. No matter what you choose, these handmade paper flowers are sure to add a touch of beauty to your home décor.
It’s time to get those scissors out and cut out your flowers! You can either freehand your cuts or use a template to make things easier. Either way, you’ll end up with beautiful paper flowers that are perfect for home decoration.
Cutting out the flowers is the second step in this easy paper craft project. Once you have your flowers cut out, you can start assembling them into a bouquet. This is a great project for kids and adults alike, so get creative and have fun!
Step Three: Assemble Your Flowers: Glue or tape your flowers together.
After you have cut out all of your flower shapes, it’s time to assemble them. You can either glue or tape your flowers together.
If you are using glue, put a small amount on the center of each petal and hold the petals together until the glue dries. If you are using tape, put a piece of tape on the center of each petal and then press the petals together.
Once your flowers are assembled, you can start adding them to your project. You can use them to decorate greeting cards, scrapbook pages, or anything else you can think of!
Step Four: Finish Your Flowers: Add embellishments like beads or buttons.
Add the finishing touches to your flowers by adding embellishments like beads or buttons. This will give your flowers a unique look that will really stand out. You can also use different colors of paper to create a more dramatic effect. Just have fun and be creative!
3. Simple Envelope Making Easy Tutorial | Eva Foam | Envelope Making With Glitter Foam Paper Sheets
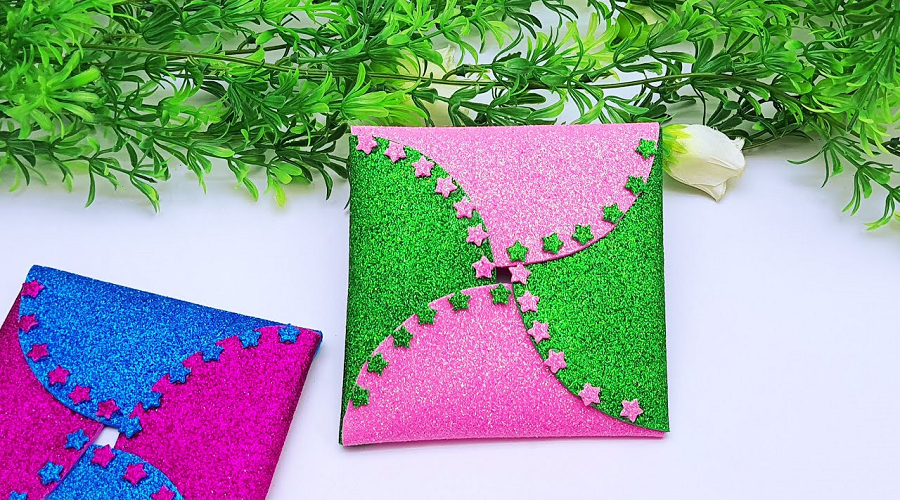
Envelope making tutorial
A simple envelope-making tutorial using Eva foam and glitter foam paper sheets. Start by cutting a piece of Eva foam to the desired size and shape. Then, using a hot glue gun, glue the edges of the foam together.
Next, take a sheet of glitter foam paper and cut it to fit over the top of the envelope. Once again, use the hot glue gun to glue the edges in place.
Finally, decorate the envelope as desired and add any finishing touches. Your simple envelope is now complete!
What you need:
- Eva foam,
- glitter foam
- paper sheets
How to make it: Simple Envelope Making Easy Tutorial
- 1. Do you want to make your own envelopes? With this easy tutorial, you can make beautiful envelopes with glitter foam paper sheets and Eva foam.
It’s simple! Just follow these steps:
- First, cut a piece of glitter foam paper to the desired size. Then, using a sharp knife, score the paper along one side.
- Next, fold the scored side over and glue it down with a hot glue gun. Be sure to use plenty of glue so that the envelope is secure.
- Finally, decorate your envelope with whatever design you like! You can use sequins, ribbons, or anything else you can think of.
1. Cut a rectangle out of Eva foam.
1. Fold one long side of the rectangle over by about an inch, and staple or glue it in place.
2. Then, fold the other long side over, so that it overlaps the first side. Again, staple or glue it in place.
3. Next, fold up one of the short sides of the rectangle, and staple or glue it in place.
4. Finally, fold up the other short side, so that it overlaps the first side. Staple or glue it in place to finish your envelope!
2. Fold the rectangle in half.
Making envelopes does not have to be a difficult task. With this simple tutorial, you can easily make envelopes using Eva foam and glitter foam paper sheets. This is a great way to add a personal touch to your letters and cards.
3. Decorate the envelope with glitter foam paper sheets.
Making your own envelopes is a great way to add a personal touch to any letter or invitation. And it’s easy to do! Just follow these simple steps and you’ll be creating beautiful envelopes in no time.
To decorate your envelope, start by cutting a piece of glitter foam paper to fit the front of the envelope. Then, use a glue stick or double-sided tape to adhere the paper to the envelope. Once the paper is in place, add any other embellishments you like – stickers, sequins, etc. – before sealing up your envelope and sending it on its way!
4. Glue or tape the envelope shut.
Making envelopes is a simple and easy process that can be done at home with just a few materials. Glue or tape is all that is needed to secure the envelope shut.
To make an envelope, you will need:
- -A sheet of paper
- -Scissors
- -Glue or tape
- -A pen or pencil
First, fold the sheet of paper in half lengthwise. Then, use scissors to cut along the fold. Next, take one of the halves and fold it in half again. Unfold this half and then fold the two outside edges in to meet at the center crease. Fold these in half again and then glue or tape them shut. Finally, use a pen or pencil to write your address on the front of the envelope.
5. Add an address label and stamps.
Adding an address label and stamps to an envelope is a simple process that can be done in just a few steps. To begin, you will need to gather your materials. You will need a sheet of glitter foam paper, an envelope, a pen, and some adhesive. You can find all of these items at your local craft store.
Next, use your pen to write the address on the glitter foam paper. Then, cut out the address label and affix it to the envelope with the adhesive.
Finally, add the stamps to the envelope and send it on its way! With just a few simple steps, you can add an extra touch of sparkle to your envelopes.
4. How To Make Snowflakes Using Glitter Foam Sheet | 3D Snowflake From Glitter Foam Sheet | EVA Foam
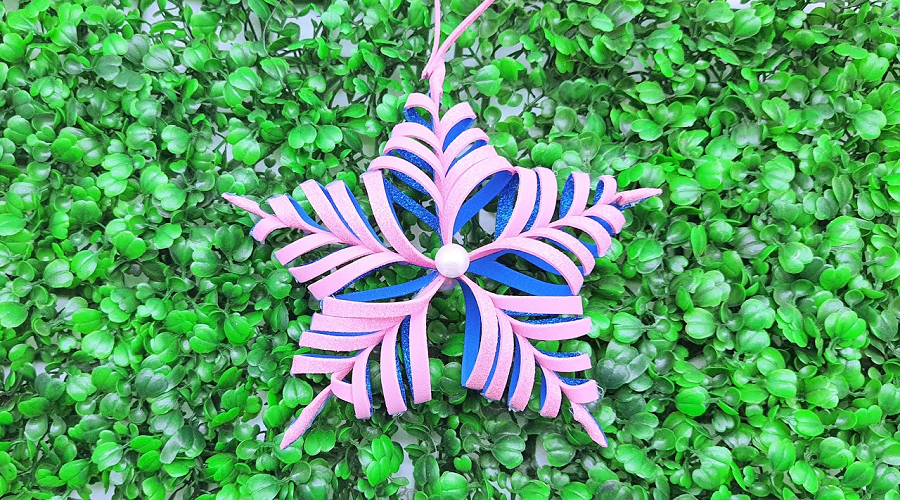
What are 3D snowflakes made of?
Snowflakes are one of the most beautiful things in nature. But have you ever wondered what they’re made of?
It turns out that 3D snowflakes are made of a material called glitter foam sheet, or EVA foam. This foam is super lightweight and sparkly, making it perfect for creating beautiful snowflakes.
To make your own 3D snowflakes, you’ll need a few supplies: glitter foam sheets, scissors, and a hot glue gun. First, cut out six identical snowflake shapes from the glitter foam sheets. Then, use the hot glue gun to attach the snowflakes together in a three-dimensional shape.
Your sparkling 3D snowflake is now complete! Hang it up on your Christmas tree or give it to a friend as a wintery gift.
Materials needed: list all supplies
3D Snowflakes from Glitter Foam Sheet
What You Need:
- -Glitter foam sheet
- -Scissors
- -Pencil
- -Ruler
- -Hot glue gun and glue sticks
- -String or fishing line
With the holiday season upon us, it’s time to start thinking about snowflakes! This year, try your hand at making 3D snowflakes out of glitter foam sheets. They’re easy to make and add a touch of sparkle to any Christmas tree. Here’s what you need: glitter foam sheet, scissors, pencil, ruler, hot glue gun and glue sticks, string, or fishing line.
Step 1: fold the foam sheet
Fold the foam sheet in half lengthwise. Then fold it in half again. You should now have a long, thin rectangle. Next, take one end of the rectangle and fold it up towards the middle. Then take the other end and do the same thing. You should now have a triangle.
Now fold the triangle in half. Once you have done that, cut along the folded edge with scissors. When you unfold your triangle, you should now have a snowflake shape! Step 2: cut out the snowflake
Step 3: add glitter
Snowflakes are one of the most beautiful things about winter. They’re also very easy to make, especially if you use glitter foam sheets. Here’s how:
- Cut a sheet of glitter foam into a square.
- Fold the square in half diagonally to form a triangle.
- Fold the triangle in half again to form a smaller triangle.
- Cut off the pointed end of the triangle so that you have a long, thin strip of foam.
- Make small cuts along one side of the strip, making sure not to cut all the way through to the other side.
- Unfold the strip and you should now have a snowflake!
Step 4: put the snowflake together
It’s that time of year again! Time to break out the glitter foam sheets and get to work on some beautiful snowflakes. This year, we’re going to take our snowflakes to the next level with some 3D snowflakes. Here’s what you’ll need:
- -Glitter foam sheets
- -Scissors
- -Pencil
- -Ruler
- -Hot glue gun
First, you’ll want to gather your supplies. You can find glitter foam sheets at most craft stores. Once you have your supplies, it’s time to start cutting! Using a pencil and ruler, draw a line down the center of your glitter foam sheet. Then, cut along the line with your scissors. You should now have two identical pieces.
Next, take one of the pieces and fold it in half.
5. Handmade Paper Flower Stick With Origami Leaf | Amazing Paper Flower Making | DIY Flower Decorations
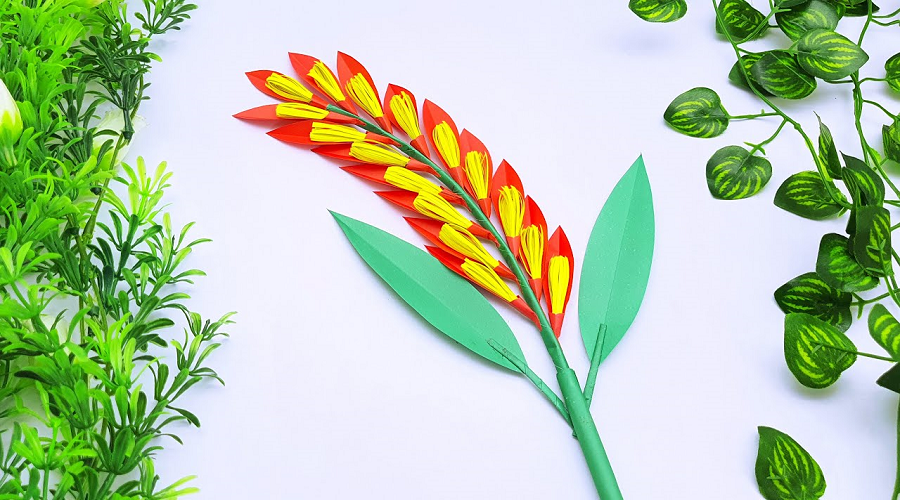
Paper flowers are a fun, easy, and inexpensive way to decorate for any occasion.
Paper flowers are a fun, easy, and inexpensive way to decorate for any occasion. You can make them from any type of paper you have on hand, and they’ll look beautiful as part of a bouquet or arrangement.
To make a paper flower, start by folding a sheet of paper in half lengthwise. Then, cut a strip of paper that’s about 1 inch wide and 6 inches long. Next, fold the strip in half lengthwise and twist it into a spiral shape. Once you have your spiral, gently flatten it out and shape it into a flower.
You can make paper flowers in any color or pattern you like. They’re perfect for special occasions like weddings or birthdays, or for adding a bit of color to your home décor.
What You’ll Need: Paper, scissors, glue, and a pencil.
To make these pretty paper flowers, you’ll need some simple supplies. Gather a sheet of paper, a pencil, a pair of scissors, and some glue. Start by folding the paper in half lengthwise. Then, cut along the fold to create two equal pieces. Next, fold each piece of paper in half again. Cut along the folds to create four equal pieces.
Now you have all the strips you need to make the flowers. To make the first flower, take one strip and glue the ends together to form a loop. Once the glue is dry, gently pull on the loop to open it up and create a flower shape. For the second flower, take two strips and glue them together at one end to form a V shape. Once dry, open up the V to create another pretty paper flower!
Step One: Cut a strip of paper about 1 inch wide and 8 inches long.
Paper flowers are a beautiful way to add a touch of nature to your home decor. They are also very easy to make! In this tutorial, we will show you how to make a paper flower stick with an origami leaf.
This project is perfect for beginners. All you need is a strip of paper and some scissors. First, cut a strip of paper about 1 inch wide and 8 inches long. Next, fold the strip in half lengthwise and crease well. Then, cut along the crease to create two strips that are each 1 inch wide and 4 inches long.
Now it’s time to start folding! Take one of the strips and make accordion folds, about 1/2 inch each. Once you have made all of the folds, tape the end of the strip together so it holds its shape.
Step Two: Fold the paper strip in half lengthwise and crease with a pencil.
For the full, step-by-step guide to making these flowers, head over to our website. But here’s a quick overview of how to make them:
Start by finding a long strip of paper—the longer, the better. Fold the paper strip in half lengthwise and crease with a pencil. This will be the center of your flower. Next, take one end of the paper strip and begin wrapping it around the center, securing it with glue as you go. Continue wrapping until you reach the end of the strip.
Now comes the fun part: origami! For the leaves, start with a square piece of paper. Fold it in half diagonally and crease well. Then fold it in half again and crease well. Unfold and repeat on the other side. Now fold each corner into the center and crease well.
Step Three: Cut along the folded edge to create fringe. Unfold the paper strip.
Origami is a traditional Japanese art form that involves the folding of paper into intricate shapes and designs. One popular origami project is the creation of paper flowers. These flowers can be used to decorate your home or as gifts for friends and family.
The first step in creating a paper flower is to choose your paper. You can use any type of paper you like, but thinner papers are easier to work with. Once you have selected your paper, fold it in half lengthwise.
Next, cut along the folded edge to create fringe. Unfold the paper strip and you will see that it looks like a long, thin ribbon. To create the petals of your flower, simply fold this ribbon in half and then in half again. Keep folding until you have reached the desired width of your petals.
Step Four: Apply glue to one end of the strip and roll it into a cylinder. Allow the glue to dry.
This will be the stem of your flower. Once the glue is dry, you can add a bit of color to the stem by painting it or wrapping it in green paper.
Step Five: Fold an origami leaf in half lengthwise and cut along the fold to create two identical leaves
This is the fifth and final step in creating a handmade paper flower stick with origami leaves. First, fold an origami leaf in half lengthwise. Next, cut along the fold to create two identical leaves. Once you have your two leaves, take one and make a small cut in the center of the leaf. This will be where you insert your stem. Finally, take the other leaf and glue it over the first leaf, hiding the stem. Your paper flower is now complete!
Final Thoughts
In conclusion, these are the best cute tree ornaments made for Christmas decorations crafts. They are easy to make and they will look great on your tree. So, get creative and start decorating your tree with these cute ornaments.


