


Christmas is a special time of year when family and friends come together to celebrate. One of the most important parts of Christmas is decorating the tree. There are many different ways to decorate a Christmas tree, but one of the most popular ways is to use glitter foam paper Christmas tree ornaments. Glitter foam paper Christmas tree ornaments are a great way to add some extra sparkle and personality to your tree.
- Nice & Pretty Glitter Foam Paper Christmas Tree Ornaments are beautiful and unique.
- These ornaments are perfect for any Christmas tree, and they will add a touch of elegance to your holiday decor.
- Made from glitter foam paper, these ornaments are lightweight and easy to hang on your tree.
- Each ornament is unique, and no two are exactly alike.
- These ornaments are sure to become a cherished part of your family’s holiday tradition.
- Order your Nice & Pretty Glitter Foam Paper Christmas Tree Ornaments today, and start celebrating the holidays in style!
These five Nice & Pretty Glitter Foam Paper Christmas Tree Ornaments are the perfect way to add some sparkle and shine to your holiday decor:
If you’re looking for a way to add some sparkle and shine to your holiday decor, these five Nice & Pretty Glitter Foam Paper Christmas Tree Ornaments are the perfect solution. Made of glitter foam paper, they’re lightweight and easy to hang on your tree. Plus, they come in a variety of colors, so you can find the perfect match for your holiday decor.
1. Nice & Pretty Glitter Foam Paper Christmas Tree Ornaments | Christmas Tree Topper Making Ideas
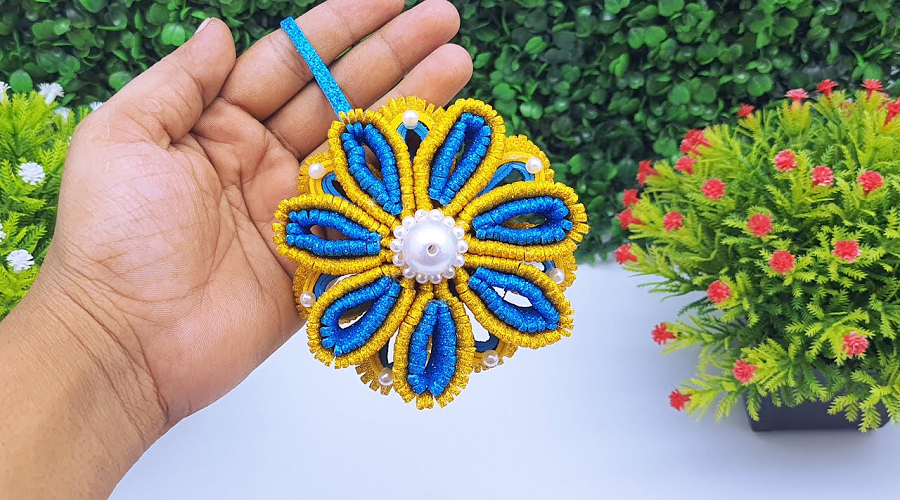
Nice & Pretty Glitter Foam Paper Christmas Tree Ornaments
- 1. Nice & Pretty Glitter Foam Paper Christmas Tree Ornaments: These easy-to-make ornaments will add a touch of sparkle to your tree.
- 2. To make these ornaments, you will need glitter foam paper, scissors, and a hot glue gun. Simply cut out the desired shape for your ornament, glue it together, and then cover it with glitter.
- 3. These ornaments are a great way to add a personal touch to your Christmas tree, and they make great gifts for friends and family. So get creative and have fun!
What You’ll Need:
1. Pretty Glitter Foam Paper
2. A Christmas Tree Topper-Making Idea
3. Some Time and Patience!
With just a few supplies and some time, you can make your own beautiful glitter foam paper Christmas tree ornaments! All you need is some pretty glitter foam paper, a Christmas tree topper-making idea, and some patience. With a little bit of effort, you can create stunning DIY Ornaments that will wow your friends and family!
Step One:
Making your own Christmas tree ornaments is a fun and easy way to get into the holiday spirit! Here’s how to make glitter foam paper Christmas tree ornaments in just a few simple steps.
First, you’ll need some glitter foam paper, which you can find at most craft stores. Cut out a variety of shapes – stars, snowflakes, circles, etc. – using a sharp knife or scissors. If you want your ornament to hang from the tree, make sure to cut a small hole at the top of each shape.
Next, it’s time to add the glitter! You can either use glue or double-sided tape to adhere the glitter to the foam shapes. Be generous with the glitter – you want these ornaments to sparkle and shine!
Finally, string a piece of ribbon through each hole and knot it securely.
Step Two:
It’s time to add some glitter to your life! This step-by-step guide will show you how to make your own sparkly foam paper Christmas tree ornaments.
All you need is some foam paper, glitter, and a hot glue gun. Start by cutting out your desired shape from the foam paper. We used a star, but you can get creative and use whatever shape you like!
Next, cover the entire surface of the ornament with hot glue. Then, it’s time to add the glitter! We used gold for a classic look, but feel free to experiment with different colors. Be sure to cover the entire ornament with a thin layer of glitter.
Finally, let the ornament dry completely before hanging it on your tree. And that’s it! You’ve now created your very own glittery Christmas tree ornament.
Step Three:
1. Cut out a variety of different-sized circles from glitter foam paper.
2. Use a pencil to draw a Christmas tree shape onto one of the larger circles.
3. Cut out the Christmas tree shape.
4. Repeat steps two and three with the remaining larger circles.
5. Glue the smaller circles onto the inside of the cut-out trees.
6. Let the glue dry completely before hanging your ornaments on the tree.
7. Enjoy your beautiful, sparkly Christmas tree!
2. Paper Heart Bag Making with Handle | Easy To Make Paper Handle With Heart | Paper Heart Bag
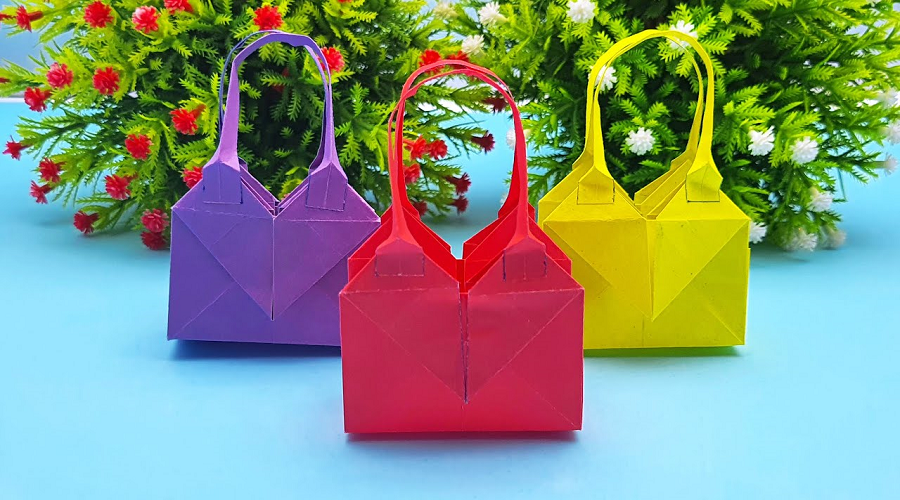
Easy steps to make a paper bag with a heart-shaped handle
Making a paper bag with a heart-shaped handle is a fun and easy project that you can do at home with your kids. Here are some easy steps to follow to make your own paper bag with a heart-shaped handle:
- 1. Cut two pieces of construction paper into rectangles. The size of the rectangles will depend on the size of the paper bag you want to make.
- 2. Fold each rectangle in half lengthwise and crease well.
- 3. Unfold the rectangles and then fold each one in half widthwise. Crease well again.
- 4. Open up the widthwise folds and then fold each side in toward the center, making sure to line up the edges evenly. Crease well once more.
Step 1: gather supplies
Paper Heart Bag Making with Handle Easy To Make Paper Handle With Heart Paper Heart Bag
What You’ll Need:
1. Two sheets of colored construction paper
2. A pencil
3. A blStepback Sharpie marker
4. Scissors
5. Glue stick or tape
6. A stapler
7. Decorations (optional) such as stickers, glitter, etc.
Now let’s get started!
2: Cut out a heart shape
A paper heart bag is an easy way to show someone you care. With just a few cuts, you can create a unique bag that shows off your personality.
To make a paper heart bag, start by cutting out a heart shape from construction paper. Then, fold the heart in half and glue the sides together. Next, cut strips of paper for the handles and glue them onto the inside of the bag. Finally, decorate the outside of the bag with hearts, ribbon, or anything else you like!
Step 3: Fold and Glue Paper Bag
- 1. Begin by folding your paper bag in half lengthwise. Then, fold the bottom edge of the bag up to meet the top edge.
- 2. Next, apply a strip of glue along the top edge of the bag. Then, fold the top edge down to meet the bottom edge, pressing firmly to seal.
- 3. Finally, apply a strip of glue along one side of the bag. Then, fold the side over to create a handle for your paper heart bag!
Step 4: insert handle and decorate
Now that you have your paper heart bag assembled, it’s time to insert the handle. This is a simple process that just requires a few extra pieces of paper. Once the handle is in place, you can decorate your bag to make it unique.
To insert the handle, first, fold a piece of paper in half lengthwise. then, cut a slit in the center of the paper, being careful not to cut all the way through. Next, slide the handles through the slits and unfold the paper. You should now have two handles on either side of your bag.
If you want to decorate your paper heart bag, there are many options available to you. You could add some ribbon or lace around the top of the bag, or glue on some sequins or beads.
3. Christmas Mini wreath Making With Glitter Eva Foam Paper | DIY Christmas Wreath | Christmas Decor
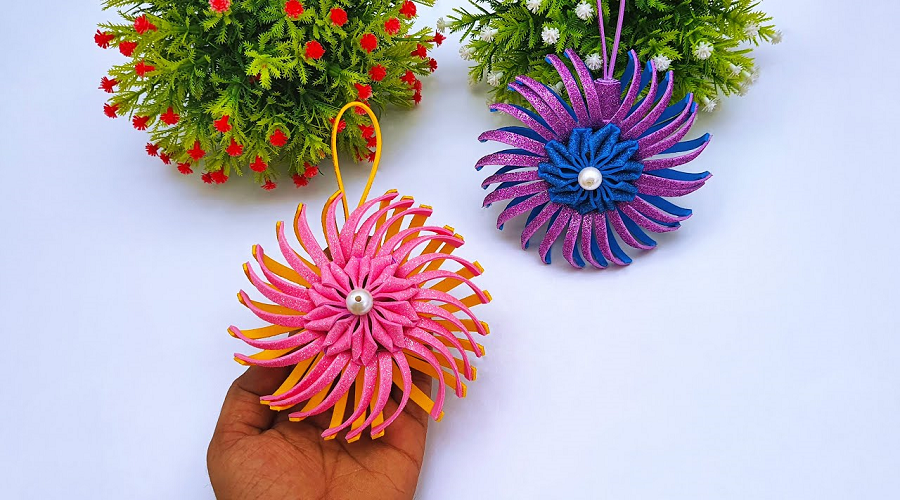
Make your own mini wreath with some help from glitter EVA foam paper and this tutorial!
Looking for a fun and easy Christmas craft? Look no further than this tutorial for making your own mini wreath out of glitter EVA foam paper! This project is perfect for kids and adults alike, and you’ll end up with a beautiful decoration for your home. All you need is some basic craft supplies and a little bit of time. So what are you waiting for? Get started on your mini wreath today!
What You’ll Need: EVA foam paper, scissors, glue, glitter, ribbon, pencil
This year, add some sparkle to your holiday decor with a DIY mini wreath made from glittery EVA foam paper. It’s a quick and easy project that’s perfect for kids and adults alike. All you need is a little imagination and some basic craft supplies.
Step One: Cut strips of EVA foam paper
Christmas is approaching and it’s time to start getting into the holiday spirit! One way to do that is by making your own decorations. This DIY mini wreath is the perfect project to get you started. It’s simple, fun, and best of all, you can make it entirely from materials you probably already have around the house. So gather up your supplies and let’s get started!
You’ll need:
- – EVA foam paper
- – Glue
- – Scissors
- – A pencil or pen
- – A plate or compass (optional)
First, cut strips of EVA foam paper. You can make them any width you like, but we recommend between 1/2″ and 1″ wide. The length is up to you too, but longer strips will be easier to work with.
Step Two: Make a loop with the strip and glue the ends together
It’s time to get creative with your Christmas mini-wreath! In step two, you will make a loop with the strip and glue the ends together. This will be the base of your wreath. Be
Sure to use strong glue so that your wreath will be secure. Once you have made your loop, you can start decorating it however you like. Get creative and have fun!
Step Three: Repeat until you have enough loops to make a full wreath
Making a mini wreath out of glittery EVA foam paper is a fun and easy Christmas craft project that kids will love. Here’s what you’ll need to do:
- 1. Cut out a circular piece of EVA foam paper. This will be the base of your wreath.
- 2. Cut out several strips of EVA foam paper, each about 1″ wide and 6″ long. These will be the loops for your wreath.
- 3. glue one end of each strip to the back side of the circular base.
- 4. Once all the strips are glued on, turn the wreath over and curl each loop around your finger to give it a nice shape.
- 5. Hang your wreath on a door or wall and enjoy!
Step Four: Decorate your wreath with glitter or whatever you like!
With only four steps, you can make a beautiful and unique mini wreath to decorate your home for Christmas! This easy project is perfect for people of all ages and skill levels. In the fourth and final step, you will add the finishing touches to your wreath by decorating it with glitter or whatever else you like. With a little creativity, your wreath will be sure to stand out!
Step Five: Hang up your wreath and enjoy your handiwork!
After you’ve completed all the previous steps, it’s time to put up your wreath and enjoy your handiwork! Make sure to find a good spot for it where it can be seen and appreciated. Take a step back and admire your work – you’ve made a beautiful and unique wreath that will bring holiday cheer to everyone who sees it.
4. Christmas Snowflakes Making Easy Tutorial Step By Step | Simple Paper Snowflakes Wall Hanging
Christmas Snowflakes Making Easy Tutorial
It’s that time of year again! The time for hot cocoa, cozy fires, and snowflakes falling gently from the sky. If you’re looking to add a little extra something to your home this holiday season, why not try your hand at making some paper snowflakes?
This tutorial will show you how to make simple paper snowflakes step-by-step. All you need is a sheet of paper and some scissors. You can hang your finished snowflakes on the Christmas tree, or use them to decorate your walls or windows.
Let’s get started!
Step One: Gather Your Supplies
Christmas is just around the corner, and what better way to get into the holiday spirit than by making your own snowflakes? This easy tutorial will show you how to make beautiful paper snowflakes in just a few simple steps.
First, you’ll need to gather your supplies. You’ll need some scissors, some thin paper (construction paper or tissue paper works well), and some tape. Once you have your supplies, you’re ready to start making snowflakes!
Step Two: Cut Out a Circle
1. It’s time to get crafty and start making your very own paper snowflakes!
2. This easy tutorial will show you how to make beautiful snowflakes in just a few simple steps.
3. Follow along and you’ll be on your way to creating unique and stunning snowflakes in no time!
Step Three: Make Your First Fold
1. Start with a square piece of paper. Fold it in half to create a crease down the middle.
2. Unfold the paper and then fold it in half again, this time making the crease at a different angle so that you have a diamond shape.
3. Once again, unfold the paper and then make the third fold, creating another crease to form a triangle.
4. Now you’re ready to start cutting! Make whatever designs you like into the sides of the triangle, being careful not to cut into the center point.
5. Once you’re happy with your design, simply unfold the paper to reveal your beautiful snowflake!
Step Four: Continue Folding and Cutting
Fold your paper: Take any size piece of paper and fold it in half hamburger style then in half again. You should now have a long, thin rectangle.
Cut your paper: Use scissors to make cuts along the folded edge of the paper. Be sure not to cut all the way to the center or you will ruin your snowflake!
Continue folding and cutting: Once you have made cuts along the entire edge of the paper, unfold it and admire your work! If you want to make your snowflake more intricate, you can continue folding and cutting until you are satisfied with the results.
Step Five: Unfold Your Snowflake
After you’ve cut out your snowflake, it’s time to unfold it and see your creation! Gently pull each point of the snowflake away from the center. If any of the points are stuck together, carefully separate them with a knife or scissors. Once your snowflake is fully unfolded, hold it up to the light to appreciate its delicate symmetry.
Now that you know how to make a snowflake, it’s time to get creative! Try cutting out different shapes and sizes of snowflakes, or experiment with different types of paper. You can even add a bit of color by coloring the paper before you start cutting. With a little practice, you’ll be able to create beautiful snowflakes that are unique as the flakes themselves!
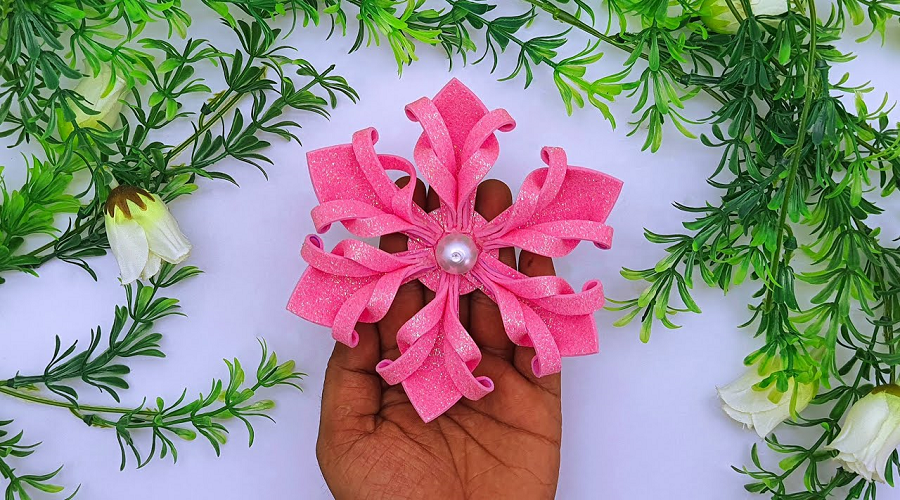
5. Glitter Foam Paper Ball Christmas Decorations | Christmas Ornaments With Glitter Ball | Christmas
What are Glitter Foam Paper Ball Christmas Decorations?
Do you love decorating for Christmas, but hate all the mess that comes with it? If so, then you need to check out these glitter foam paper ball Christmas decorations! They’re super easy to make and there is no mess to clean up afterward.
To make these decorations, all you need is some glitter foam paper and a hot glue gun. First, cut the foam paper into small circles. Next, use the hot glue gun to glue the circles together in the shape of a ball. Finally, add some glitter to the balls for a festive touch.
These decorations are perfect for any home or office. They add a touch of class and elegance to any space, and they’re sure to impress your guests. So if you’re looking for a unique and beautiful way to decorate your home this holiday season, consider making these glitter foam paper ball Christmas decorations.
How to make Glitter Foam Paper Ball Christmas Decorations
To make these easy and fun glitter foam paper ball Christmas decorations, you will need:
- -A sheet of glitter foam paper
- -A sharp knife or cutting tool
- -A hot glue gun and glue sticks
- -Ribbon or string
Cut the foam sheet into equal-sized strips. Roll the strips into balls, using a small amount of hot glue to secure the end. Once all the balls are made, use a hot glue gun to add details like eyes, noses, mouths, etc. Finally, cut a small hole in the top of each ball and thread ribbon or string through to create a hanger.
Why Glitter Foam Paper Ball Christmas Decorations are popular
In recent years, Glitter Foam Paper Ball Christmas Decorations have become increasingly popular. There are a number of reasons for this trend. First, these decorations are relatively inexpensive. Second, they are easy to find and purchase. Third, they add a touch of glamour and sparkle to any Christmas tree.
Fourth, they can be used to create a variety of different looks. For example, some people use them to create an elegant look, while others use them to add a fun and festive touch to their trees. Fifth, they are also easy to store and transport. Sixth, they come in a wide range of colors and styles so you can find the perfect match for your decorating scheme.
Finally, Glitter Foam Paper Ball Christmas Decorations are also popular because they are safe for both children and pets.
How to use Glitter Foam Paper Ball Christmas Decorations
It’s that time of year again! The time to get out the Christmas decorations and turn your home into a winter wonderland. One of the most popular and easy-to-find Christmas decorations is glitter foam paper balls. These balls come in all different sizes and colors, making them perfect for any Christmas decorating theme.
Here are a few tips on how to use glitter foam paper balls to create beautiful Christmas decorations:
1. Hang them from the ceiling: This is an easy way to add some sparkle to your room without using a lot of space. Simply use a clear fishing line or string to tie the balls together and then hang them from the ceiling.
2. Fill a vase or bowl: Another quick and easy way to decorate with these balls is to fill a vase or bowl with them.
Final Thoughts
In conclusion, these nice and pretty glitter foam paper Christmas tree ornaments are a great way to add some holiday cheer to your home. They are easy to make and can be used to decorate any room in your house. So get creative and have fun!


