


Creating a beautiful flower out of Glitter Foam Paper Christmas Decorations may seem like an intimidating task, but with the right tools and instructions, anyone can make a stunning piece of art. Glitter foam paper is a unique material that adds a vibrant sparkle to almost any project. Not only is it easy to use, but it also comes in many colors and types to choose from. Crafting a beautiful flower out of glitter foam paper will require some patience and creativity, however, the results will be worth it!
Creating beautiful flower decorations can be a fun and satisfying activity that can easily be done with the help of glitter foam paper. Glitter foam paper is an incredibly versatile material that can be used to make all kinds of beautiful crafts, especially 3D flower decorations. From basic designs to more intricate patterns, these crafty creations will add charm and style to any room in your home or workspace!
Glitter Foam Paper Christmas Decorations:
1. How To Make Beautiful Flower With Glitter Foam Paper | Diy Flower With Foam Sheet | Eva Foam Paper
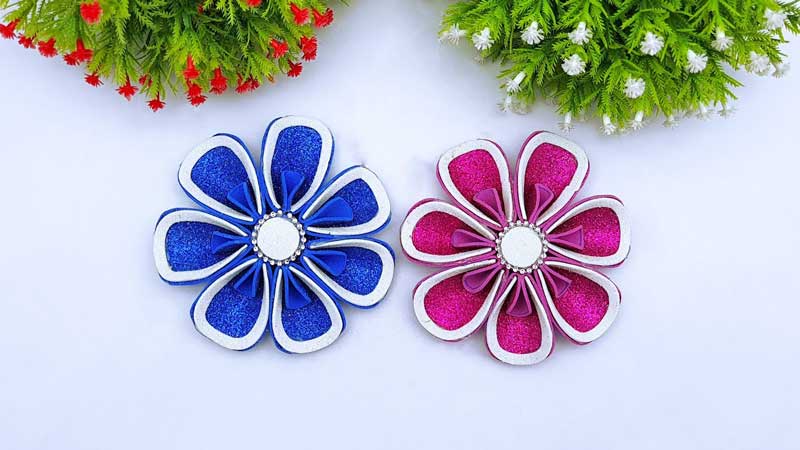
What is Glitter Foam Paper? How to make beautiful flowers with it?
Glitter foam paper, or EVA foam sheets as they are also known, is a great way to make beautiful flowers with minimal effort. These multi-colored and sparkly sheets of foam are easy to find in craft stores and come in various sizes, shapes, and colors. As such, they can be used for all sorts of DIY projects.
Using glitter foam paper to make a flower is an easy process that requires only basic crafting tools. All you need is scissors, glue, tape, and some felt tips in different colors for embellishments. Start by cutting out the shape of the petal from the glitter foam paper; cut out several petals in different sizes before gluing them together to form a complete flower shape. Alternatively, you can add on extra details like leaves or stamens using felt tip pens or even more layers of glitter foam paper!
Materials:
Materials: Crafting with glitter foam paper has become a popular way to add texture and dimension to your projects. Glitter foam paper is an incredibly versatile material that can be used for a variety of DIY projects. Here are the materials you will need to create beautiful flowers with glitter foam paper:
Glitter foam paper, scissors, glue gun, floral wire, and floral tape. The glitter foam paper comes in various sizes and colors; you can use whichever color combinations you like when making your flowers. You will also need some additional tools such as tweezers, pliers, or a craft knife to make precise cuts and shape the flower petals. With these supplies on hand, you’ll have everything you need to make beautiful floral decorations!
What materials do you need to make beautiful flowers with glitter foam paper?
Creating beautiful flowers with glitter foam paper is an easy and inexpensive way to add a touch of sparkle and color to any craft project or decoration. All you need are some basic materials, including glitter foam paper, scissors, glue, and a few other simple supplies. With these items in hand, anybody can easily make gorgeous floral decorations that will last for years!
To get started on your own decorative flower creations all you need to do is gather up the necessary materials. Glitter foam paper comes in a variety of colors and textures so you can choose the one most suited for your needs. Besides this, all you need are scissors and glue to assemble the pieces together into beautiful blooms. Other optional supplies such as paint or markers can be used if desired to give the flowers more life-like details or patterns.
Flower Design:
The flower design is an art form that brings beauty to any space. Whether you’re looking to create a bouquet of blooms to give as a gift, or add some greenery and color to your home office, crafting beautiful flowers out of glitter foam paper can be a fun and creative activity. Glitter foam paper is an affordable material that’s perfect for creating intricate flower designs.
It’s easy to cut into shapes and comes in various colors and textures, which makes it ideal for adding dimension and texture to your floral creations. To get started with this DIY project, all you need is some glitter foam paper, scissors, a glue gun, and your imagination! Follow these tips on how to make beautiful flowers with glitter foam paper – from simple daisies to elaborate roses – using Eva foam paper.
How to create a beautiful flower design with glitter foam paper?
Creating a beautiful flower design with glitter foam paper is easy and fun! This article will provide step-by-step instructions so anyone can make their very own personalized flower decoration. All you need is some foam paper, glue, scissors, and of course, glitter. By following these simple steps you can create a unique piece of art that will last for years to come.
Begin by cutting out the desired shapes from the foam paper. You might choose to make petals, leaves, or even an entire flower shape. Once all your pieces are cut out, it’s time to add some sparkle! Spread some glue on one side of each piece and sprinkle on plenty of glitters; this will give your design a touch of shine and glamour. Finally, assemble your pieces into the desired shape using more glue until everything is secure in place.
Tips:
Are you looking for an easy and inexpensive way to make beautiful flowers? Crafting with glitter foam paper is a great way to get creative! Whether you’re making decorations for a special occasion or adding some extra flair to your home decor, these tips will help you create stunning flower creations.
To start, you’ll need to gather the right supplies. Glitter foam paper can be found in craft stores and online – look for different colors and shades of glitter that match your desired project. When it comes to cutting out shapes, it’s best to use scissors or an X-Acto knife depending on the size of the flower that you want.
Some tips on how to make beautiful flowers with glitter foam paper.
Creating beautiful flowers out of glitter foam paper can be a fun and creative way to add some pizzazz to your home décor. Glitter foam paper is an affordable and easy-to-use material that can be transformed into a variety of flower shapes with just a few simple steps. Here are some tips on how to make the most out of this versatile crafting material.
To begin, you’ll need supplies such as scissors, a glue gun, glitter foam paper in different colors, and an S hook or something similar for assembling the petals. Cut out one big circle from the foam paper for the center of your flower then cut 8-10 smaller circles from different colors for petals. Once all pieces have been cut out arrange them so that you have four petal layers going around the center circle in alternating colors for contrast.
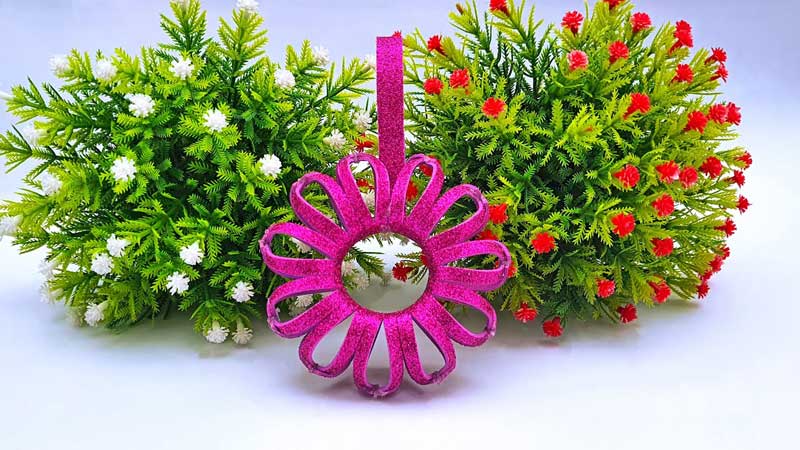
2. How To Make Mini wreath With Glitter Foam Sheet Paper For Room Decoration | Christmas Tree Ornaments
Crafting Fun
Making decorations for the holidays can be a fun and creative way to show your festive spirit. Whether you are looking to make something to hang on the Christmas tree or simply spruce up your home, crafting is an enjoyable way to express yourself. With just a few simple materials like glitter foam paper sheets, you can create cute little mini wreaths that serve as ideal room decorations or even Christmas tree ornaments.
Crafting doesn’t have to be a daunting task. With this how-to guide by your side, creating these mini wreaths will be fun and easy! You will learn how to assemble each of the materials together and fashion them into charming miniature wreaths that bring holiday cheer into any space. So break out those craft supplies and get ready for some festive crafting fun with this exciting DIY project!
Materials Needed: Glitter foam sheet paper
When it comes to adding a little sparkle and shine to your Christmas decorations, glitter foam sheet paper is the perfect material. From festive wreaths to colorful ornaments, this craft material is easy to use and can create impressive decorations quickly. If you want to make mini wreaths with glitter foam sheet paper for room decoration, here’s what you’ll need.
You’ll need some basic supplies such as scissors, a glue gun, a ruler, and adhesive tape along with the glitter foam sheet paper which comes in many colors and sizes. You will also need a thin metal wire or pipe cleaner for creating the loop of the ornament. To give your wreath a special touch, try adding some decorative items like buttons, beads, or sequins that match your chosen color palette.
Step 1: Cutting the Foam
Creating a mini wreath with glitter foam sheet paper is the perfect way to add some festive cheer to your home this holiday season. Whether it’s for room decoration, ornaments for the Christmas tree, or even just as a creative outlet for yourself and your family, making these delightful decorations is easy. But before you can start gluing and sparkling away, you must first cut the foam sheet paper into manageable pieces.
For basic shapes like circles and stars, use scissors to cut out your desired pattern from the foam sheet – be sure to take it slow so that you get clean cuts. If more intricate designs are required, then an Exacto knife offers more precision and control when cutting those tiny details.
Step 2: Forming a Wreath
Now that the glitter foam sheet paper has been cut into shape, it’s time to start forming a wreath. Begin by gluing one of the shapes at top of another and hold them together for several seconds until they are securely attached. Then add additional shapes around them in a circular pattern to form the base of your mini wreath. Make sure each shape is properly glued down in place before adding more since this will provide stability for the entire structure.
When you have added enough shapes to make a complete circle, you can adjust any lopsided areas and make sure everything is even. Gluing extra pieces onto any empty spots will help create an aesthetically pleasing design as well as increase its sturdiness. Finally, once every piece is firmly glued into place, your mini wreath should be ready for further decoration!
Step 3: Decorating the Wreath
When it comes to decorating the wreath, the possibilities are endless. Glitter foam sheet paper is an ideal material for making mini wreaths, as it can easily be cut into any shape and size. The best bit about using this type of paper is that you can add whatever decorations you like to create a unique design.
To start with, decide on the color scheme for your wreath and select glitter foam sheet paper in these colors. You could use traditional green and red for a Christmas-themed wreath or bright pinks and purples for something more eye-catching. Once you have selected your desired materials, carefully cut out circles or other shapes from each piece of paper to create your design elements.
Step 4: Attaching a Ribbon
Step 4: Attaching a Ribbon is the final step in making Mini Wreaths with Glitter Foam Sheet Paper for Room Decoration Christmas Tree Ornaments. This step will bring your festive decorations to life! The addition of ribbon adds a finished look and a personal touch to the wreath. To attach the ribbon, begin by cutting one long piece of ribbon that is around 3 feet long.
Begin securing the end of the ribbon on one side of your wreath by using tape or glue. Wrap it around the entire circumference of your wreath, making sure to keep it taut as you go along. Once you have completed wrapping all around your mini wreaths, secure the remaining ends with tape or glue. You can adjust and cut down any excess pieces if desired.
Step 5: Creating Ornaments
Before you can create the beautiful ornaments for your Christmas tree, you must first cut out the shapes from glitter foam sheets. Step five in the series of instructions for making a mini wreath with glitter foam sheet paper for room decoration Christmas tree ornaments will show you how to do just that. All you need are scissors and a paper cutter if desired.
Start by tracing the pattern of your desired ornament shape onto the foam sheet. Then carefully cut it out with scissors or, if more precise shapes are required, use a paper cutter to get exact edges and curves on your ornament pieces. Be sure not to press too hard so as not to tear through the foam. Once cut out, proceed on to step six which is assembling all of your pieces together with glue!
3. 🎄 Christmas Ornaments 🎄 | How To Make Christmas Decorations Ornament | Hanging Christmas Crafts
Christmas Decorations
Christmas decorations bring cheer and joy to the season, and there’s no easier way to create a festive atmosphere than with homemade Christmas ornaments. From traditional holiday shapes like stars and snowmen to more creative pieces like clay sculptures or custom-made paper designs, these fun hanging decorations can be crafted for very little money. Making Christmas ornaments is an enjoyable activity for both adults and kids alike; it’s a great way to start the holiday season off on the right foot.
For those looking for inspiration on how to make their own unique Christmas decor, check out these easy DIY craft ideas! Beginners can start with simple ornament shapes such as stars, snowflakes, and candy canes; more experienced crafters might enjoy making intricate 3D sculptures of Santa Claus or reindeer from clay.
Materials: What You Need
Christmas decorations are a staple of the holiday season. From evergreen trees to twinkling lights, these festive decorations help to spread cheer throughout the home. If you’re looking for something special this year, why not make your own Christmas ornaments? With the right materials and a bit of creativity, you can easily make hanging Christmas crafts that add sparkle and joy to any room.
To get started with your holiday projects, it’s important to have all of your essential supplies on hand. Gather together bits and pieces like glitter glue pens, Styrofoam balls, feathers, and more. You may also find it helpful to have items like craft glue, scissors, and felt on hand for when inspiration strikes. Once you’ve gathered all of the necessary materials, you can begin creating your own unique ornaments in no time!
Step 1: Prepare Materials
Making your own Christmas ornaments is a great way to get into the holiday spirit and create decorations that are unique and meaningful. Before you begin, make sure you have all the materials necessary for creating your custom ornaments. Here’s what you’ll need for Step 1: Prepare Materials:
Gather up all of your supplies such as glitter, glue, scissors, ribbon, and paints. You might also want to pick up some craft foam in different shapes such as stars or snowflakes. If you plan on using beads for any of your decorations, decide if they should be plastic or glass so that they will stay securely attached to your ornament. Once all of these materials have been gathered together it’s time to start crafting! Finally, set up an area to work where there is plenty of room for cutting and gluing with no distractions.
Step 2: Create a Design
When it comes to creating the perfect Christmas decorations and ornaments, the design is often key. Step 2 of making a festive ornament involves creating an eye-catching and creative design that can be used as the basis for the decoration.
To start this process, you’ll need to decide on what material you’d like to use. This could include wood, felt, or even foam paper – whatever supplies will give your craft that extra bit of sparkle! Once you have chosen your materials, it’s time to come up with a design. You may want to look at pictures of other decorations for inspiration or create something completely unique by combining various elements together. Make sure that the design is something that catches your eye and brings out all of its festive glory!
Step 3: Assemble the Ornament
Assembling your Christmas ornament is a simple and creative way to show off your holiday spirit. Begin by gathering all of the materials you’ll need for this step, including any beads, sequins, or glitter that you have chosen to use as decoration. With these items in hand and an image of what your finished product should look like in mind, you are ready to begin.
For most DIY ornaments, there will be one main body piece that serves as the canvas for all other decorations. This could be something like a plain wooden ball or a paper mache star. Once you have found this base element and secured it with glue if necessary, start adding any smaller pieces of decoration such as beads or sequins with hot glue or craft adhesive.
Step 4: Hang Ornament
Christmas decorations are a timeless way to mark the holiday season. Crafting and hanging homemade ornaments is an enjoyable tradition for many families. Step 4 of making your own Christmas ornament involves suspending them from the tree.
The first step to take when hanging your handmade ornament is to gather all materials you need: tape, string, scissors, and the ornament itself. After gathering these supplies, measure out two pieces of string that are approximately 15 inches long. Next tie a double knot at both ends of each piece of string. The next step is to insert one end of the string through the top loop on the ornament and thread it until it reaches the other end which now should be securely knotted together with its mate in a loop shape. Finally, attach this loop to any portion of your tree with tape or by using other decorative items such as ribbons or bows if desired!
Final Touch
In conclusion, Glitter Foam Paper Christmas Decorations are a great way to add a special touch to your holiday decorations. They are easy and inexpensive to make, they can be used in a variety of ways, and they will bring joy to everyone that sees them. Whether you choose to hang them on the tree or display them around the house, these decorations will add sparkle and cheer to your holiday celebrations. So this season, why not give glitter foam paper a try?


