


Handmade Foam Paper Cup Making is becoming increasingly popular as people move towards a more ecologically conscious lifestyle. Crafting these cups requires both artistry and skill, making it an enjoyable and rewarding experience for those who choose to create them. Making handmade foam paper cups is a great way to reuse materials that may otherwise go to waste, while still creating something useful and beautiful. With the correct supplies and techniques, anyone can make their own unique cup that can be used in a variety of ways.
Making your own handmade foam paper cups is a great way to add a personal touch to any event or gathering. Whether you’re hosting a birthday party or just having friends over for coffee and dessert, it’s easy to make these cute and crafty cups with minimal supplies. In this article, we’ll cover the basics of handmade foam paper cup making and provide tips on how you can customize them to match your unique style.
1. DIY Mini Toy Cup | Easter Mini Cup DIY | Handmade Foam Paper Cup Making Tutorial | Foamiran Crafts
What is Foamiran Crafts?
Foamiran crafts are becoming increasingly popular among DIY enthusiasts. This type of craft involves creating small, delicate items using foamiran, a special 3D foam paper. The unique texture and flexibility of the material allow crafters to create intricate designs that are both visually appealing and durable. Popular projects include mini toy cups, handmade greeting cards, flower decorations, and Easter eggs.
The beauty of Foamiran crafts is that anyone can do them – from novice crafters to experienced artists alike. All you need is some basic knowledge about crafting tools and techniques, as well as access to the right materials. There are plenty of tutorials online which provide detailed instructions for creating different projects with Foamiran. Whether you’re looking for an easy-to-follow tutorial or something more advanced, there’s sure to be something perfect for your skill level!
Materials Needed
Making a DIY mini toy cup with Easter designs is an easy and fun project that can be done in just a few hours. Creating this unique piece of art requires only minimal materials and supplies, but the finished product will be sure to bring joy to anyone who receives it as a gift. Below is a list of items needed to create your very own handmade foam paper cup:
Foamiran sheets – these are soft and flexible sheets, perfect for making crafts like this mini toy cup. They come in a variety of colors and patterns, allowing you to customize your design as desired. A cutting tool – this can be either scissors or an X-Acto knife, depending on how intricate you want the details of your cup to be. Glue – any type of craft glue works well for bonding the Foamiran sheets together.
Cutting Out Pieces
If you’re looking for a fun and creative Easter craft project, look no further than this DIY Mini Toy Cup Easter Mini Cup DIY Handmade Foam Paper Cup Making Tutorial Foamiran Crafts. With just some basic materials and tools, you can create your own unique mini cups to give as gifts or use as decorations. This tutorial will show you how to cut out the pieces of foam paper that make up the cup, so that you can get started with your crafting project right away.
The first step is to measure and mark the size of the cup on a piece of foam paper. Using a ruler and pencil, draw a straight line around the edge of the pattern that will be used for making your cup. Next, cut out each piece according to your measurements using either scissors or an X-Acto knife.
Assembling the Cup
Assembling the Cup is a DIY tutorial that will help you create a handmade miniature toy cup this Easter. This creative craft project uses foam paper and other materials to make a cute and eye-catching decoration for your home. It’s an easy, fun activity that children of all ages can enjoy, so why not get the whole family involved in creating something special?
The step-by-step instructions in this tutorial will guide you through the process of assembling the cup. You will learn how to cut up pieces of foam paper, use glue to stick them together, and form a cup shape. With some patience and practice, you’ll be able to make your own unique design with bright colors or patterns. When finished, display your masterpiece proudly – it makes for a great home decor item or tabletop centerpiece!
2. Handmade Glitter Foam Sheet Flowers | Beautiful Flower Making Out Of Paper | Foamiran Crafts

Glitter Foam Sheets
Glitter foam sheets are an exciting craft material that can be used to make vibrant, beautiful flower creations. A perfect combination of color, sparkle, and texture, glitter foam sheets are easy to work with and provide endless possibilities for crafting. Whether you want a bright bouquet of flowers for decorating your home or a unique gift for someone special, handmade glitter foam sheet flowers could be the perfect answer!
With just some basic supplies such as scissors, glue sticks, and colorful glitter foam sheets you can get started on your own flower-making project. This type of craft is ideal for those who may not have much experience in paper crafting or floral design because it’s simple enough even for beginners. Plus there is plenty of room to get creative by adding different colors and shapes to each flower creation so no two will ever look alike!
Types of Flowers
Types of Flowers – From the classic rose to the exotic orchid, flowers come in a variety of shapes and sizes. Every flower has its own unique beauty that can bring joy to anyone who sees it. Handmade glitter foam sheet flowers are a creative way to show off that beauty without breaking the bank. Not only do they look stunning, but they also add a touch of fun and whimsy to any room in your home or workspace.
Making these types of flowers is easy when you have some simple materials like glitter foam sheets, scissors, glue sticks, and a hot glue gun. With just these items you can craft beautiful handmade paper and foamiran flowers that will last for years. You can make roses by cutting different lengths of petals from the glitter foam sheet and then gluing them together with hot glue or glue stick.
How to Make Flowers
Flowers are a classic and timeless way to add beauty to your home or craft projects. Whether you’re looking for an eye-catching centerpiece or a unique bouquet, handmade glitter foam sheet flowers will make a stunning addition. With just a few materials, you can create beautiful flowers made out of paper with Foamiran crafts. These gorgeous blooms are perfect for adding texture and color to any project. Best of all, they’re simple enough for even beginner crafters to make! To get started crafting your own glitter foam sheet flowers, gather supplies such as decorative paper, scissors, glue, and glitter foam sheets in the colors of your choice. Follow these instructions step-by-step to learn how to make lovely handmade flowers that will last forever!
Tools Needed
Handmade glitter foam sheet flowers add a unique, beautiful touch to any craft project. Crafting these stunning blooms is enjoyable and relatively simple with the right tools. To make your own handmade glitter foam sheet flowers, you’ll need a few basic materials that are easy to find at most craft stores.
To start, you will need scissors or a craft knife for cutting shapes out of the foam sheets. You’ll also want some glue for assembling the petals and leaves together as well as attaching them to a stem or other base material. For creating intricate details and adding texture, use needles or pins to poke patterns in your petals and leaves. Finally, collect some colorful glitter or other embellishments like beads, sequins, and ribbons to accessorize your beautiful flower creations!
3. DIY Mini Flower Basket Making Ideas | Easter Mini Basket DIY | Eva Glitter Foam Paper Basket Crafts
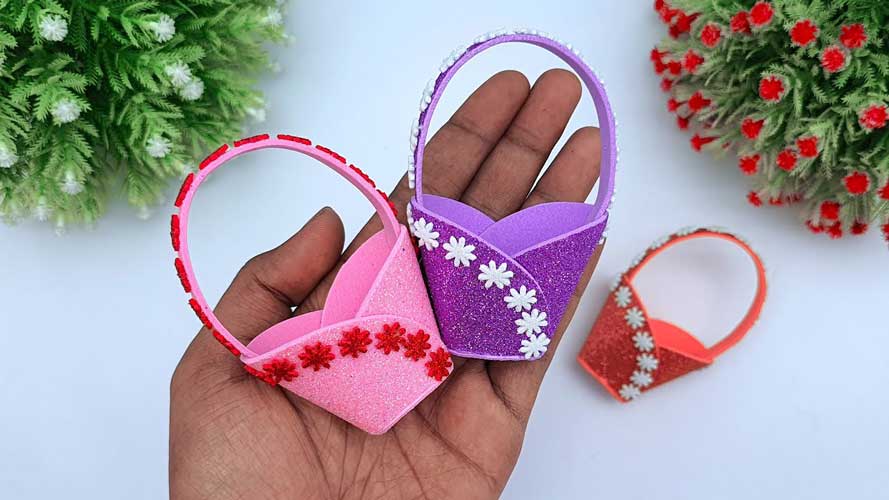
Easter Basket Making
Easter is just around the corner and it’s time to get creative with crafting! Making your own Easter baskets is an easy and fun way to express your creativity and make something unique for this special holiday. With a few simple craft supplies, you can make Eva Glitter Foam Paper Baskets that will add a pop of sparkle to any Easter celebration. This DIY Mini Flower Basket Making Idea offers an easy-to-follow tutorial on how to create these cute mini baskets from start to finish. Perfect for holding small treats or homemade decorations, these Eva Glitter Foam Paper Baskets are sure to be enjoyed by everyone at your Easter gathering. Get ready for some family fun crafting this holiday season with this great DIY project!
Materials Needed: Glitter Foam Paper
This Easter, make your own mini flower basket with some simple materials. Using glitter foam paper, you can create a colorful and fun Easter craft that is perfect for making as a gift or decorating your home. The best part? You don’t even need any special skills to make these cute baskets! All you need is the right material – glitter foam paper – and a few creative ideas.
You can find various types of glitter foam paper in different colors and sizes in most craft stores. This material is easy to cut and shape, so you can use it to make all sorts of baskets with intricate designs. With its shimmering surface, it gives each basket an added touch of glamour that will be sure to impress everyone who sees them! Once you have the materials ready, all you have to do is choose a design and get creative!
- Step One: Cutting Out Pieces
- Step Two: Assembling the Basket
- Step Three: Adding Decorations
- Step Four: Finishing Touches
4. How To Make Foamiran Flower Easy Ideas – DIY Glitter Paper Flower Making Tutorial – DIY And Crafts
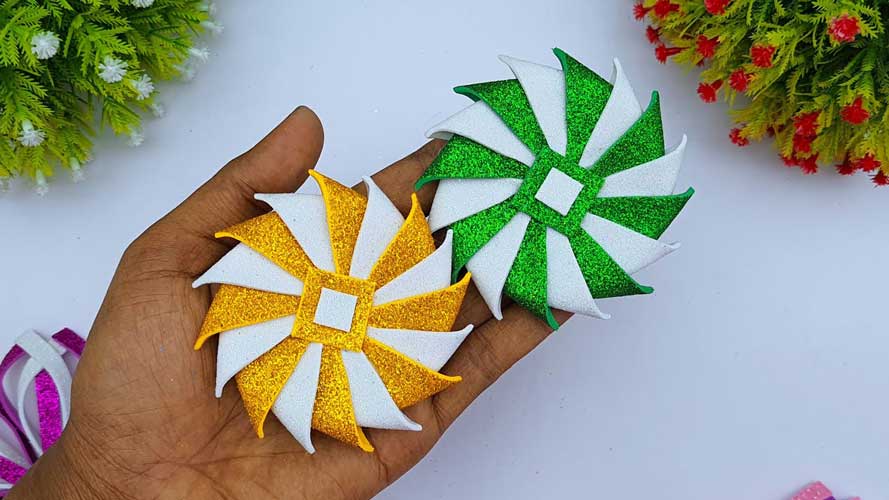
DIY Glitter Paper Flower Making
DIY Glitter Paper Flower Making is the perfect way to create stunning floral arrangements for any special occasion. Whether you’re looking to decorate a wedding, or birthday celebration or simply add a touch of color and sparkle to your home décor, these paper flowers are a great way to ensure that your creations stand out from the crowd. This tutorial will show you how easy it is to make these beautiful glittery blooms using Foamiran – an innovative craft material that’s both flexible and durable.
With the help of our step-by-step instructions, you can create gorgeous designs in no time at all! From assembling simple petals and leaves to mixing and matching various colors and shapes, this guide has all the tips and tricks you need for making stunning DIY glitter paper flowers. So let’s get started on creating some magic!
Supplies Needed
Have you ever wanted to make beautiful, intricate foamiran flowers? With this DIY Glitter Paper Flower Making Tutorial, you can learn how to make these delicate blooms with just a few simple supplies. All you’ll need is some glitter paper, craft scissors, foamiran sheets, and a hot glue gun or glue dots. These supplies will help you create stunningly detailed flowers in no time!
Not only are foamiran flowers fun and easy to make, but they also offer limitless opportunities for creative expression. The best part about choosing your own colors and patterns for the glitter paper is that it allows you to customize each flower according to your own unique style. Plus, with the help of this tutorial, anyone can learn how to make these beautiful creations in just a few simple steps! So grab your supplies and get crafting today!
- Step 1: Prepare Foamiran
- Step 2: Create Flower Petals
- Step 3: Attach Petals to Base
- Step 4: Glue Flowers Together
- Step 5: Add Embellishments
5. Making Easy Snowflakes Flower With Glitter Foam Sheet – DIY Multi-Colored Snowflake Flower
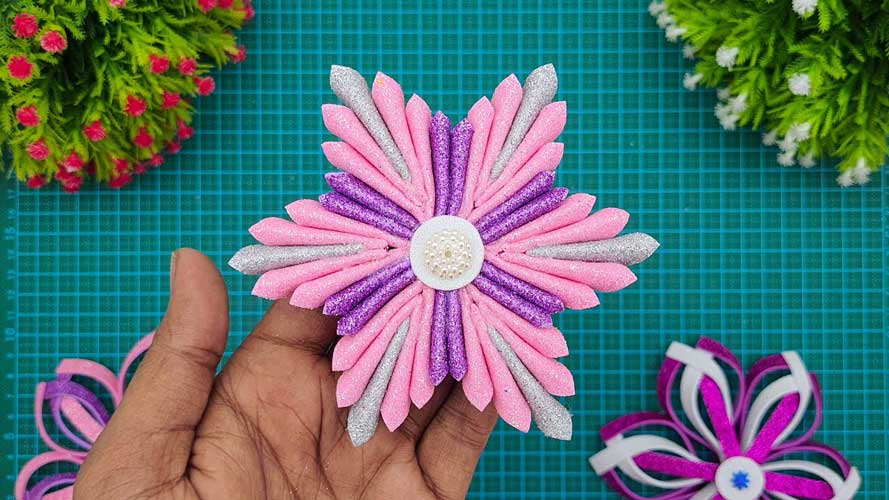
DIY Snowflake Flower
Making your own snowflake flower is a fun and easy project that can be done with just a few simple materials. With glitter foam sheets, you can create multi-colored, handmade snowflakes in no time. This DIY project is perfect for any season, but especially wintertime when snowfall is magical!
The basic supplies needed to make the flower include a pair of scissors, a ball of yarn, a glitter foam sheet, and glue. Start by cutting out several small shapes from the sheet using your scissors. The best results will be achieved if you use different colors of foam sheets to give the snowflake more depth and detail. Once all the shapes have been cut out, tie them together with a piece of yarn or string to form a big circle for your flower. Apply glue on each shape before connecting them together for extra stability.
Step 1: Gather Materials
Making a unique and beautiful snowflake flower with glitter foam sheets can be an exciting activity to do as part of your winter decor. This DIY project is simple, fun, and requires minimal materials. Before you dive into the craft, it’s important to gather all the necessary items that are needed for the job. Step 1: Gather Materials should be the first task you complete before starting your snowflake flower masterpiece.
The supplies required for this project include glitter foam sheets, scissors, a pencil or pen, a ruler, and glue. Glitter foam sheets come in various sizes and colors so make sure to pick something that suits your preference. Ensure you have at least six pieces of foam sheet for each flower pattern desired – three for each side of the flower petal.
Step 2: Cut Foam Sheets
Making your own dazzling snowflakes flowers is an easy and fun craft project that can be done in the comfort of your own home. The key to mastering this craft is to follow a few simple steps; such as cutting the foam sheets into accurate shapes. Here are some tips on how you can cut foam sheets with ease for making multi-colored snowflake flowers.
Using scissors or a paper cutter, measure and mark the length of each foam piece depending on how big you want your flower to be. It’s important to make sure all pieces are as equal as possible for symmetrical flowers. If using scissors, start from one end and slowly move towards the other in a curved motion until you have successfully cut out all pieces needed for the flower.
Step 3: Layer & Glue Foam Sheets
Making Easy Snowflakes Flower With Glitter Foam Sheet – DIY Multi-Colored Snowflake Flower is a fun way to make beautiful holiday decorations. Step 3 of this craft project is a crucial step in the process, as it involves layering and gluing foam sheets together. To begin, gather all the supplies needed for the project: glitter foam sheets, glue gun, and scissors.
Start by cutting out two layers of snowflakes from different colors of glitter foam sheets – one layer should be slightly larger than the other so that it overlaps when layered on top. Then use hot glue to attach one side of the smaller snowflake layer to its larger counterpart, making sure that both sides are securely glued together with no gaps in between them. Finally, cut off any excess pieces from around the edges and your layered snowflake flower is now ready!
Step 4: Create Petals
Creating petals on your DIY Multi Colored Snowflake Flower is a great way to add a bit of color and vibrancy to the final product. Step 4 in this easy craft project requires you to use scissors, glitter foam sheets, and hot glue. To create your petals, cut four strips from the glitter foam sheets that are about one inch wide and two inches long.
Make sure you keep each strip in its original shape for a more even look. After cutting out the four strips, fold them in half so that they resemble an “M” shape. Then use hot glue to stick them onto the center of the snowflake flower design, making sure that they stay securely attached while drying. Be careful not to burn yourself when using hot glue! You now have beautiful petals on your DIY Snowflake Flower – enjoy!
Step 5: Assemble the Snowflake Flower
Creating a snowflake flower is an easy and fun craft project that requires very few materials. By using glitter foam sheets, it’s possible to make an eye-catching multi-colored snowflake flower in just five simple steps. The fifth step of this craft project is assembling the snowflake flower.
This step involves putting all of the individual pieces together to create one larger piece. To do this, use a needle and thread to attach the different parts of each snowflake together at their centers with a knot. Then, connect all eight sides of the eight separate pieces together at their centers with another knot. This will form one large octagonal shape when done correctly. Once finished, it’s time to hang your beautiful new multi-colored snowflake flower on the wall!
Final Thoughts
In conclusion, handmade foam paper cup making is a unique and creative craft that anyone can do. It is easy to learn, inexpensive, and fun to create. Whether you are looking for something to make as a hobby or an item to sell, handmade foam paper cups are a great way to showcase your creativity and expand your skill set. With the right tools and materials on hand, you can easily make beautiful and useful items in no time. Plus, they can be tailored to fit any theme or occasion!


